
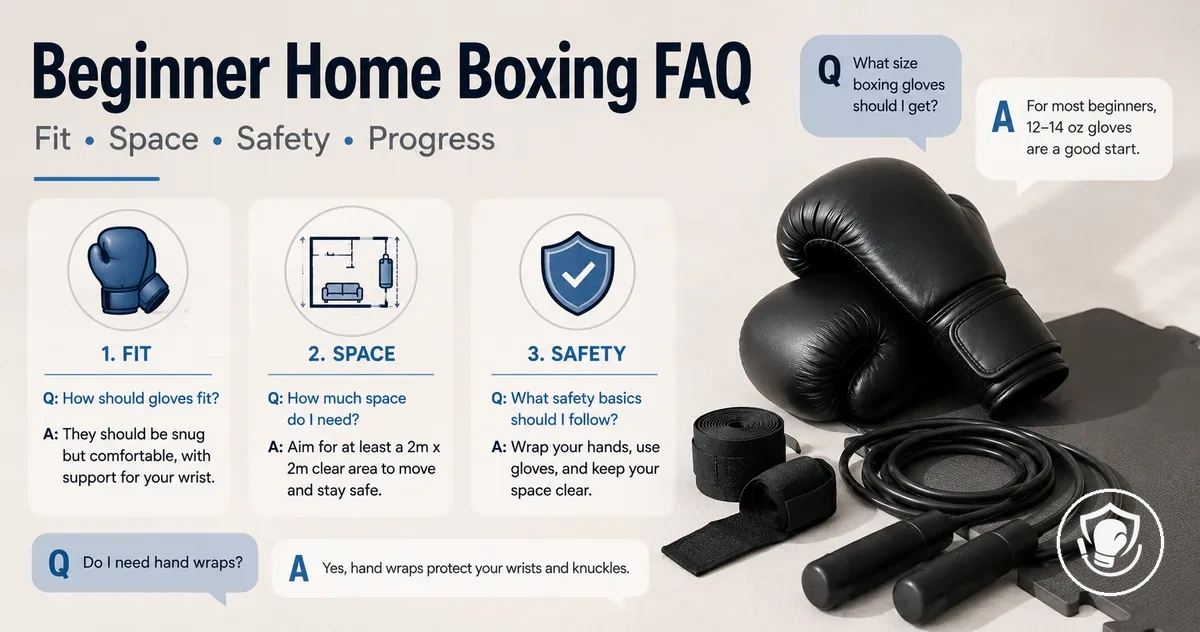
Beginner Home Boxing Equipment FAQs: Fit, Space, Safety, Care, and Training Progress
Beginner home boxing equipment FAQs cover practical decisions about fit, space, safety, hygiene, and progression for at-home training. Outcomes depend on your specific setup, bag type, and training goals. This page stays on equipment selection, installation, care, and beginner-safe progression — not on advanced technique or programming.
These FAQs cover what gear you need, how to choose gloves and wraps that fit comfortably, how much clearance your bag setup requires, how to manage noise in shared spaces, and how to keep your equipment clean to avoid odor and skin irritation. For a broader overview of gear decisions, visit the home boxing equipment for beginners hub.
To find answers quickly, scan each question for your specific setup. Each answer starts with a direct answer and then adds conditions. The first section clarifies what counts as beginner home boxing equipment.
What counts as beginner home boxing equipment and what can wait
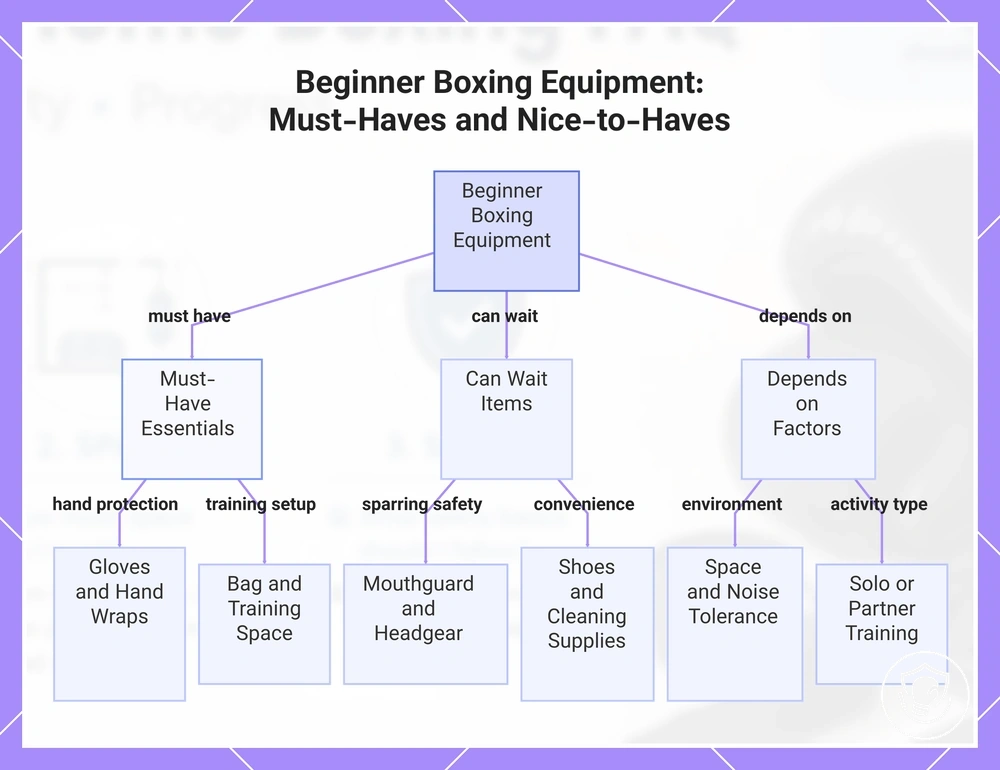
Beginner home boxing equipment covers protective and training gear for safely practicing basic punches and starting to hit a bag. At a minimum, you typically need boxing gloves, hand wraps, and a punching bag.
Not all gear is equally urgent for a beginner training at home. Items such as a mouthguard or headgear are nice-to-have and can wait. Whether optional gear becomes necessary depends on your available space, noise tolerance (if you live in an apartment), and training style (partner drills or bag work only).
- Boxing gloves: essential hand protection for bag and pad work.
- Hand wraps: important wrist and knuckle support under gloves.
- Punching bag: allows strike practice at home.
- Training space: clear area that permits footwork and movement.
- Mouthguard: important if you eventually spar or hit mitts.
- Headgear: reduces facial cuts when training with a partner.
- Boxing shoes: enhances footwork but not required on bag.
- Cleaning supplies: wash wraps, dry gloves to control odor and hygiene.
Review our starter checklist for beginners for a prioritized equipment list.
This chart shows the essential gear a beginner needs for home training, equipment that can wait, and the factors influencing optional purchases.
What size boxing gloves should a beginner buy for home training
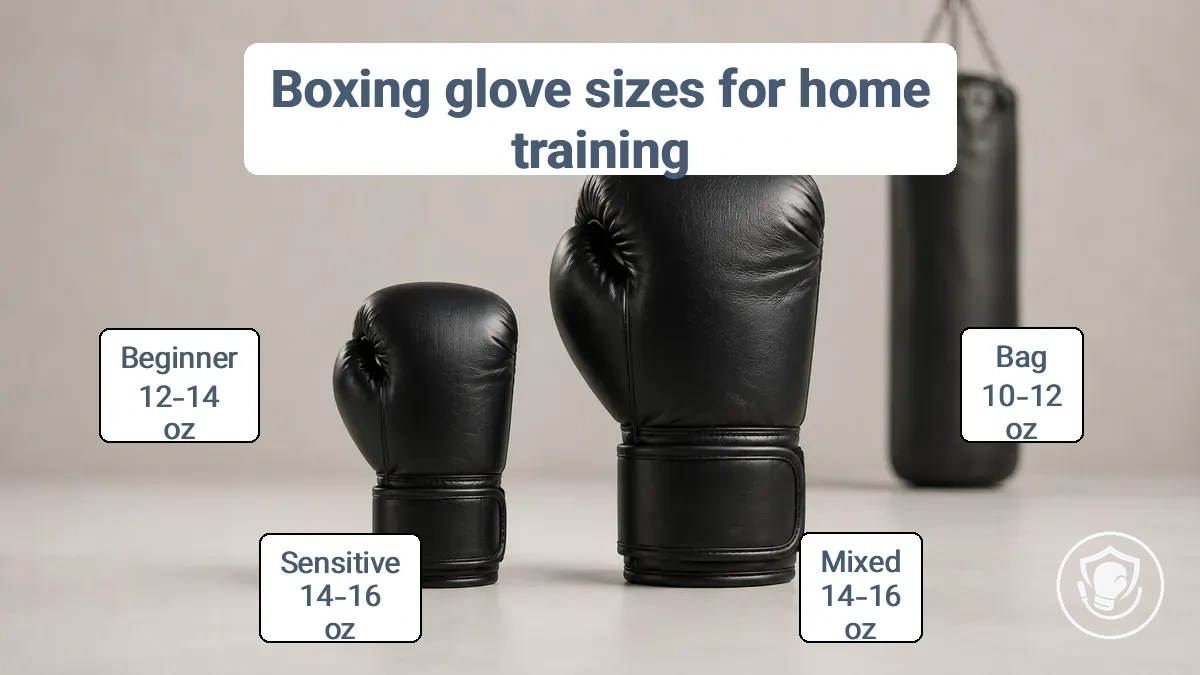
The size of boxing gloves a beginner should buy depends on the training use case, how the gloves fit with hand wraps, and the trade-off between protection and feedback. Lighter gloves (10–12 oz) are often used for bag work to allow faster movement and better feel, while heavier gloves (14–16 oz) provide more padding and wrist support for mixed drills or heavier practice. The choice depends on use case and fit with wraps.
A common myth is that one glove size fits all beginners. In reality, glove weight depends on body weight, hand circumference, and training goals. When trying gloves with wraps, the fit should feel supportive—snug around the wrist and fingers—but not so tight that it restricts circulation or natural fist formation.
What size boxing gloves a beginner should buy for home training depends on the training scenario. This table organizes common glove choices by home training scenario, considering typical beginner goals and anatomical differences.
| Training use case | Typical glove weight range | Fit notes with wraps | Trade-off to expect |
|---|---|---|---|
| Bag-only training (heavy bag, speed bag) | 10–12 oz | Snug around hand with wraps; fingers reach top without cramping | Lighter weight gives more feedback and speed, less padding |
| Mixed training (bag, pads, light sparring) | 14–16 oz | Secure wrist support; thumb and fingers comfortable | Heavier padding protects hands and partner, reduces feel |
| Sensitive hands or wrists | 14–16 oz (or higher) | Extra padding layer; check wrist strap tension | More protection, but may feel heavier and slower |
| Smaller hands with wraps | 10–12 oz (or youth sizes if needed) | Ensure glove inner length covers fingers fully | Lighter weight allows better control, less impact absorption |
| General beginner comfort | 12–14 oz | Balanced fit; moderate wrist support | Versatile for most home drills, decent protection and feedback |
- Bag-only focus: For bag-only training, 10–12 oz gloves allow quicker movement and better feedback.
- Mixed training focus: For mixed training, 14–16 oz gloves offer balanced protection for you and a training partner.
Glove Weight and Padding Feel for Beginner Sessions
Glove weight and padding distribution across the knuckles influence feel and comfort. Heavier padding softens impact but reduces feedback, while lighter padding provides clearer sensation for technique control but allows more shock to reach your hands. The balance between feedback and protection is a personal trade-off, not a fixed rule.
As a beginner, try this quick self-check: hit the bag with a few light punches and note whether the impact feels muffled or sharp. Adjust by criteria, not ego.
Here are quick cues for glove weight and padding feel:
- Your knuckles should feel cushioned but not lost in excessive foam.
- Wrist support should feel secure and aligned without restricting movement.
- Feedback from each punch should be clear enough to adjust your technique.
- If fatigue in your hands or wrists increases during a session, padding or wrist support may not be right for your weight class.
How Glove Fit Should Feel on the Hand with Wraps On
With wraps on, glove fit should feel snug but not restrictive. The goal is a fit that feels supported and movable, not compressed and restrictive.
Use these quick fit checks to verify how glove fit should feel with wraps on:
- Your fist should close naturally without forcing.
- Your wrist should stay aligned when you make a fist.
- You should feel no uncomfortable pinching across the knuckles or thumb.
- Circulation in your fingers should remain normal; if you feel tingling, stop and adjust.
- The glove interior should feel filled but not crammed.
- Your hand should not slide inside the glove during movement.
How to choose hand wrap length and get a supportive wrap tightness
The right wrap length and tightness depend on your hand size and glove fit, but the goal is to support your wrist and knuckles without restricting circulation. Hand wraps should feel firm but not painful. A common safety boundary is that tingling, numbness, or cold fingers after wrapping indicate you may need to loosen and rewrap.
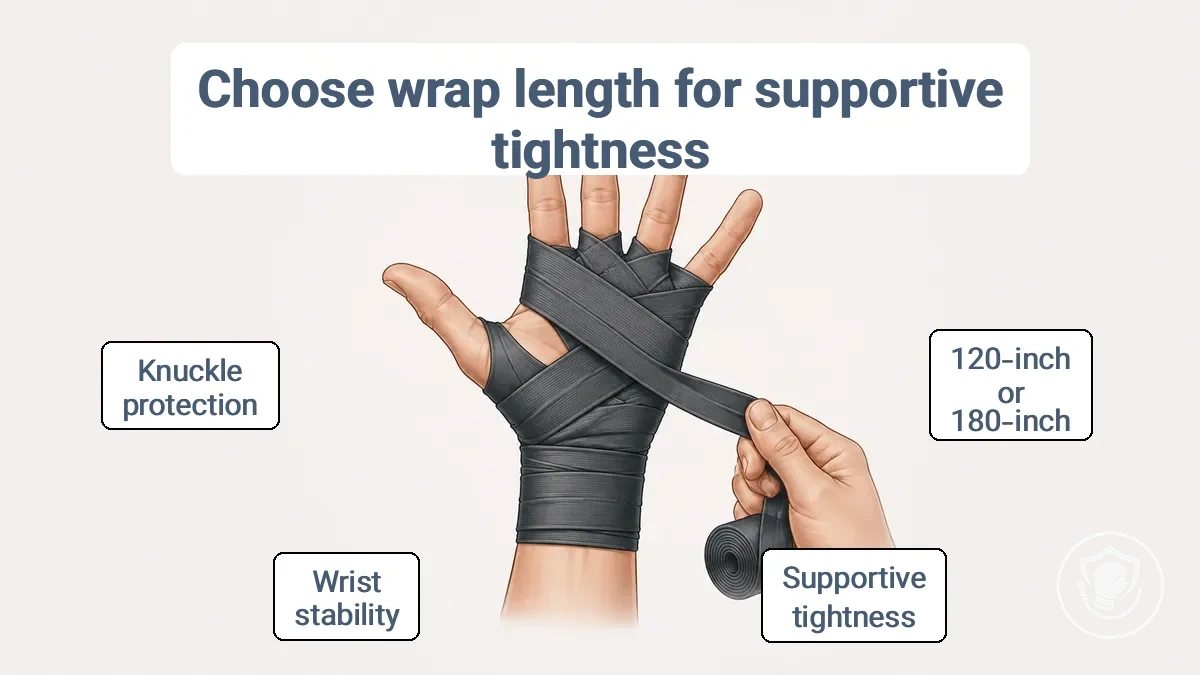
A 120-inch wrap suits smaller hands or tighter gloves, while 180-inch wraps provide extra room for wrist passes and knuckle layers, depending on the wrap's stretch. Test the fit inside your glove before training. Key points to verify each time you wrap:
- Tension: Snug fit, allowing normal finger movement.
- Knuckle coverage: Padding sits evenly over knuckles without bunching.
- Wrist support: Multiple passes keep wrist stable when making a fist.
- Thumb loop: Anchors thumb without pulling it out of alignment.
- Finger movement: Hand opens and closes without shifting the wrap.
- Glove fit: No cramped or numb feeling after gloving up.
Distinguish supportive tightness from restrictive tightness using the hand wrap method:
- Supportive tightness: Stable wrist alignment and comfortable knuckle protection without discomfort.
- Restrictive tightness: Tingling, numbness, or reduced finger mobility, indicating the wrap is too tight.
How Much Space You Need for a Punching Bag Setup at Home
How much space you need for a punching bag setup at home depends on bag type, swing radius, and footwork clearance — not just floor footprint. Usable space for movement around the bag matters more than the footprint alone. A hanging punching bag needs vertical clearance and a clear swing return path, while a freestanding bag requires stable floor grip and enough room to circle it.
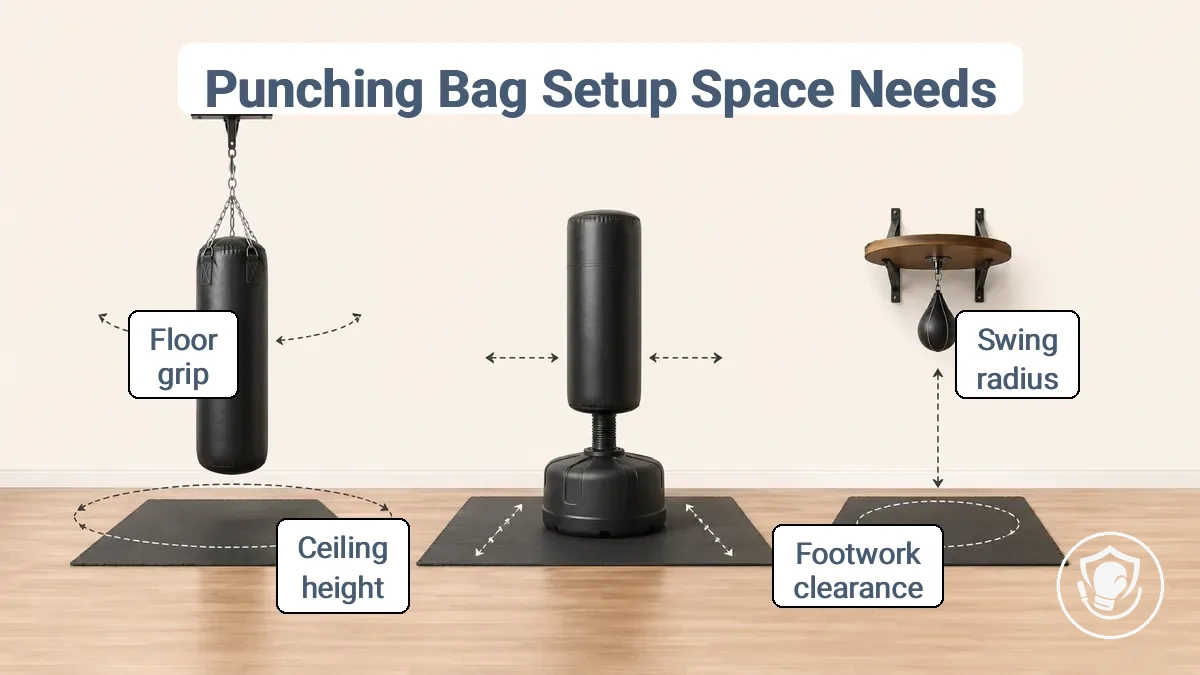
Training in a shared home or apartment introduces constraints: hard floors can reduce freestanding bag stability, low ceilings may limit where a hanging bag can be mounted, and inadequate clearance increases collision risk and encourages unsafe compensations.
The table organizes clearance needs by bag type to help determine how much space you need for a punching bag setup at home. For further guidance, see our small space setup guidance.
| Bag type | Clearance focus | Common constraint | What it affects |
|---|---|---|---|
| Heavy bag (hanging) | Swing radius, ceiling height | Low ceiling | Training range and safety |
| Freestanding bag | Floor grip, lateral space | Hard floor | Bag stability and noise control |
| Speed bag | Mounting platform height and clearance above | Shared home noise | Rhythm training and hand speed |
Clearance around the bag for safe footwork and swings
Clearance around the bag defines the movement buffer for stepping, pivoting, and letting the bag swing without hitting obstacles. A safe clearance zone accounts for stance width, the bag’s return path after impact, and lateral movement space. Standing in place limits the bag’s natural arc, while moving with the bag demands open room to step back and pivot freely without collision. The checklist below validates the clearance around the bag for basic footwork and movement:
- Can you step back one full stride from your stance without touching a wall or furniture?
- Does the bag have enough clearance from walls on each side for its full swing?
- Can you pivot 90 degrees without bumping an obstacle?
- Is the bag's return path after a punch clear of your body, nearby objects, and the floor?
- Is there room to circle the bag without scraping shoulders or elbows against a wall or ceiling joist?
- Is there enough depth to avoid the bag striking your back when you step inside its range?
Ceiling height, mounting points, and floor type considerations
Ceiling height, mounting points, and floor type determine whether a home boxing setup is viable and comfortable.
A hanging bag may drag or strike the floor if clearance is too low, a mount can loosen over time if not anchored to a solid ceiling joist, and the base may slip during use if the floor lacks grip. If you are uncertain about any of these factors, consider a safer alternative such as a freestanding bag or stand instead of improvising a permanent mount.
Use this checklist to verify ceiling height, mounting points, and floor type:
- Ceiling clearance: verify that the combined height of the bag plus the rigging leaves enough room between the bottom of the bag and the floor; low ceilings may limit the bag length you can use.
- Mounting point: confirm the anchor is fastened into a structural ceiling member (such as a joist) and not into drywall alone; a weak mount can cause the bag to pull free.
- Floor grip: ensure the bag base or stand rests on a non‑slip surface; smooth tile or polished wood can allow the unit to slide during training.
- Wobble and sway: after mounting, test for lateral movement; excessive sway may indicate that the mount lacks rigidity or that the floor under a standing base is uneven, reducing stability.
- Noise transfer: the chain, bracket, or base can transmit vibration and noise through the ceiling and floor, which may be noticeable in other rooms.
How to set up a home punching bag so it stays stable and safe
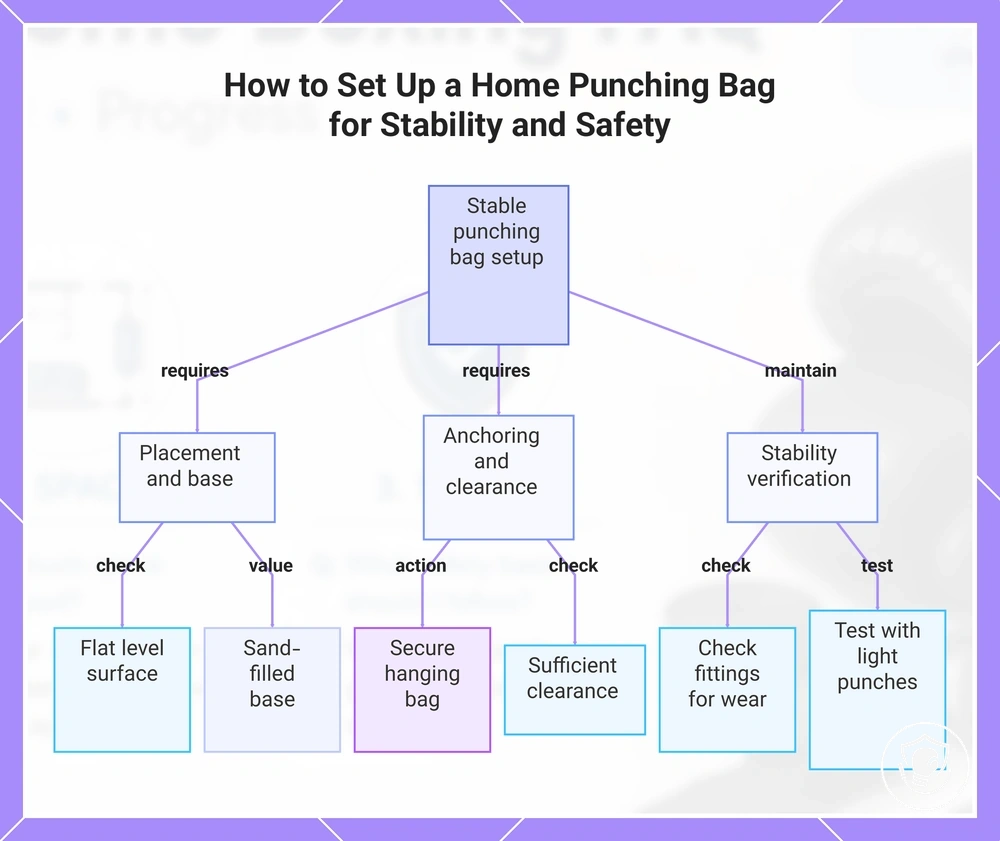
To set up a home punching bag so it stays stable and safe, you need correct placement, proper anchoring, controlled swing behavior, and a safe contact surface. Start by assessing your bag type and floor conditions. Re-check stability regularly to catch any wobble or loosening early. These steps help reduce tipping and slipping risks.
- Place the bag on a flat, level surface to avoid uneven swing and reduce tipping risk.
- Use a non-slip mat under the base or stand to help prevent slipping on smooth floors.
- Fill a freestanding bag base with sand (not water) for greater stability and less wobble.
- Anchor hanging bags securely according to manufacturer instructions to keep the swing path predictable.
- Ensure sufficient clearance around the bag so it does not hit walls or furniture during use.
- Check all fittings and connections periodically for signs of wear; tighten any that show wear.
- After each adjustment, test the bag with light punches to verify stability before full training.
If stability can’t be achieved safely, switch to a safer setup type.
This chart shows the key setup steps and stability checks to ensure a home punching bag remains stable and safe during use.
Hanging vs Freestanding Punching Bags for Beginners at Home
Hanging and freestanding punching bags differ in impact feel, stability, footprint, and noise. Hanging bags have a harder striking surface and a natural swing; freestanding bags have a softer surface and a generally stationary base.
Here is a comparison of hanging and freestanding bags across home-relevant trade-offs:
| Bag type | Stability feel | Space impact | Noise/vibration tendency | Best home use case |
|---|---|---|---|---|
| Hanging bag | Swings when struck; provides a dynamic target that requires timing and footwork | Needs clear space around it (typically a 5-foot radius) to allow for swing | May transmit vibration through ceiling mount; can be noisier for downstairs neighbors | Suitable for dedicated training areas where mounting is possible and swing clearance is available |
| Freestanding bag | Base stays on the floor; may rock or tip under heavy strikes; softer foam surface | Compact footprint; can be placed in smaller rooms and moved after use | Often quieter than hanging bags; placing on a mat reduces floor noise further | Works well in apartments, shared spaces, or rooms where mounting and wide clearance are not feasible |
Your final choice comes down to space and noise tolerance. A hanging bag supports realistic training if you have mounting space and can handle its swing. A freestanding bag fits apartments where portability and low noise are priorities.
How to Reduce Punching Bag Noise and Vibration in Apartments or Shared Homes
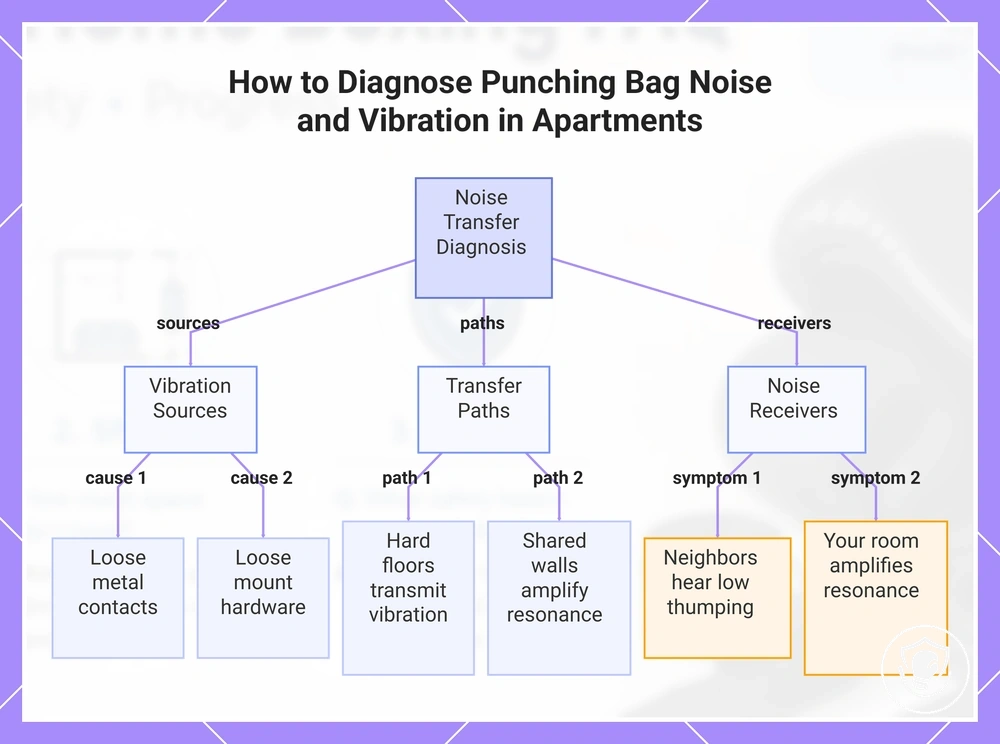
To reduce punching bag noise and vibration in an apartment, start by identifying where vibration is created and how it transfers—trace the source, transfer path, and receiving surface. When you strike the bag, vibration travels through contact points like chains, snap hooks, the mount, and the floor or wall. The problem is not just impact sound but also structural resonance that reaches neighbors.
Adding a mat under the bag does not silence the setup entirely. Dampening depends on whether the noise comes from transfer (vibration through structure) or impact sound (direct strike noise). The checklist 'How to reduce punching bag noise and vibration in apartments or shared homes' helps diagnose source, path, and receiver. If dampening isn't possible, the safest fix may be reducing intensity, moving the bag away from a shared wall, or switching to a free‑standing bag.
- Source: Loose metal-on-metal contact points (snap hooks, carabiners, chains) create rattling noise.
- Source: Loose mount or wall bracket hardware adds vibration under repeated strikes.
- Source: Bag material and fill type affect slap noise; sand‑filled bags may be quieter than water‑filled ones.
- Path: Hard floors transmit impact vibration directly to the structure below, especially without a dampening pad.
- Path: Shared walls amplify resonance when the mount is attached or the bag swings against them.
- Path: Ceiling joists and beams can carry vibration from an overhead mount to adjacent rooms.
- Receiver: Neighbors may hear low‑frequency thumping through floors and walls even if it seems quiet to you.
- Receiver: Your own room may amplify resonance if the bag is placed in a corner or against a hollow wall.
This chart shows the diagnostic framework for identifying sources, transfer paths, and receivers of punching bag noise to guide reduction efforts.
Noise sources from mounts, stands, chains, and contact surfaces
Identifying the noise source means matching the sound character to the component. Sharp impact sounds from moving parts differ from the continuous hum of structural vibration.
Mount
- Loose mount: rattle and vibration from fastener loosening – check: press mount while running.
- Worn isolator: increased vibration from rubber fatigue – check: inspect for visible cracks.
Stand / base
- Uneven stand: wobble and low thump from floor unevenness – check: place a level on base.
- Hollow stand: amplified noise from cavity resonance – check: tap leg to hear ringing.
Chain
- Slack chain: clattering from insufficient tension – check: press down on chain span.
- Worn sprocket: rhythmic click from tooth wear – check: rotate chain to inspect sprocket teeth.
Floor contact
- Direct floor contact: vibration transfer from missing pad – check: lift corner and check noise change.
- Thin floor: secondary noise from floor resonance – check: place hand on floor near machine.
Practical Ways to Dampen Sound Without Changing the Training Goal
To dampen sound, target vibration transfer paths from training equipment. The steps below do that while preserving stability.
- Add a dense rubber mat under the equipment contact point. Placing it on a hard floor may reduce vibration transfer to the structure below.
- Check for loose junctions or bolts at the base. Tightening these contact points can reduce rattling and may lower audible noise.
- Position the equipment away from shared walls when possible. Changing placement on the floor can reduce vibration reaching adjacent rooms.
- Place a cushioned pad or foam layer between the equipment and the floor. That cushion at the contact point may dampen impact noise.
- If using a hanging bag, ensure the mounting bracket is secure and the chain or strap has a vibration-dampening sleeve. This change at the suspension point can reduce transfer through the ceiling or wall.
- Place a heavy rubber or carpet scrap under the bag's landing area. This placement on the floor may absorb some footstep and bag impact noise.
Safety cue: After making any changes, re-check for slipping, tipping, or altered swing behavior to maintain stable training conditions.
Do beginners need a mouthguard and what safety gear matters most at home
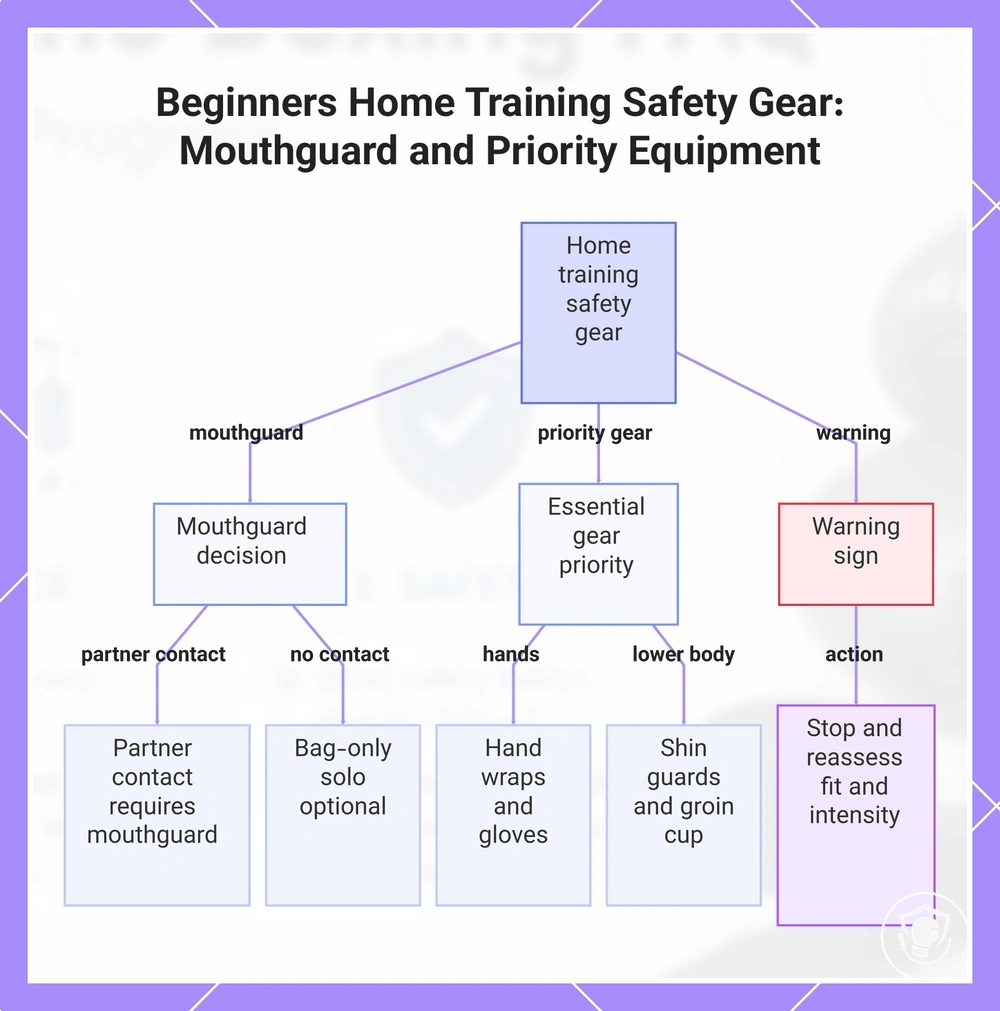
Do beginners need a mouthguard? It depends on contact risk. For training that includes partner contact such as sparring or drilled strikes, a mouthguard is strongly recommended to protect teeth. For bag-only solo practice, the risk to teeth is lower, so a mouthguard may be optional until partner work begins.
Beyond the mouthguard, here is how to prioritize additional safety gear for home training based on risk reduction. Stop using the gear and reassess fit and intensity if you experience persistent pain, swelling, or numbness during or after training — such pain signals may indicate that protection or technique needs adjustment.
- Mouthguard — teeth — partner contact — reduces risk of dental injury.
- Hand wraps — wrists and knuckles — bag work or pad work — reduces risk of sprains and supports knuckles.
- Boxing gloves — hands — all impact training — reduces risk of hand fractures.
- Shin guards — shins and instep — partner kicking drills — reduces risk of bone bruising from shin contact.
- Protective cup — groin — sparring or contact drills — reduces risk of injury.
- Headgear — head — heavier sparring — reduces risk of cuts (optional for beginners).
This chart shows how to decide on mouthguard use based on contact risk, which other gear matters most, and when to stop and reassess.
How Often to Wash Hand Wraps and Clean Gloves to Reduce Odor and Skin Issues
How often you need to wash hand wraps and clean gloves depends on your sweat level, training frequency, and how well your gear dries between sessions. After heavy sweating or daily use, washing wraps after every workout reduces odor and skin irritation. Drying quality matters: moisture trapped in fabric encourages odor regardless of how often you wash.
A quick rinse after training is not enough to keep gear fresh; sweat and bacteria build up in fibers even if wraps look clean.
- Heavy sweat or daily use: wash wraps after every session, wipe gloves weekly.
- Light use or good air-drying: weekly wrap wash, monthly glove wipe-down.
When odor persists, cleaning and odor control may require deeper methods like a vinegar soak for wraps or a disinfectant spray for gloves. The following table organizes how often to wash hand wraps and clean gloves based on typical training conditions, including actions for recurring odor or irritation.
| Item | After-session habit | Routine wash/clean | If odor/irritation persists |
|---|---|---|---|
| Hand wraps | Air-dry immediately after use; never store wet | Wash after every session with mild detergent in cold water | Soak in white vinegar and water before next wash; improve drying airflow |
| Boxing gloves | Remove from bag; place in ventilated area with deodorizer | Wipe interior weekly with mild soap or disinfectant; air-dry | Use bamboo charcoal deodorizer; if smell remains, replace inner pads or consider new gloves |
Washing and Drying Hand Wraps Without Losing Elasticity
Use cool water, mild detergent, and air-drying to protect elasticity when washing and drying hand wraps.
- Identify the wrap material. Cotton and elastic blends each react differently to washing conditions. Knowing your material helps you choose a method that preserves elasticity and avoids stiffness.
- Secure the Velcro and place wraps in a mesh laundry bag. This prevents tangling and protects the fabric from excessive wear. Use cold or lukewarm water with a mild detergent. Avoid fabric softeners, which can reduce elasticity.
- Rinse thoroughly to remove all detergent residue. Leftover soap can stiffen the fabric and reduce stretch, so rinse until the water runs clear.
- Air-dry the wraps in a well-ventilated area away from direct sunlight and high heat. Air-drying is the preferred method to preserve elasticity; machine drying with heat can shrink cotton and damage elastic fibers, leading to loss of support.
- Check for stiffness after drying. If the wraps feel inflexible, a quick rinse and proper air-dry may restore some stretch. Persistent stiffness is often a sign that the material has lost its elasticity.
- Replace the wraps when they no longer provide firm support for the wrist or knuckles. Fraying fabric, weak Velcro, or a permanent loss of stretch indicate that the material can no longer protect effectively.
Glove drying and basic odor control between sessions
How well you dry your gloves between sessions affects odor buildup and how long they last. Moisture left inside encourages smell, especially in humid conditions or when used back-to-back without enough drying time. The goal: let airflow do the work—don't mask, dry.
- Remove gloves from your bag immediately after each session to start airing them out.
- Place gloves in a well-ventilated area with good airflow, not inside a closed bag or locker.
- Allow enough drying time between back-to-back sessions, more if the environment is humid.
- Turn gloves inside out when possible to expose moisture to the air.
- Avoid leaving gloves near heat sources; rely on consistent airflow instead.
- If odor persists despite consistent drying, address it with a thorough cleaning rather than relying on sprays or deodorizers.
How to progress at home boxing as a beginner without overuse injuries
When training at home as a beginner, safe progression means increasing one variable at a time — frequency, duration, or intensity — while maintaining good technique and allowing recovery between sessions. Without this approach, overuse injuries become more likely even with light workouts. Gradual capacity building helps joints, muscles, and connective tissues adapt without breaking down.
When you add new bag work or increase training volume, mild soreness for a day or two is typical and often indicates muscles are responding. However, if you notice form breakdown early in a round, sharp or nerve-like pain, or fatigue that persists into the next day, these are signals to scale back — either reduce the number of rounds, lower intensity, or replace an intense session with shadowboxing and recovery drills.
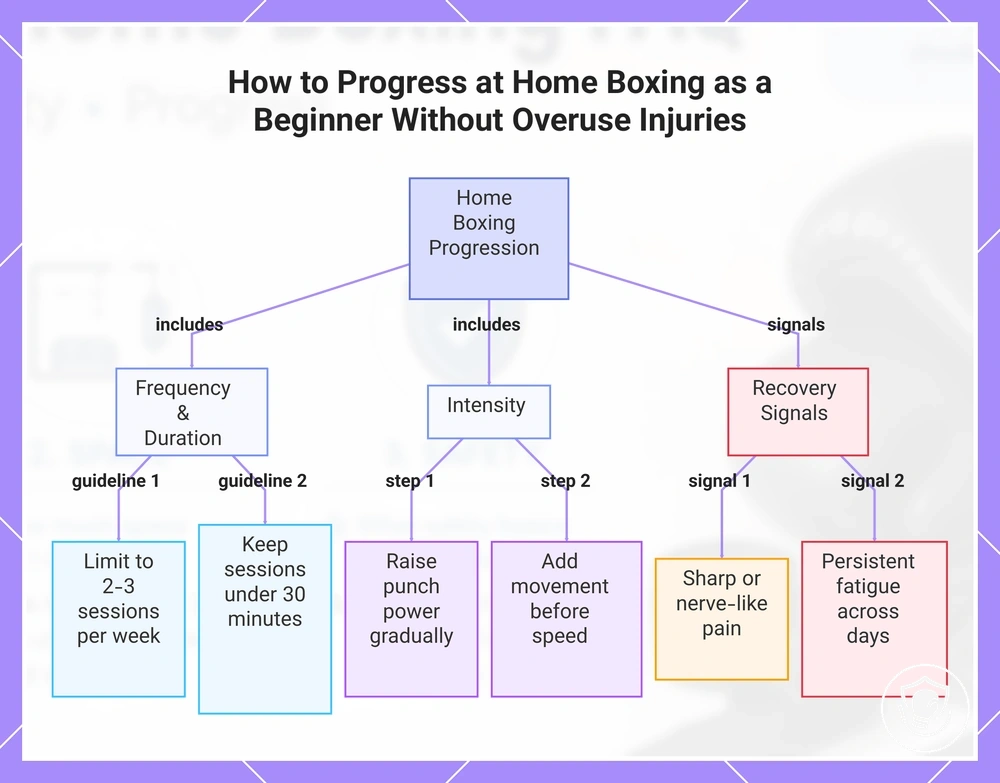
How to progress at home boxing without overuse injuries involves managing progression variables and rest signals. The following checklist organizes them by category.
- Frequency
- Increase training frequency only after maintaining consistent form and recovery for a sufficient period.
- Limit sessions to a manageable frequency, such as 2–3 per week, with adequate rest between intense workouts.
- Duration
- Consider extending each work round by a small increment once you can complete current rounds without form breakdown.
- Keep total session time to a manageable duration, such as under 30 minutes initially, until conditioning allows longer periods without fatigue buildup.
- Intensity
- Raise punch power gradually; start at a moderate intensity and progress only when technique remains consistent.
- Add movement complexity or resistance before increasing speed or impact.
- Recovery signals
- Conditioning discomfort — mild soreness that fades within a day — typically does not require full rest, but monitor form closely.
- Sharp or nerve-like pain in joints, especially wrists or shoulders, is a clear signal to stop and change the session type (e.g., shadowboxing instead of bag work).
- Persistent fatigue or declining punch quality across multiple sessions suggests a need for a full rest day or a lighter week.
This chart outlines the main progression variables and key recovery signals to avoid overuse injuries when training at home.
Progressing volume and intensity before upgrading equipment
Volume and intensity adjustments should be the first step before upgrading equipment. Discomfort, stalled progress, or inconsistent performance often trace back to mismatched volume, intensity, or recovery rather than gear inadequacy. These criteria help decide when to adjust these variables first.
- If technique quality declines during high-volume phases, reducing workload and focusing on controlled repetition may improve consistency and reduce discomfort.
- If strength gains plateau despite adequate recovery, gradually increasing effort can stimulate further adaptation.
- If discomfort increases as volume is added, scaling back volume while monitoring recovery often resolves the issue.
- If consistency suffers due to lingering fatigue from excessive intensity, lowering effort temporarily can restore regular training sessions.
- If technique breaks down under heavy loads, reducing intensity to a level that maintains good form can help build a more reliable foundation.
- If recovery is inadequate despite moderate volume, adjusting training frequency or reducing total workload may restore balance and comfort.
- If discomfort persists after systematically adjusting volume and intensity, equipment comfort can then be examined as a secondary factor.
Common Beginner Mistakes in Fit, Setup, and Training Pace and When to Pause
Common mistakes in boxing gear fit, heavy bag setup, and training pace can often be corrected with small adjustments, but some warning signs require a pause. Recognizing the difference between normal discomfort and a stop signal helps beginners train safely. Short answers, stop-signals included.
Question: Should you adjust your gloves if your fingers feel numb after a session?
Answer: Numbness is a warning sign that your glove fit may be too tight. Adjusting the laces or selecting a larger size can relieve pressure. If numbness persists after adjustment, pause training and reassess your glove size.
Question: How can you tell if your heavy bag mount is unstable?
Answer: A wobbling bag after each punch signals an unstable setup. Check the mounting hardware and the surface attachment. If the wobble does not improve after tightening, pause use until the mount is secured.
Question: When should you pause training because of wrist pain?
Answer: Sharp wrist pain during punching is a pain signal you should not ignore. Slow down your pace and check your hand wrap tightness and punch technique. If pain continues, rest until the soreness subsides before resuming.
Question: Should you slow down your training pace if you feel a sharp pain in your shoulder?
Answer: Sharp pain is a stop signal that your pace or form may be off. Reduce your output and focus on proper shoulder engagement. Pause the round if the pain persists and consider a rest day.
Question: How do you know if hand wraps are too tight?
Answer: A tight sensation that causes numbness or discoloration in your fingers is a fit mistake. Loosen the wraps and reapply with even tension. If numbness continues, adjust your wrapping technique.
Question: When should you stop using gloves that cause skin irritation with persistent odor?
Answer: Persistent odor combined with skin irritation may indicate bacterial buildup that requires cleaning. Dry your gloves thoroughly after each use and consider a disinfectant spray. If irritation does not improve, pause use and allow the gloves to fully air out.
Question: Should you pause hitting the bag if it wobbles repeatedly after mounting?
Answer: Tighten all bolts and check the ceiling or bracket mount. If the wobble continues, pause until reinforced.
Question: How does improper footwork lead to pain and when to pause?
Answer: Poor footwork can cause extra impact on your joints, leading to soreness. If you feel sharp pain in your ankles or knees during footwork drills, slow down and focus on lighter steps. Pause if the pain signal becomes sharp or persistent.