Home Boxing Equipment for Beginners: A Simple At-Home Boxing Routine for Any Setup
A simple home boxing equipment routine starts with controlling three variables: the round timer, drill substitutions, and an intensity cap that keeps form clean. This round-based structure typically stays the same whether you have a heavy bag, pads, or no equipment at all. What changes is the feedback you get, not the structure.
- Shadowboxing replaces the bag for no-equipment setups—provided enough space to move safely and focus on form.
- Pads add a partner and targeted drills.
- A heavy bag gives resistance and impact feedback.
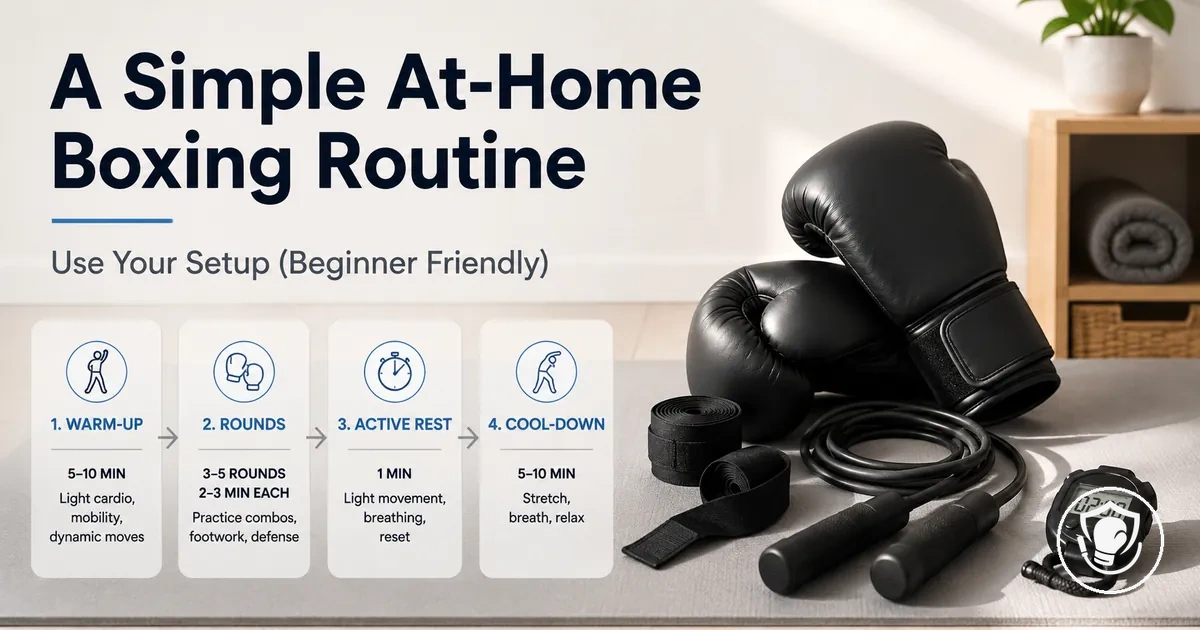
A typical session runs through a short warm-up, a set of main rounds, a brief finisher, and a cooldown. The exact round length and number of rounds can vary based on your fitness level and available time.
As covered, the routine can be done without a bag when space and form allow. Stop and rest if you feel pain or dizziness. Prioritize safety over output.
To run this simple at-home boxing routine, you need only a few basics—these are prerequisites for the session, not purchases:
- A round timer (phone app or stopwatch) to manage rounds and rest
- Open floor space large enough to step, pivot, and shadowbox safely
- Hand wraps or gloves if you use a bag or pads; optional otherwise
- A punching surface (heavy bag, focus mitts, or a partner) or just your own body for shadowboxing
- Water, a towel, and optional gear like a jump rope or workout mat
Routine scope: what your home boxing equipment changes and what stays consistent
The constants of a home boxing routine—warm-up, technique-first round order, cooldown, and progression logic—stay unchanged, while the drills you use shift based on your available home boxing equipment. Substitutions depend on your space and the feedback your equipment provides.
Equipment changes the type of feedback you get—impact, resistance, or target—while the technique goal of clean form, proper guard, and controlled breathing stays consistent as long as you maintain pacing and quality. With a heavy bag, your drill produces impact and resistance that shape power and endurance. With pads, you get target feedback for accuracy and timing. Without either, shadowboxing relies on self-correction and footwork. This is not a buying guide; it is about adapting the same routine across setups. For a full overview of what gear supports each skill, see the home boxing equipment hub.
Consider the first technique round: if you have no equipment, substitute with shadowboxing emphasizing guard and footwork; if you have a heavy bag or pads, substitute the same round with controlled combinations against the target. Both keep the same timer structure and focus on form, but the feedback changes; learn how to choose gear by training goal to align substitutions to your training goal.
To prevent confusion between what your home boxing equipment changes and what stays consistent, use this quick reference:
- Constants
- Warm-up drills that prepare joints and activate core
- Technique-first round order (jab focus, combo focus, power shots)
- Cooldown with stretching and breathing
- Progression logic (add complexity as form stabilizes)
- Substitutions
- If you have a heavy bag: bag drills for impact endurance and punch resistance
- If you have pads: partner drills for timing and accuracy
- If you have only space: shadowboxing for footwork, guard, and head movement
- If you have resistance bands: band drills for punching mechanics and strength
- If you have a double-end bag: reflex work for speed and hand-eye coordination
This chart shows the elements of a home boxing routine that remain constant versus the drills that change based on available equipment.
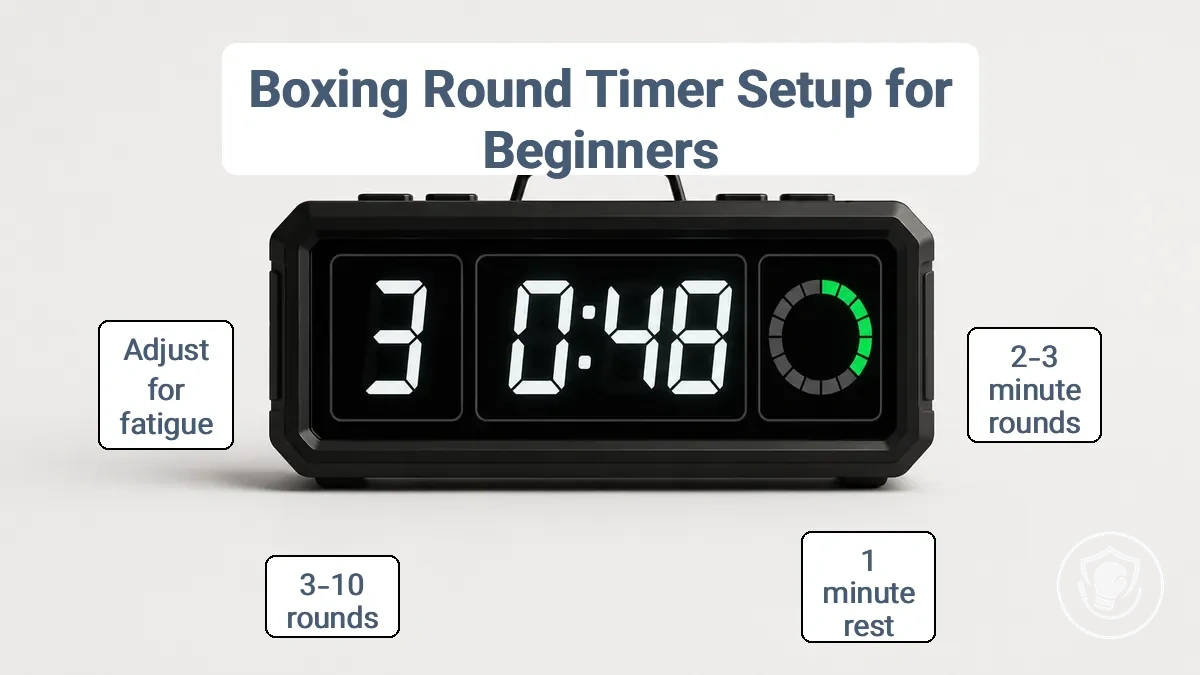
Boxing round timer setup for beginners: round length, rest, and total session time
When you set up a boxing round timer as a beginner, start by choosing round lengths and rest periods that keep your form stable and allow recovery. The exact numbers depend on your current fitness and ability to maintain clean technique. You adjust three main variables: round length, rest duration, and number of rounds.
An interval timer controls your pace by alternating work and recovery. Each round has a clear start and end, and rest lets your breathing and heart rate settle before the next effort.
A boxing round timer setup typically displays the round number, countdown, and rest indicator.
The table maps total session time to round length, rest, and round count so you can choose a manageable setup.
| Total time | Round length (range) | Rest (range) | Rounds (range) | When to use |
|---|---|---|---|---|
| 8–12 min | 2 min | 1 min | 3–4 | Beginner conditioning, form-first focus |
| 12–18 min | 2 min | 1 min | 5–6 | Building endurance while keeping round length sustainable |
| 18–24 min | 3 min | 1 min | 4–6 | Transition to standard round length when 2-minute rounds feel manageable |
| 24–36 min | 3 min | 1 min | 6–10 | Longer sessions for fitter beginners or fight camp preparation |
Two-minute rounds are common for beginner conditioning; three-minute rounds suit standard training once two-minute rounds feel manageable. Longer rounds test pacing, not power. Pick a row that matches your total time and current fitness. Stop if technique breaks down, you feel dizzy, or you cannot recover breathing during rest. For example, if three-minute rounds leave your breathing unsettled, switch to two-minute rounds or extend rest to 90 seconds.
- If form declines before the round ends, shorten round length by 30–60 seconds.
- If breathing does not return to near normal during rest, increase rest by 30 seconds.
- If you finish a session without fatigue, add one round next time instead of increasing round length.
- If dizziness or sharp pain occurs, stop and reassess.
Beginner Round Formats That Work at Home
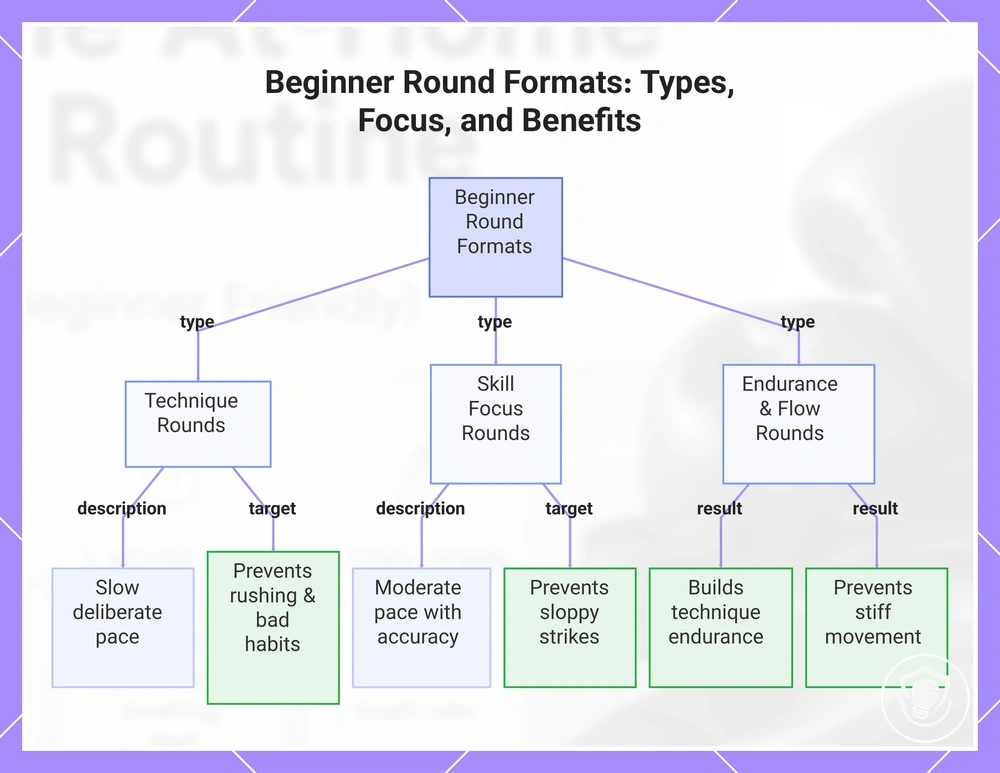
A round format defines what you focus on during a given round. These beginner round formats map a specific training intent and effort level, keeping each round simple while building foundational skills.
- Technique rounds – slow, deliberate pace focused on control and steady breathing; proper form target can help prevent rushing and ingrained bad habits.
- Skill focus rounds – moderate pace with tasks requiring accuracy and timing; clean execution and footwork target can help prevent sloppy, off‑balance strikes.
- Light conditioning rounds – steady rhythmic movement with controlled breathing; maintaining technique while building endurance can help prevent fatigue‑driven breakdown.
- Rhythm and coordination rounds – consistent, fluid pace often using simple combination cues; smooth transitions and hand‑eye coordination target can help prevent stiff movement.
These round types can be mixed within a single session to vary the training focus.
This chart shows the main beginner round formats, their key characteristics, and the training benefits they provide to prevent common mistakes.
How many rounds to do based on your time and fitness
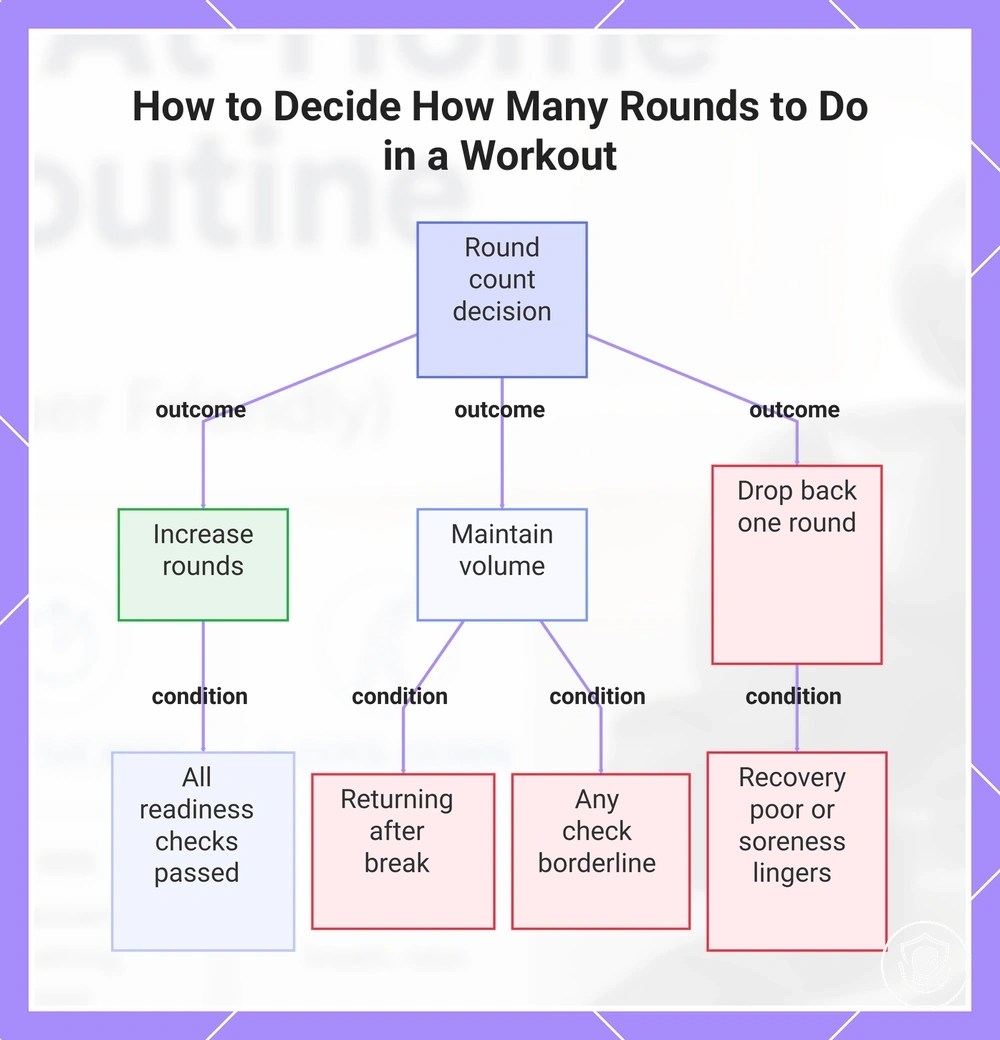
Start with 3 to 5 rounds, based on your time available and fitness, and keep your form consistent as the deciding factor. The checklist below helps you decide how many rounds to do today—whether to add a round or hold steady.
- Can you complete the current round count without your technique breaking down?
- Do you have enough time available for the session without rushing your rest between rounds?
- Is your recovery from the last workout good enough that you feel fresh, not sore?
- Are you breathing steadily and able to maintain the pace you set?
- If you are returning after a break, start at the lower end of the range and hold there for the first session.
- When you can answer yes to all checks above, you can try adding one round next time.
- If any check feels borderline, keep the current volume and focus on form.
When recovery is poor or soreness lingers, dropping back by one round can keep the session productive without risking technique breakdown.
This chart shows the decision logic for adding, maintaining, or reducing workout rounds based on readiness checks and recovery status.
Warm-up block to prepare hands, shoulders, and footwork
A warm-up block to prepare hands, shoulders, and footwork takes about 8 to 12 minutes and helps you move more efficiently in your first round. By loosening stiff areas and raising your heart rate, you set up better technique and reduce avoidable strain early in the session.
The warm-up block to prepare hands, shoulders, and footwork covers the key movement positions you repeat during the sequence. The image combines shoulder circles, wrist mobility, light footwork, guard stance, and a brief shadow round to show how each action connects.
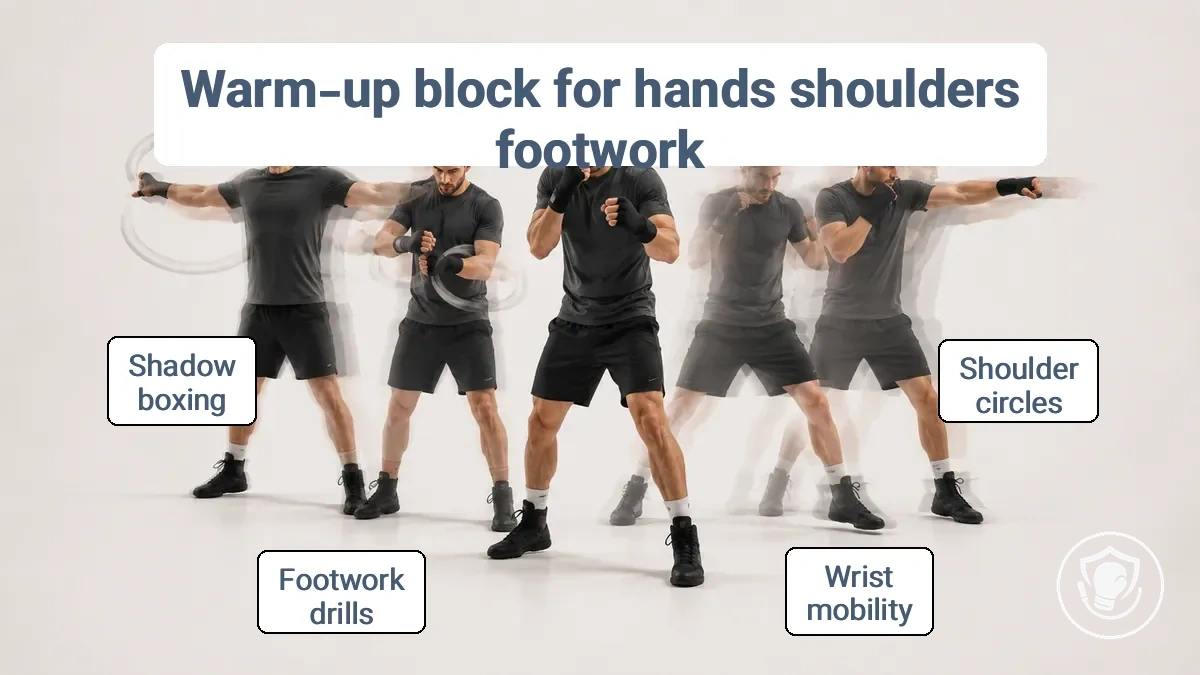
This warm-up block prepares your joints for your first punching rounds. Each step targets a specific area, gives a short time or rep range, and explains how it can improve control or comfort.
- Light movement (shoulders, hips, whole body): 1–2 minutes of jumping jacks or shoulder rolls to raise heart rate and wake up the upper body.
- Shoulder circles (shoulders): 10 slow circles forward and 10 backward to improve shoulder mobility and can help with overhead reach.
- Wrist circles (wrists): 10 circles each way to improve wrist mobility and can help reduce stiffness when holding guard.
- Footwork light steps (footwork, stance, balance): 30 seconds of side-to-side steps and pivots in stance to help build rhythm and ankle stability.
- Guards holds (shoulders, wrists, breathing): 20 seconds in relaxed guard, focusing on steady breaths and keeping shoulders down to help avoid early fatigue.
- Breathing control sets (breathing, core): 5 slow exhales through the mouth while maintaining guard; this helps prime your wind for the first round.
- Shadow boxing easy pace (footwork, guard, full coordination): 1 minute of single punches and light movement to rehearse timing without impact.
If you feel stiff in the shoulders or wrists, repeat the joint circles for another set before moving to footwork. If energy is already high, you can reduce the light movement time and go straight to mobility steps. Caution: sharp pain, dizziness, or escalating discomfort means reducing intensity or stopping for a safety-first reset.
Form first, speed later.
This warm-up is one layer of injury prevention; for more detail on safe training habits, see safety basics before training.
Jump Rope Warm-Up Pace and Easy Progressions
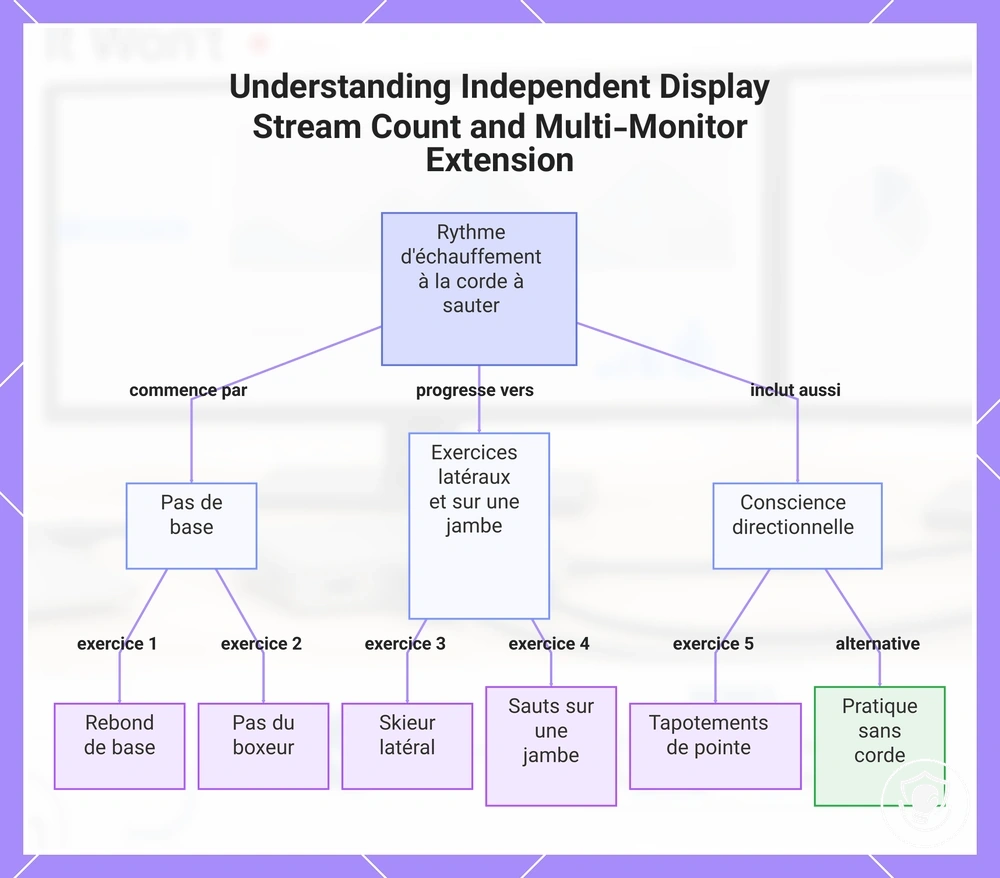
A jump rope warm-up for beginners starts with a comfortable rhythm before focusing on speed or intensity; the goal is coordination and rhythmic footwork, not breathless conditioning. If you have a rope, include it after your general mobility work, and keep the session to a few minutes of steady, controlled jumping.
These pace and easy progressions move from basic footwork to slightly more coordinated patterns, keeping breathing easy throughout.
- Basic bounce: keep a steady cadence, jump just enough to clear the rope, and hold for 30 seconds to settle into a relaxed footwork pattern.
- Boxer step: alternate feet with a light shift in weight, match your pace to easy breathing, and hold for 30 seconds to warm up the legs.
- Side-to-side skier: jump both feet together left and right at a controlled pace for 20–30 seconds to improve lateral footwork.
- Single leg hops: hop on one foot for 20 seconds at a comfortable pace, then switch, to build ankle stability and single-leg control.
- Toe taps: lightly tap one toe forward and then back while skipping, keep the rhythm steady, and do 20 seconds to add directional awareness.
If you do not have a rope, practice the same footwork patterns at the same pace without it.
This chart shows the progression of footwork patterns for a jump rope warm-up, from basic steps to more coordinated drills, including a no-rope alternative.
Movement and joint prep before the first round
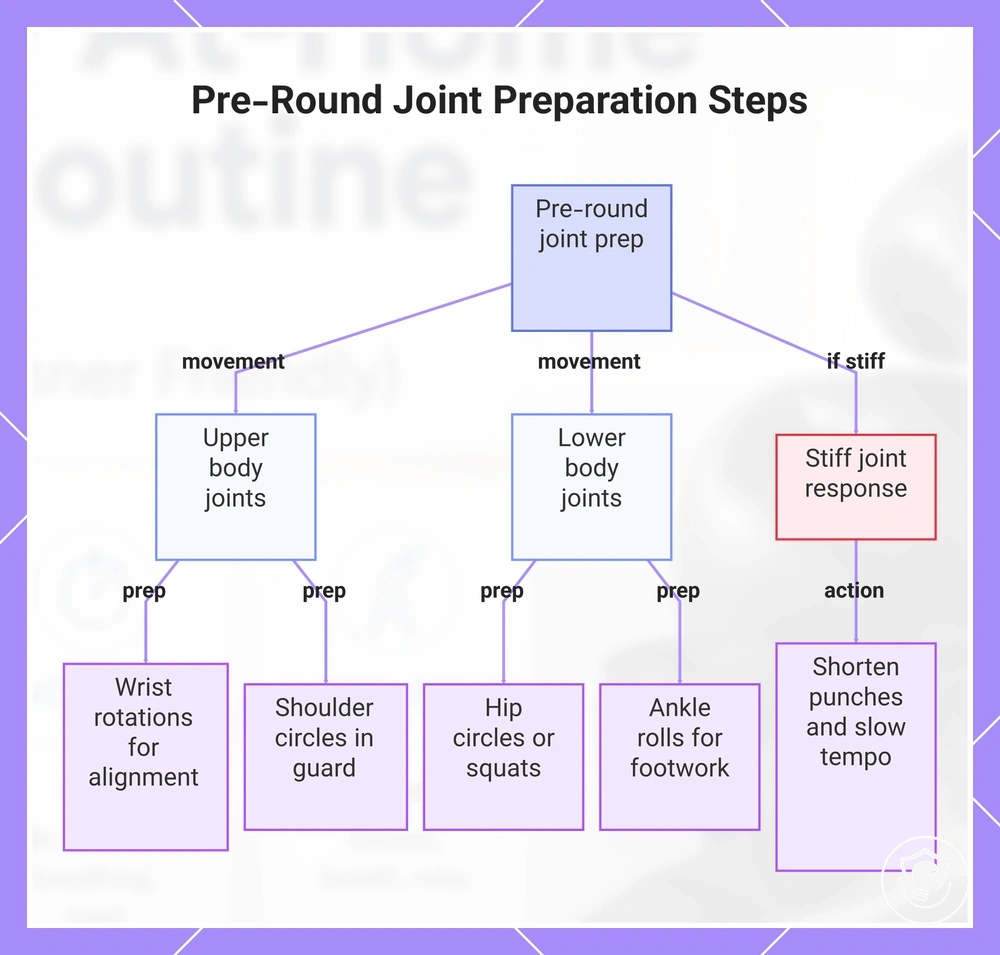
Joint prep is about moving your wrists, shoulders, hips, and ankles through their available range of motion under control to support stable punching mechanics. The goal is readiness and control, not deep stretching; the steps that follow help verify that control before the first round.
- Wrists: rotate each wrist slowly in circles, keeping alignment for straight punches — this maintains control before loading.
- Shoulders: circle each arm forward and backward while holding a guard position — this reinforces rotation and posture.
- Hips: perform controlled hip circles or side-to-side squats to prepare the hips for rotation without forcing range.
- Ankles: roll each ankle in both directions to prepare for stable footwork and weight transfer.
If any joint feels stiff or has limited range of motion, shorten your punches and slow your tempo for the opening round.
This chart shows the joint movements to perform before the first round and the action to take if a joint feels stiff.
Main Rounds: A Technique-First Order That Fits No-Equipment and Heavy Bag Setups
Main rounds follow a technique-first order that prioritizes skill quality before intensity. The flow is structured around feedback and fatigue.
The diagram illustrates the round flow, and the list explains each round with substitution options for no-equipment and heavy bag setups.
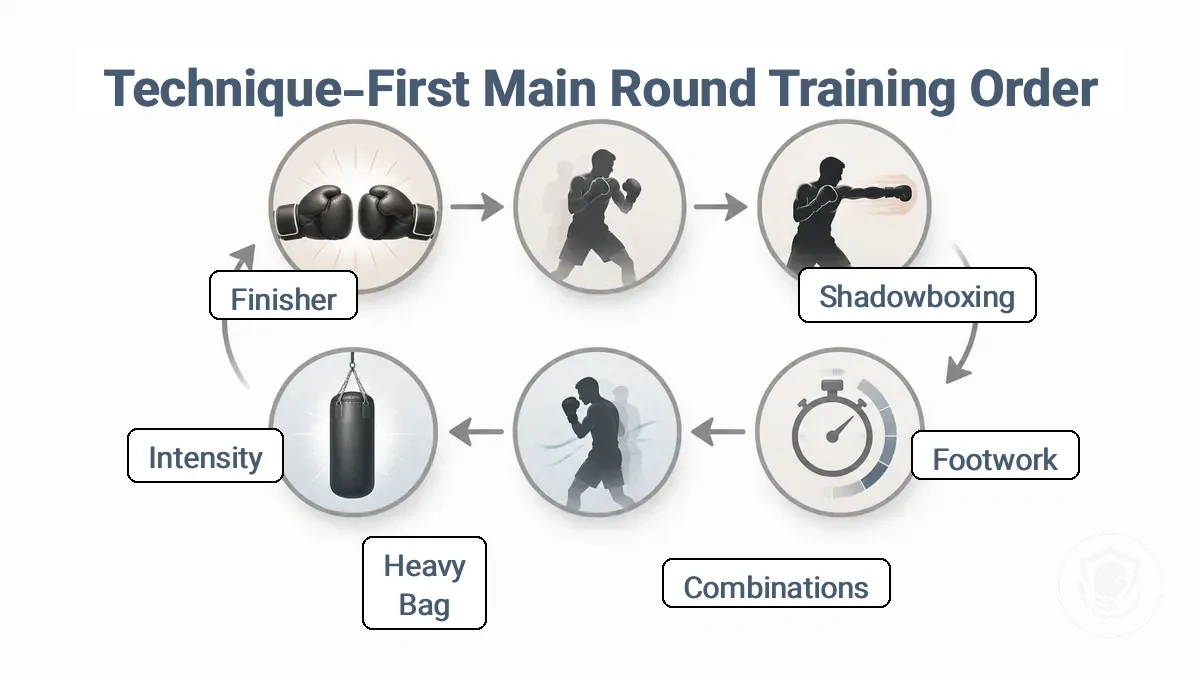
- Shadowboxing round: Build stance, guard, and breathing at low intensity to establish proper mechanics and manage early fatigue.
- Footwork round: Practice circling, pivoting, and distance control without punching to reinforce movement as a foundation for combinations.
- Combination round: Link basic punches on air or bag, capping power to maintain technical consistency.
- Heavy bag round (if available): Focus on accuracy and distance; keep power controlled until form stays consistent across the round.
- Intensity round: Increase speed and power within the same intensity cap, monitoring for form breakdown and stopping if technique falters.
- Finisher round: Sustain simple combinations or defensive movements under fatigue, prioritizing breathing and guard integrity over output.
For a detailed comparison of heavy bag vs pads options, see the dedicated options page.
- No equipment: Use the round slot for extended shadowboxing that focuses on accuracy and precision instead of bag feedback.
- Heavy bag: Add the bag round; bag rounds add impact feedback, shadow rounds add precision feedback.
When fatigue affects your form mid-session, extend the rest period or end the round early to protect technique retention and reduce injury risk.
No-equipment rounds: shadowboxing for stance, guard, and breathing control
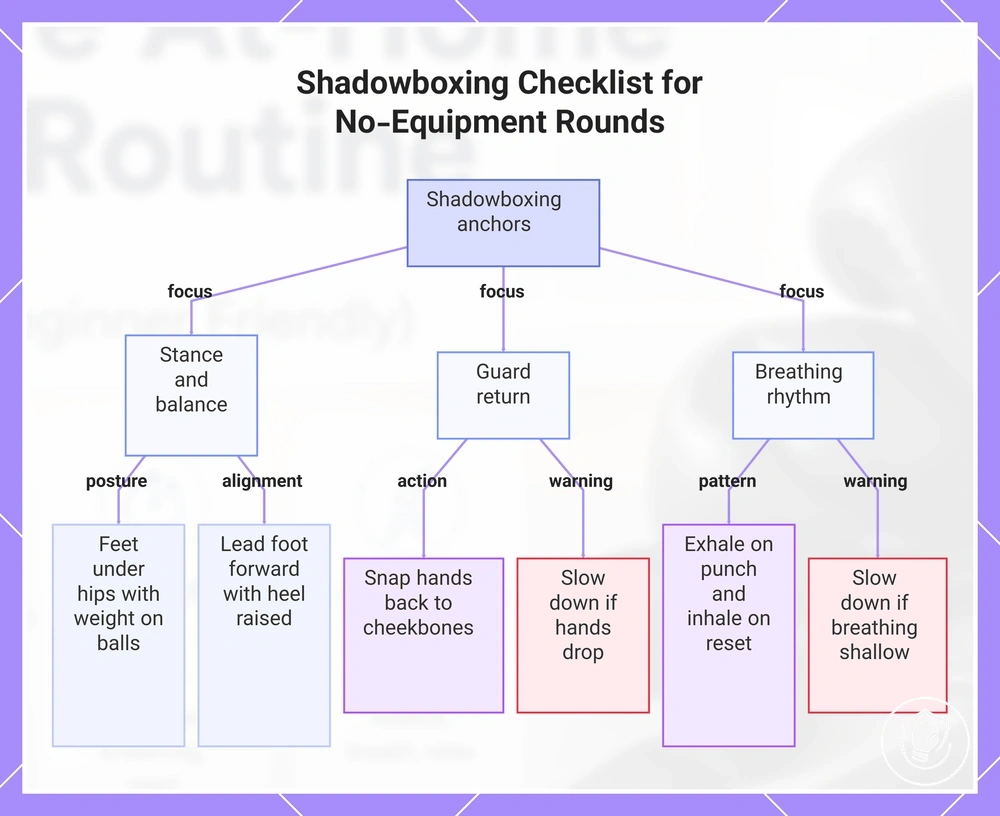
Shadowboxing without equipment focuses on three anchors: stance, guard return, and breathing control. Use these as a checklist to keep each round technical and honest before adding speed or power.
- Stance and balance: Feet stay under hips, shoulder-width apart, weight on the balls of the feet — keeps the base stable without locking the knees.
- Guard return: Hands snap back to cheekbones after every punch — a high guard prevents openings and builds the habit of protecting your face.
- Breathing rhythm: Exhale sharply with each punch, inhale on the reset — that pace keeps your core engaged and prevents lung tightening.
- Foot placement: Lead foot points forward, rear heel slightly raised — this alignment supports quick pivots and lateral steps.
- Pacing control: Stay light on your toes and match punch tempo to your breath — a steady rhythm helps prevent early fatigue.
- Form over speed: Rotate your hips on crosses and hooks, don't just swing your arms — body-driven punches travel with control and reduce strain.
- Slow down if… you notice your hands dropping or your breathing turning shallow — return to one anchor at a time and rebuild from there.
This chart shows the three core anchors (stance, guard return, and breathing rhythm) to maintain during no-equipment shadowboxing, along with warning signs to slow down.
Beginner punch combinations used across the routine
Combinations are repeatable punch sequences used during practice to build rhythm and defensive habits, not to add variety. The following basic sequences are used across the routine for safety and consistent learning, whether shadowboxing, working the heavy bag, or drilling on focus mitts.
- Jab-cross: keep the rear hand up and return to guard to protect your chin after the cross.
- Double jab cross: snap both jabs quickly and maintain balance to prevent leaning forward as you shift weight into the cross.
- Jab-cross-hook: rotate your lead hip and keep your stance stable to prevent swinging off-balance.
- Jab-cross-jab: finish with a straight jab that keeps your weight centered to prevent over-committing.
- Hook-cross-hook: pivot on the lead foot for the hook and keep your chin tucked through the sequence.
When your form starts to break, slow down — clean execution matters more than speed.
Heavy bag or pad rounds: controlled power and accuracy without breaking form
Heavy bag and pad rounds build controlled power and accuracy — hit with intent while keeping your body aligned from your feet through your wrist and knuckles. Treat these rounds as precision work first, not power work. This checklist helps you maintain controlled power and accuracy without breaking form.
- Set your distance so your straight punches land with the knuckles aligned and the wrist straight.
- Focus on accuracy: aim for a specific spot on the bag or pad with each strike.
- Keep contact clean: snap each punch back immediately, avoiding a push or lean.
- Cap your power to a level that keeps your alignment clean from foot to fist.
- Reset your feet after each combination to maintain balance and distance.
- Breathe out sharply on each strike to stay relaxed and in rhythm.
Caution: In limited clearance, shorten combinations and stay a half-step from the bag or pads to maintain form without hitting walls.
When fatigue affects form, lower your power and shorten your combos to two or three punches.
Footwork and angle drills using simple training cones
Training cones help beginners develop stance stability, step-return habits, and an understanding of basic angles without a partner. These footwork drills build movement patterns that can carry into punching rounds by training the feet to reset to a balanced guard after each shift. The two drills use simple cone placements to reinforce these core footwork cues.
- Box step-around: Place one cone in front of you. Stand in your boxing stance with your lead foot pointing toward the cone. Step around the cone with your back foot, pivoting on the lead foot so your body turns 90 degrees. Reset by bringing the back foot back to stance width and raising your guard. Repeat five times per side. This movement reinforces the habit of returning to a stable guard after shifting angles.
- Angle cut: Set two cones about two feet apart in a straight line. Start behind the back cone in your stance, lead foot forward. Advance past the first cone with your lead foot, then rotate on that foot to turn your hips 45 degrees. Return the back foot to your original stance width and reestablish your guard. Repeat five times per side. This pattern can improve control of stance width during angle changes.
If you do not have cones, use small tape marks on the floor or imagine pointed spots—the effect is similar as long as you focus on foot placement.
Timing rounds with a reflex ball kit for defense and rhythm
Reflex ball rounds train timing, rhythm, and coordination as you track and tap a moving target while staying in a stable stance. These control-first cues keep each round predictable and safe while building defense and rhythm.
- Set a steady tempo by matching your taps to the ball's rebound speed — this builds rhythmic control without rushing.
- Maintain proper distance by stepping in and out with each punch — this reinforces footwork and coordination.
- Focus on tracking the ball with soft eyes to improve reaction timing — this trains defensive awareness without overcommitting.
- Pause after every 4–5 taps to reset your stance and breathing — this prevents fatigue from breaking your rhythm.
- Slow down or stop if balance or tracking breaks down — loss of control signals that the tempo needs to drop.
- Reflex ball drills are an optional tool; shadowboxing and pad work also build similar timing and defense cues.
Conditioning finisher that won't wreck your technique
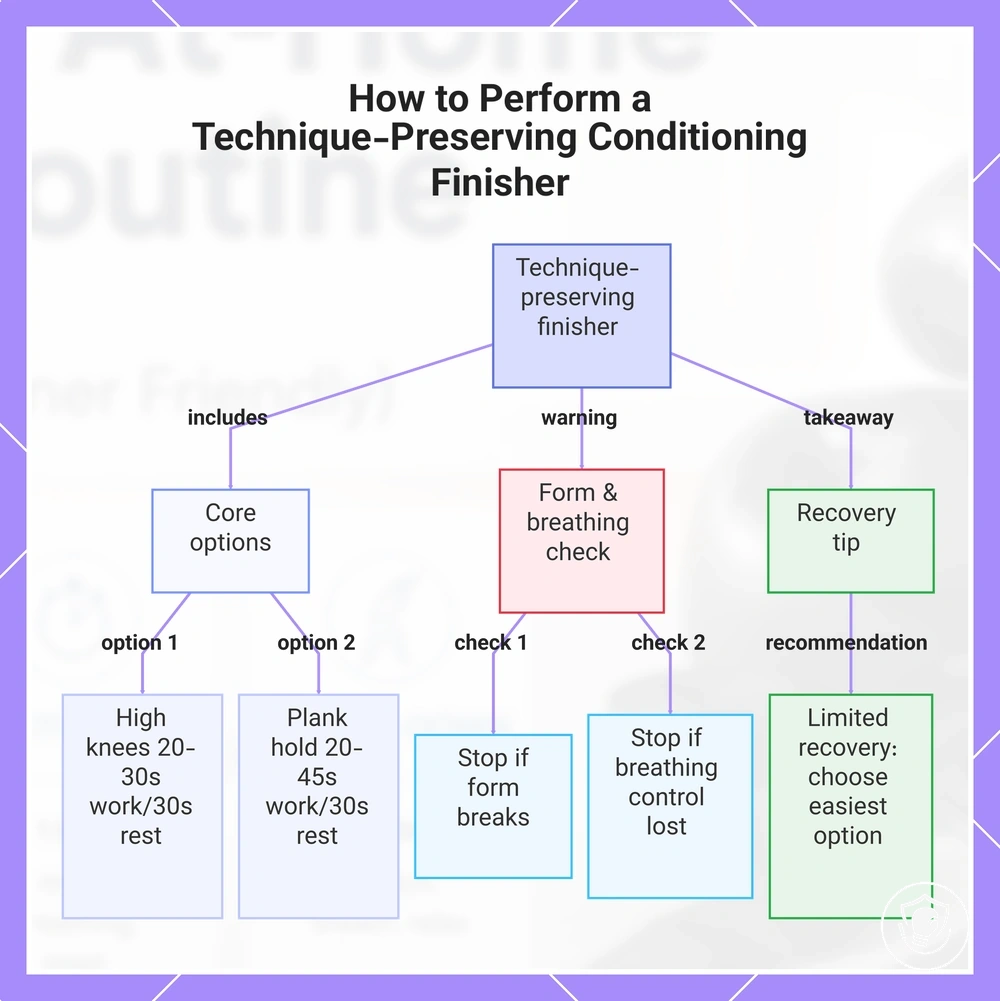
A finisher that won't wreck your technique adds conditioning and helps you preserve the form you built during the main rounds. When your technique begins to slip, you have gone past your intensity cap. The following low-risk options pair short work:rest intervals with a clear form cue.
- High knees – 20–30 seconds work, 30 seconds rest. Keep knees at hip height, land softly, and control your breathing.
- Dead Bug – 30 seconds work, 20–30 seconds rest. Press your lower back into the floor and reach opposite arm and leg slowly; stop if your back arches.
- Plank Hold – 20–45 seconds work, 30 seconds rest. Keep a straight line from shoulders to heels, engage your core, and breathe steadily.
- Shadow boxing (light punches) – 30 seconds work, 30 seconds rest. Keep your guard up, use short combinations, and maintain proper stance. Stop if your punches get sloppy.
Stop any option if your form breaks or you lose control of your breathing.
When recovery is limited, choose the easiest option — such as high knees or a plank hold — because they require minimal coordination and help you keep breathing under control.
This chart shows the core principle, the easiest finisher options, and the key warning to keep your technique intact during a conditioning finisher.
Cool-down and basic recovery after home boxing rounds
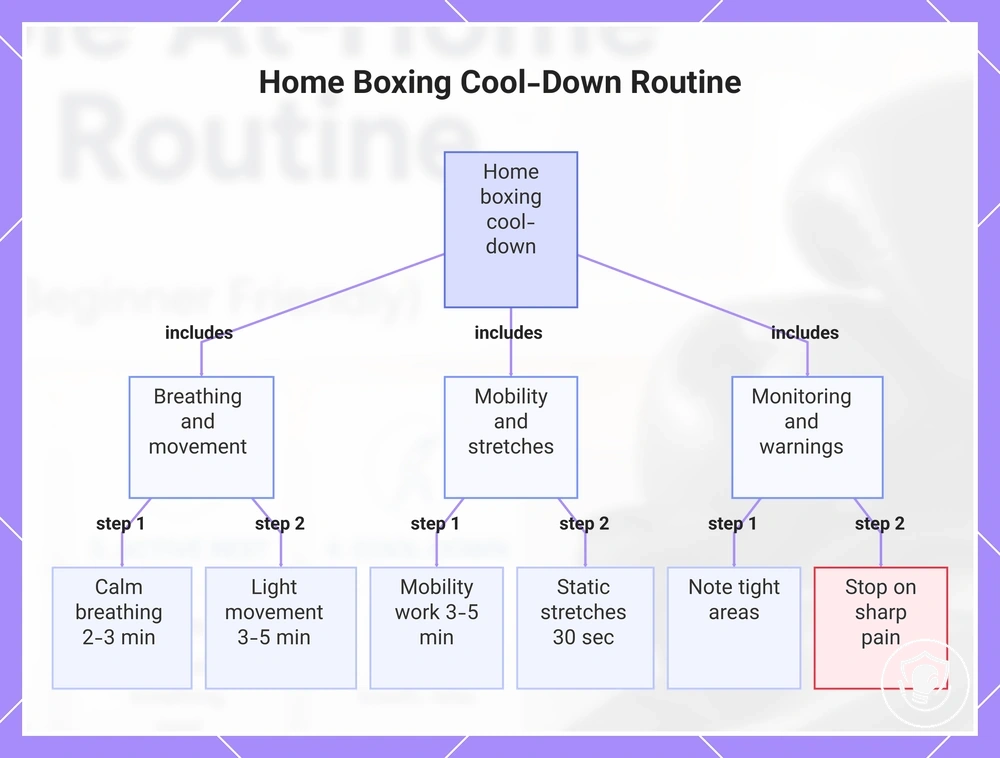
A cool-down after home boxing rounds is a short routine that lowers your breathing and heart rate while restoring mobility. Spending 10 to 15 minutes on this wind-down may help reduce next-day soreness and prepare you for the next session. This cool-down and basic recovery checklist keeps your routine consistent and supports joint comfort.
- Calm breathing for 2 to 3 minutes helps lower your heart rate and signals your body to relax.
- Light movement such as slow walking or gentle shadowboxing for 3 to 5 minutes can loosen your legs and back.
- Gentle shoulder and hip mobility work (arm circles, hip circles) for 3 to 5 minutes can reduce stiffness and improve range of motion.
- Hold gentle static stretches for your shoulders, hips, and legs for about 30 seconds to reduce muscle tightness.
- Note tight areas during this cool-down to guide mobility focus for your next session.
- Stop and reduce intensity in future sessions if you notice sharp pain, swelling, or numbness during or after the cool-down.
This chart shows the main components of a cool-down routine after home boxing rounds, including breathing, movement, mobility, stretches, and monitoring for pain.
Weekly Plan and Progression: How to Increase Rounds, Intensity, and Drills Safely
Progression starts by adding one variable at a time while keeping your form stable. Your weekly plan should only increase load when technique stays solid and recovery is complete.
The three progression levers are rounds (volume), rest (work-to-rest ratio), and drill complexity or intensity cap.
| Lever | Small change | When to use | When to pause |
|---|---|---|---|
| Rounds | Add one round per drill or extend round time slightly | If all rounds were completed with clean technique and you felt you had one or two reps left | If technique slips in later rounds or soreness carries over into next session |
| Rest | Reduce rest between rounds by a few seconds | If you recover fully within the current rest period and can maintain form | If you cannot catch your breath or speed begins to drop significantly |
| Drill complexity / intensity cap | Add a slight movement variation (e.g., slip after punch) or increase speed/power gradually | If basic drills feel smooth and you can execute them without thinking | If you lose coordination or feel joint discomfort |
For example, if your current weekly plan includes three two-minute rounds with one-minute rest, a safe progression would be to first increase round duration slightly while keeping rest the same. After consistently performing with clean technique, you could reduce rest slightly (e.g., by a few seconds). If you notice technique regression or persistent soreness that does not clear after a full rest day, deload by dropping back one step (e.g., return to original rest time) and only resume progression once technique and recovery are fully restored. Common derailers, such as skipping warm-ups or ignoring early fatigue, can also affect progress.
Common mistakes that make beginner home routines less safe or less effective
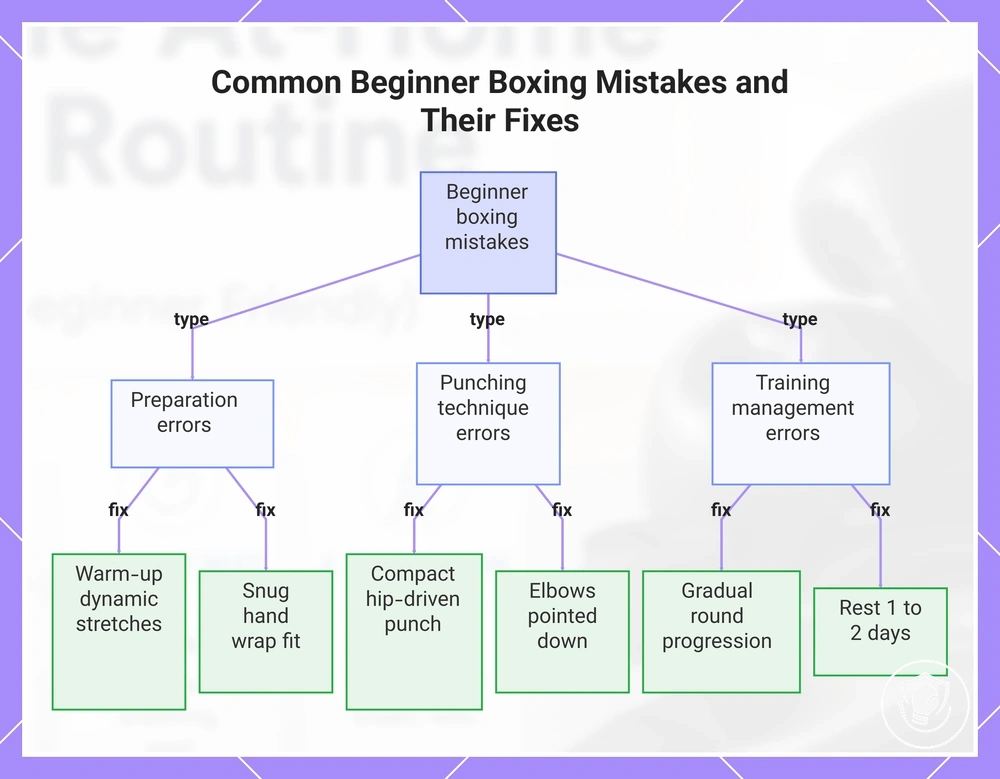
Most mistakes in beginner at-home boxing routines come from rushing pace or adding intensity too soon, causing form breakdown, poor breathing, and less effective training. The following mistakes are grouped by how they make routines less safe or less effective, each paired with a fix.
Mistake: Skipping the warm-up – starting without preparing muscles and joints.
Fix: Spend about 5 minutes on dynamic stretches and light shadowboxing at a low pace.
Why it matters: This reduces muscle strain and improves range of motion, making punches safer.
Mistake: Loose or absent hand wrapping under gloves – inadequate wrist and knuckle support.
Fix: Rewrap snugly around knuckles and wrist before every session.
Why it matters: This helps prevent wrist sprains and protects small hand bones.
Mistake: Looking down during combos instead of at your target.
Fix: Keep your eyes on the bag or an imaginary opponent at eye level.
Why it matters: This helps maintain spine alignment and balance, reducing the risk of falls and poor posture.
Mistake: Holding your breath when you punch.
Fix: Exhale sharply with every strike.
Why it matters: This improves power output and delays fatigue, allowing longer sessions.
Mistake: Over-swinging on the heavy bag – reaching too far back or rotating the shoulder too much.
Fix: Keep punches compact, drive from the hips, and stop your elbow just before it locks.
Why it matters: That lowers joint strain and improves punch control.
Mistake: Flaring elbows upward when punching.
Fix: Keep elbows pointing down and aligned with your fists.
Why it matters: This helps protect the shoulder joint and keep your guard tight against counters.
Mistake: Increasing round length too quickly each session.
Fix: Add roughly 10 seconds per week instead of 30.
Why it matters: This lets your body adapt without burning out.
Mistake: Training every day without rest days.
Fix: Aim for 1–2 rest days per week and use light stretching on those days.
Why it matters: This helps prevent overtraining and gives muscles time to recover.
Mistake: Using the same weight gloves for bag work and shadowboxing.
Fix: Use heavier gloves for the bag and lighter ones for shadowboxing.
Why it matters: This avoids unnecessary shoulder fatigue and protects wrists during impact.
Mistake: Leaning forward too much, reaching with your punches.
Fix: Keep your weight centered and pivot on your back foot as you extend.
Why it matters: This improves balance and power transfer while reducing lower back strain.
If you feel sharp pain, dizziness, or instability during any drill, stop immediately. Reduce training volume, extend rest between rounds, and return to focused shadowboxing until movement feels controlled. Prioritize clean technique over adding rounds or heavier punches – safe progression comes from quality, not quantity.
This chart shows the most common mistakes in beginner at-home boxing routines, grouped by preparation, technique, and training management, along with their practical fixes.