
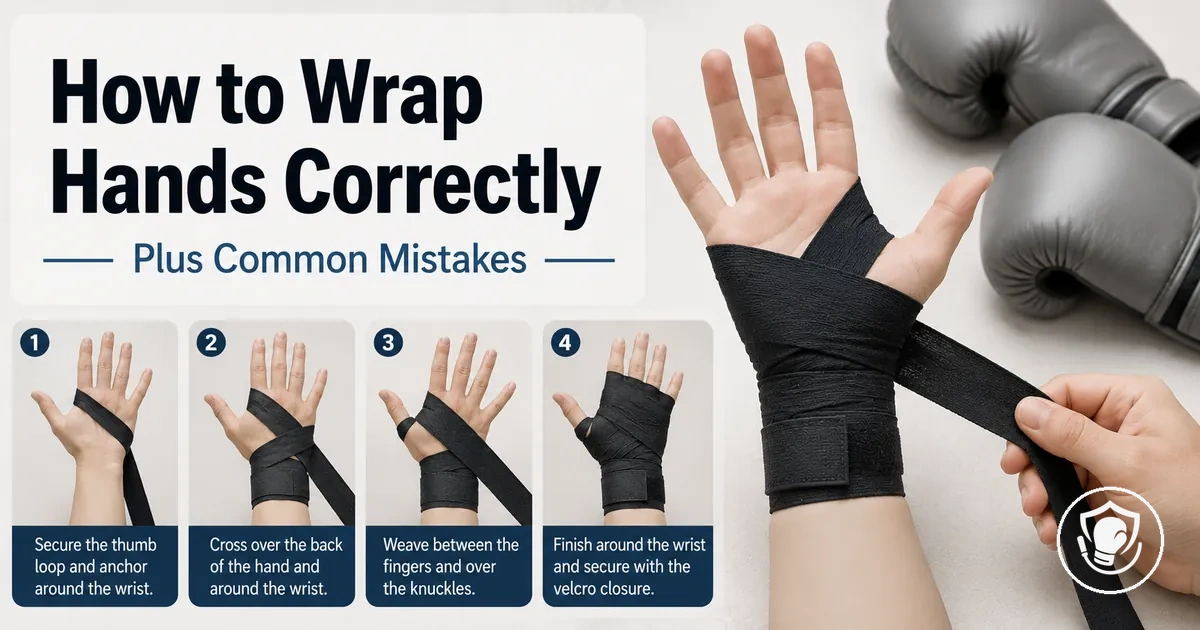
Home Boxing Equipment for Beginners: How to Wrap Hands for Boxing with Hand Wraps
Boxing hand wraps are the first protective layer you put under gloves to support your wrists and cushion your knuckles when learning to punch at home. They compress the small bones of the hand into a more stable unit, reducing joint movement during impact. Hand wrapping for recreational home training is distinct from medical taping and the custom gauze-and-tape methods used in professional fight camps.
Boxing hand wraps create wrist alignment through tension, provide knuckle coverage through layered wrapping, and hold the hand cohesively under gloves to reduce shifting and pressure points for a more consistent glove feel when punching. How much protection you get depends on the tightness of the wrap, the fit of your glove, and the intensity of your training session. The main areas this wrapping is meant to protect are the wrist joint, the knuckles, and the overall structure of the hand during repeated bag work and pad drills. For a complete overview of the gear needed to start training at home, see the beginner home boxing equipment hub.
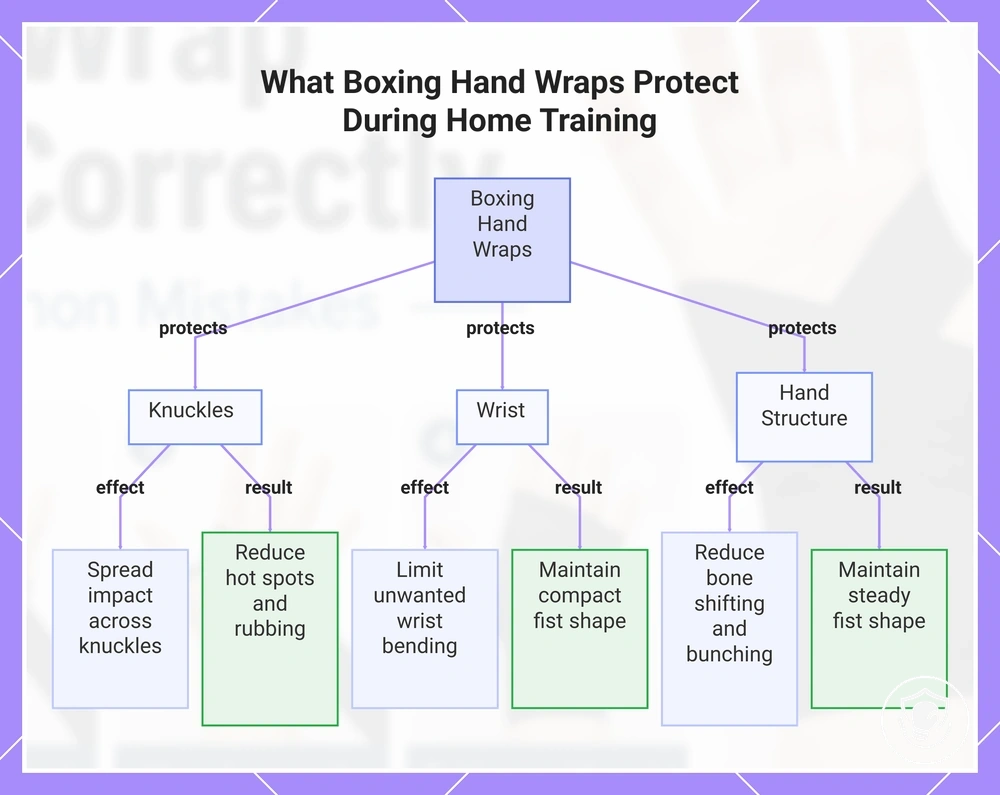
What Boxing Hand Wraps Protect During Beginner Home Training
Boxing hand wraps protect your knuckles, wrists, and hand bones by providing a snug layer under gloves that helps distribute impact, maintain alignment, and keep the hand in a compact shape during strikes. This structural support is separate from the glove padding, which absorbs surface impact, and from punching technique.
During training, the hand's many small bones and joints can shift or bunch inside the glove. The shifting or bunching creates uncomfortable pressure points and makes the fist feel less solid. Wraps limit that shifting by holding the bones in position, reducing pressure points and maintaining alignment.
- Knuckles
- Wraps add a layer that helps spread impact across the knuckles, reducing concentrated hot spots and rubbing inside the glove.
- Wraps help minimize pressure points, keeping the knuckles cushioned and letting the glove's padding work more effectively.
- Wrist
- Wraps support wrist alignment by limiting unwanted bending when the punch lands, especially during repetitive bag work.
- This wrist alignment helps the fist stay compact and the punch feel solid during repetitive bag work.
- Hand structure
- Wraps reduce shifting and bunching of the hand bones, which helps maintain a steady fist shape inside the glove.
- Less internal movement can mean better glove feel and more consistent force transfer, especially during home training without a coach.
This chart shows the three main areas boxing hand wraps protect: knuckles, wrists, and hand structure.
Hand wrap length, thumb loop orientation, and pre-wrap setup
How well your hand wraps fit depends on three setup decisions: wrap length, thumb loop orientation, and tension. Each of these affects fit, bulk, and wrist stability inside the glove. The image shows the thumb loop orientation and the correct starting direction on the back of the hand, so the wrap lies flat.
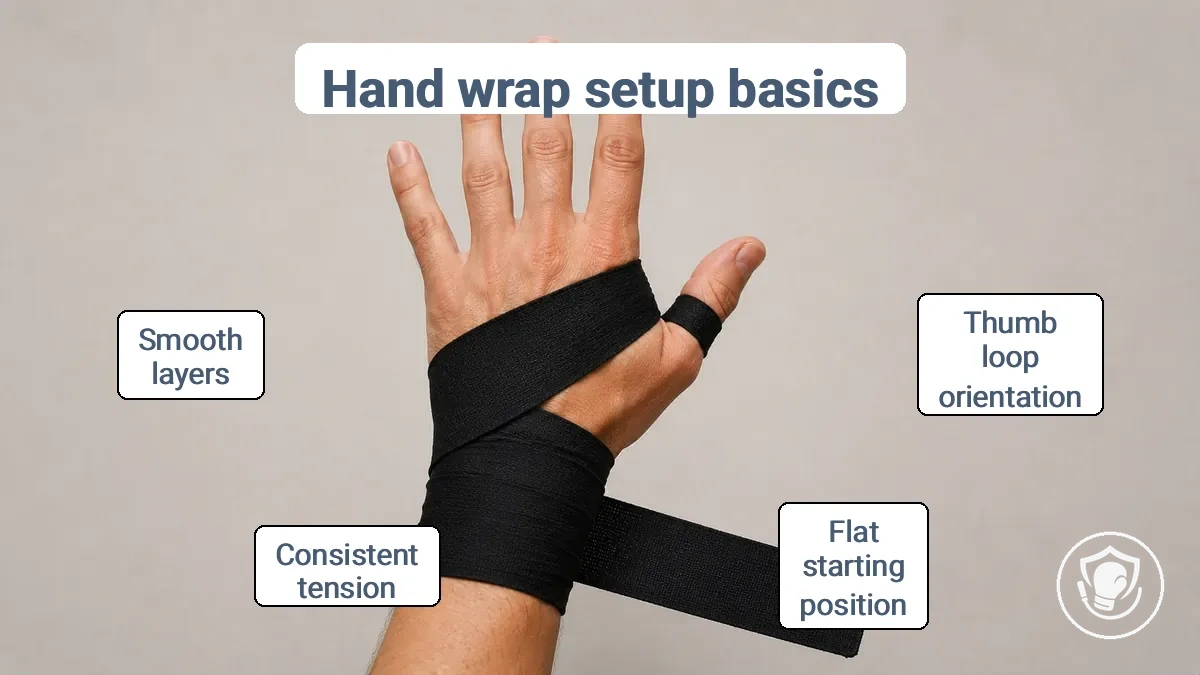
A common beginner mistake is twisting the wrap early, which creates uneven layers and pressure points. Checking that the thumb loop lies flat and the wrap stays smooth prevents this. If wraps feel bulky in gloves, reduce layers; if they slip, increase structure. To fit the wrap to your hand size and preferred support level, choose the right hand wraps. Use the checklist below to set up before wrapping.
- Choose wrap length based on hand size and glove interior space
- Locate the thumb loop at one end of the wrap
- Slip the thumb through the loop so the wrap rests on the back of your hand
- Ensure the wrap lies flat on the skin and does not twist
- Confirm that the Velcro closure end points toward the wrist
- Apply light, consistent tension on the first pass around the wrist
- Keep each layer flat and smooth as you build the foundation
Choosing Hand Wrap Length for Your Hands and Glove Fit (120 vs 180)
Shorter 120-inch wraps tend to fit well for smaller hands or less bulk, while longer 180-inch wraps tend to fit better when you need extra wrist support and knuckle coverage.
The trade-off is between bulk and coverage. A 180‑inch wrap gives you more layers and finger passes. A 120‑inch wrap keeps bulk lower and fits more easily in smaller glove interiors, though it offers fewer layers. Longer wraps allow more structure but can feel tight in smaller gloves. The table below compares the two lengths across coverage, bulk, and typical beginner use.
| Factor | 120‑inch wraps | 180‑inch wraps |
|---|---|---|
| Coverage | Moderate wrist and knuckle coverage; fewer layers | More wrist passes and knuckle layers; often used for heavy impact |
| Bulk under gloves | Less bulk; fits well in snug gloves | More bulk; may feel cramped in small glove interiors |
| Typical beginner use | Lighter pad work, cardio boxing, smaller hands | Bag work, sparring, or when wrist support is a priority |
Finding the Thumb Loop and Starting Direction So the Wrap Lies Flat
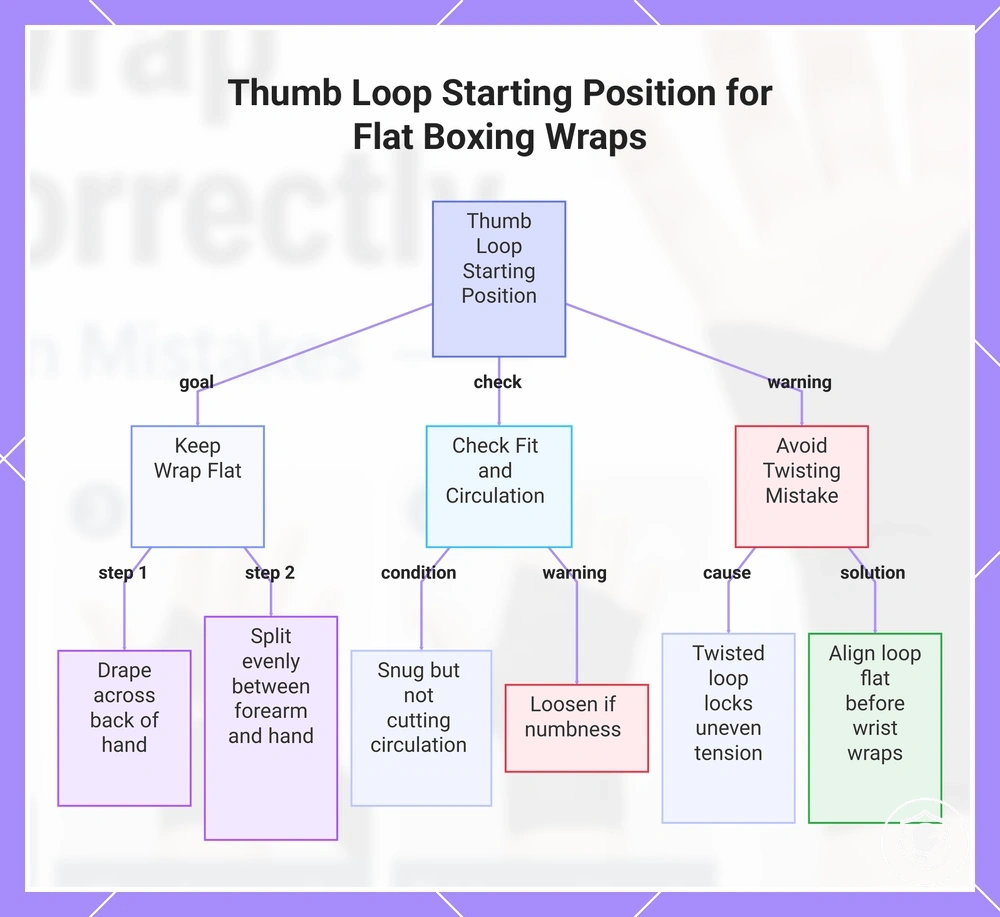
First, find the thumb loop and choose a start direction that keeps the wrap flat, not twisted. Slide your thumb through the loop so the wrap rests on the back of your hand with the Velcro end toward your wrist. This keeps the wrap flat and prevents bunching inside the glove later.
- Hold the wrap with the thumb loop facing up and the Velcro end free.
- Let the wrap drape across the back of your hand, not your palm.
- Position the wrap so it lies half on your forearm and half on your hand before the first pass.
- Make sure the wrap is snug but not cutting off circulation (if you feel numbness, loosen it).
A common beginner mistake is twisting the thumb loop, which can lock in uneven tension. Align the loop so it lies flat before making wrist wraps.
This chart shows the correct way to place the thumb loop and start wrapping to keep the wrap flat, avoid twisting, and ensure proper fit.
Step-by-step boxing hand wrap method for beginners
This step-by-step boxing hand wrap method for beginners aims for a stable wrist base, protected knuckles, and a wrap that stays put under gloves. The diagram below shows the stage sequence: wrist base → knuckle layers → finger passes → thumb/palm lock → closure. Keeping the layers flat prevents pressure points and shifting. Before you start, lay the wrap flat and check that the loop end is free, then follow the steps in order.
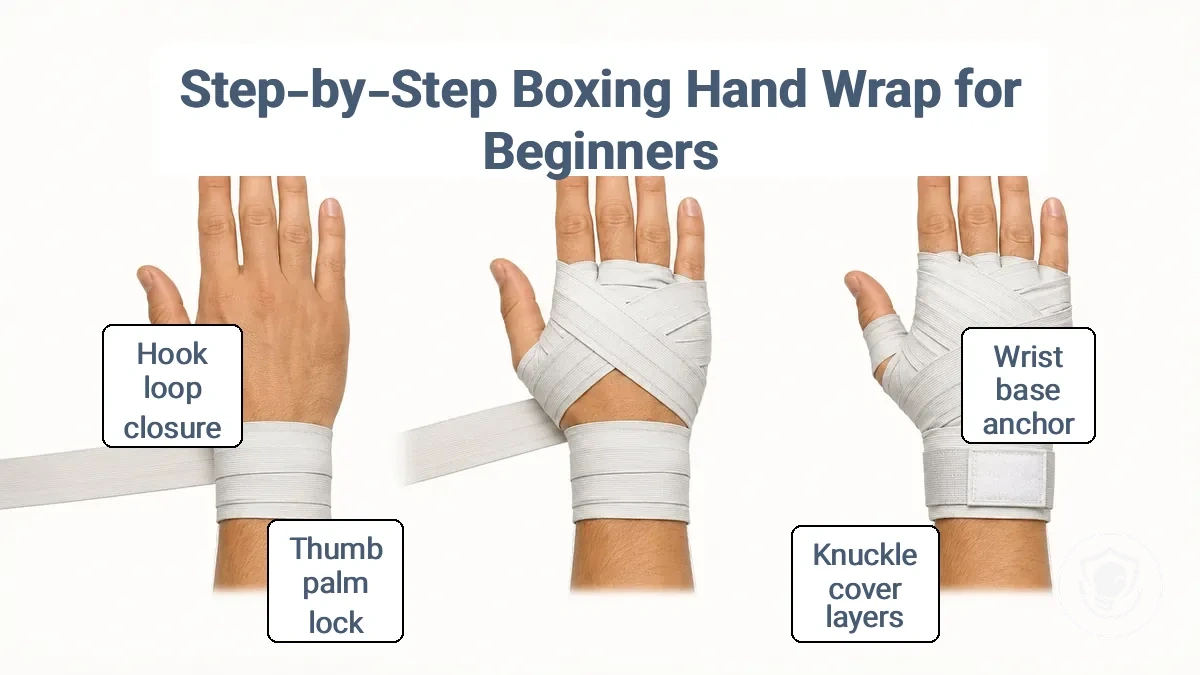
- Anchor the wrist base. Place your thumb through the loop and let the wrap rest on the back of your hand. Wrap the band around your wrist 2–3 times just above the wrist bone. Keep each pass snug and flat to establish a stable anchor. The wrist base provides tension that carries through the rest of the wrap.
- Cover the knuckle layers. Bring the wrap across the back of your hand and over the knuckles. Make 2–3 full passes around the knuckles, overlapping the wrap evenly. Keep each layer flat so no ridges press into the hand. The knuckle layers protect the pressure points along the top of the hand.
- Complete the finger passes. Starting at the inside of the wrist, bring the wrap between the pinky and ring finger, around the back of the hand, and back to the wrist. Repeat between the ring and middle finger, then between the middle and index finger. Each pass locks the wrap in place and prevents shifting when you close your fist.
- Perform the first thumb pass. From the knuckles, bring the wrap diagonally across the back of the hand to the thumb. Loop around the thumb once, then return to the wrist. This pass begins the thumb/palm lock and reinforces the alignment started at the wrist base.
- Lock the thumb and palm. After the finger passes, bring the wrap diagonally across the back of the hand to the thumb again. Loop around the thumb a second time, then bring it back diagonally to the wrist. This second thumb pass creates a visible "X" on the back of the hand and secures the palm side of the wrap.
- Wrap the wrist once more. Wind the remaining wrap around the wrist 2–3 times. Keep the band flat and smooth over the earlier layers. If numbness or tingling starts, loosen the wrap immediately and restart from the wrist base—the wrap should feel snug, not numbing.
- Fasten the closure. Press the hook-and-loop strip firmly against the outer wrap layer. The closure should stay closed without rubbing against the glove lining. Avoid adding extra passes that make the closure bulky; your chosen length should leave enough wrap for a clean finish.
- Check the fit. Make a fist and open your hand several times. The wrap should stay in place without restricting movement. Adjust tension if needed, but do not rewrap a section that is already flat; start over if the layers feel uneven.
To prevent common mistakes, avoid twisting the wrap, avoid making it so tight that it numbs the hand, and avoid letting the closure bunch up under the glove.
Anchoring the Wrap and Building a Stable Wrist Base
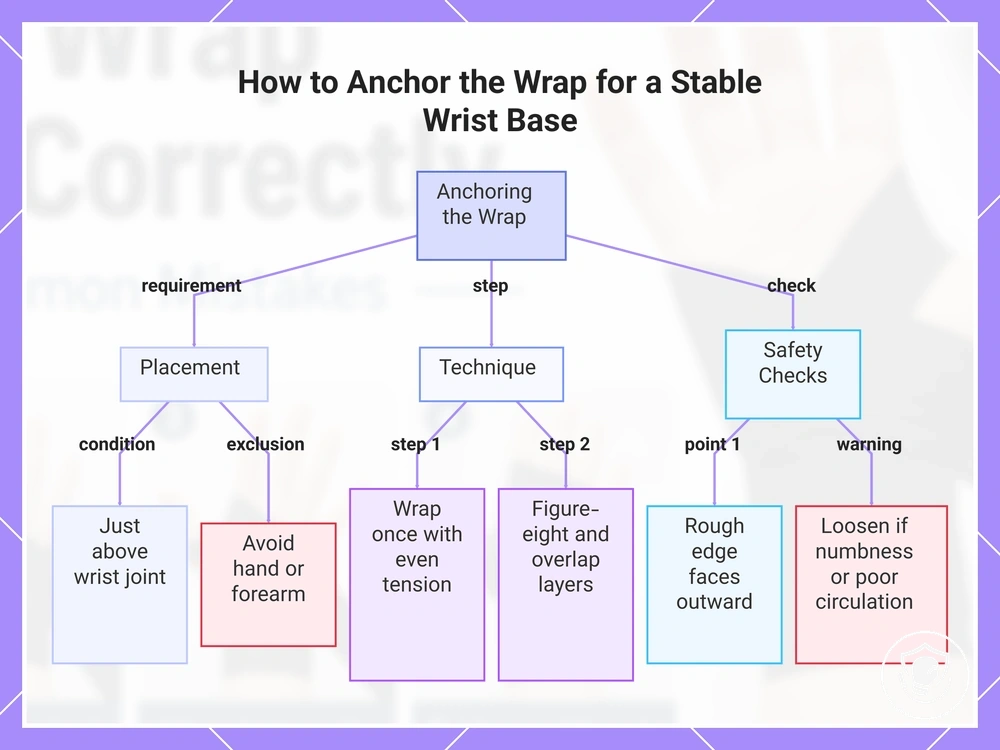
Anchoring the wrap just above the wrist joint creates a stable base that helps keep the wrist aligned, reducing excessive bending on contact for a steadier glove feel. Building a stable wrist base is the first step to secure hand wraps that stay in place during training.
- Anchor the wrap by placing its center just above the wrist joint, where the wrist bends naturally.
- Keep the wrap's center just above the wrist joint, not on the hand or forearm.
- Wrap once around the wrist with even tension, keeping the bandage flat and smooth.
- Pass the wrap between the thumb and index finger in a figure-eight motion to help lock alignment.
- Overlap each subsequent layer halfway as you continue around the wrist for consistent support.
- Check that the rough edge of the finishing material faces outward, away from skin, to avoid pressure against glove seams. If you feel numbness or restricted circulation, loosen the wrap immediately.
This chart shows the placement, technique, and safety checks for anchoring hand wraps above the wrist joint to build a stable base.
Covering Knuckles with Even Layers Without Pressure Points
Wrap the knuckles with a few even layers that stay flat when the fist closes and distribute impact across the whole area. Such flat layering can reduce hot spots and create a more comfortable punching platform.
After wrapping, make a fist and check that the layers remain flat and do not bunch.
- Uneven layering across the knuckles is a common mistake that can create bumps and cause pressure points.
- Crossing the wrap over the same spot repeatedly can lead to rubbing and hot spots.
- Leaving gaps between layers can expose the knuckles to friction and uneven support.
- Using wrinkled or twisted wraps can create bumps that press into the skin.
Using Finger Passes to Lock Knuckles and Reduce Wrap Shifting
Finger passes lock the wrap to prevent it from shifting under gloves. They weave the wrap between fingers, creating anchor points that reduce shifting and keep knuckle coverage.
- Insert the wrap between pinky and ring, then cross the back of the hand to wrist.
- Pass the wrap between ring and middle, then cross the back of the hand to wrist.
- Pass the wrap between middle and index, then cross the back of the hand to wrist.
- After the last finger pass, bring the wrap around the knuckles or wrist to secure the lock.
When wraps slip during training, finger passes are usually missing or loosely applied.
Avoid pulling the wrap too tight between the fingers, as that can cause discomfort and limit flexibility. Avoid leaving slack that bunches when you make a fist, which reduces the lock effect.
Securing the thumb and palm without restricting movement
Lock the thumb and palm in a stable position while keeping full mobility and range of motion. Depending on tension and number of passes, this can reduce loosening during punching and give a more consistent glove-on feel.
- Start with the tape around your wrist, then bring it across the back of your hand toward the thumb.
- Wrap the base of the thumb once for the thumb pass, then bring the tape diagonally across the palm back to the wrist.
- Repeat the thumb pass once more for extra stability.
- Check range of motion by moving your thumb fully. If you feel tightness or discomfort, loosen the wrap and reapply—wrapping too tightly around the thumb often means you'll need to rewrap later.
Securing Hand Wraps and Testing Fit Before Training
A correct fit feels secure and snug across your wrist and knuckles without numbness, pinching, or bunching. Too tight shows as numbness, tingling, or discoloration; too loose shows as shifting or bunching. If you feel numbness, tingling, or notice discoloration, stop and rewrap. If the wrap shifts or bunches, rewrap for a better fit.
When you put your gloves on, the fit becomes apparent. Wrap bulk can feel fine by itself but become uncomfortable once the glove compresses around it, and how snug the wrap feels can vary with glove interior space and wrap stretch. After you finish wrapping, run the quick checklist to confirm your fit before training.
Before training, use this image to check your fit. It shows a correctly wrapped hand with the glove on — fist closed, wrist straight, wrap ends flat. Refer to it alongside the quick checklist.
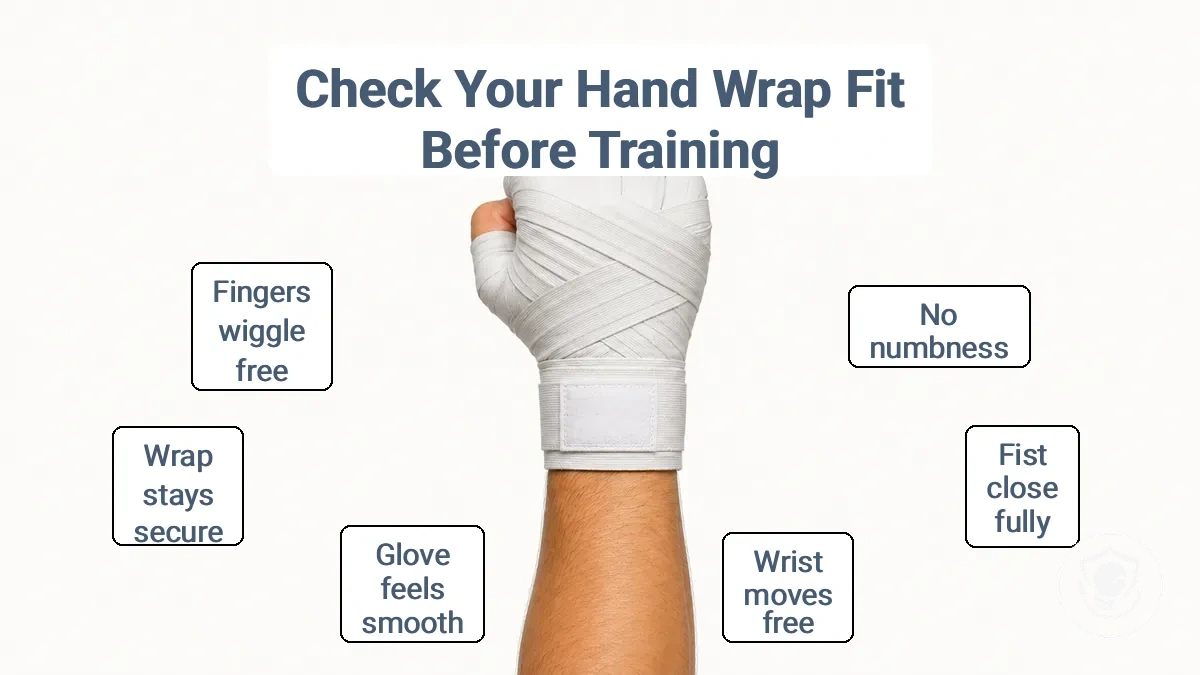
- Circulation check: No numbness or tingling — rewrap if any.
- Fist close test: Make a fist; the wrap should stay snug without restricting full closure.
- Wrist mobility check: Rotate your wrist; the wrap should not dig in or limit movement.
- Glove-on feel: Put the glove on and make a fist; the wrap should not bunch up or create pressure points.
- Closure rub check: The Velcro fastener should sit flat against the wrap and not rub your other wrist.
- Security test: Shake your hand gently; the wrap should remain in place without shifting.
- Finger wiggle test: Wiggle your fingers; you should have full range without the wrap pulling.
Caution: Do not train with restricted circulation — rewrap if needed.
How tight hand wraps should feel and the quick circulation checks
Hand wraps should feel snug—firm enough to stay in place without slipping, but not so tight that they cause numbness, tingling, or a change in finger color. Tightness should support, not restrict. When circulation is compromised, rewrap triggers apply.
- If you feel numbness, tingling, pins and needles, or cold fingers, stop and rewrap with less tension.
- If your fingers turn pale or bluish, stop and rewrap.
- If the wrap shifts or bunches during movement, rewrap to restore stability.
- If you cannot make a fist comfortably without cutting off circulation, loosen and rewrap.
- If you feel tightness restricting circulation while wrapping, stop and rewrap immediately.
Hook-and-loop fastener placement so it stays closed and doesn't rub
Finish the closure against the outside of your wrist, slightly offset from the center, so the tab lies flat without pressure from the glove seam. This position helps the hook-and-loop hold firmly during rounds and reduces movement that leads to rub or peel. When the fastener edge sits directly under the glove cuff or along a seam, friction can cause early loosening, even if the wrap initially feels tight. Secure hand wraps often fail because of closure placement rather than the wrap material itself.
- Fastener edge under glove seam: A tab pressed by the glove seam can loosen or rub. Fix: Reposition the closure to the flat wrist area away from the seam.
- Hook side facing outward: An exposed hook side can snag on glove fabric and collect debris, weakening the hold. Fix: Face the loop side outward against the glove; keep the hook side on the wrap surface only.
- Loose tail left beyond the fastener: Excess wrap past the closure can catch on the glove cuff and pull it open. Fix: Trim or tuck the tail under the closure tab.
- Closure wrapped too far around the wrist: Fastener on the tapered wrist may cause the tab to lift. Fix: Position the closure on the flattest wrist area, above the thumb-side pad.
- Closure pressed against glove padding: Fastener under glove padding gets constant pressure that can peel the hook-and-loop apart. Fix: Adjust the wrap higher or lower to rest against a less padded area.
Glove-on fit check: what to adjust if wraps bunch, slip, or feel bulky
Glove-on feel helps you judge if the wrap fit is right. How you wrap your hands can affect glove protection basics. Address each issue using the symptom-to-fix list.
- Bunching – often caused by uneven layers or a seam pressing into the hand.
- Fix: Flatten the layers and re-route the wrap so seams sit flush against the skin, then rewrap smoothly.
- Verify: Make a fist inside the glove; you should not feel ridges or pressure points.
- Slipping – often caused by missing lock points that let the wrap shift during movement.
- Fix: Add structure by crossing the wrap between the knuckles or anchoring it with an extra wrist pass.
- Verify: The glove should stay in place during light shadow punches; if the wrap moves, stop and rewrap.
- Bulky feel – often caused by excess layers that crowd the glove interior.
- Fix: Reduce the number of passes over the knuckles or redistribute coverage so the palm and fingers have less bulk.
- Verify: The glove should close naturally without forcing your fingers together.
Wraps shifting during punching reduce protection; rewrap completely.
Common Boxing Hand Wrap Mistakes That Reduce Support or Cause Pain
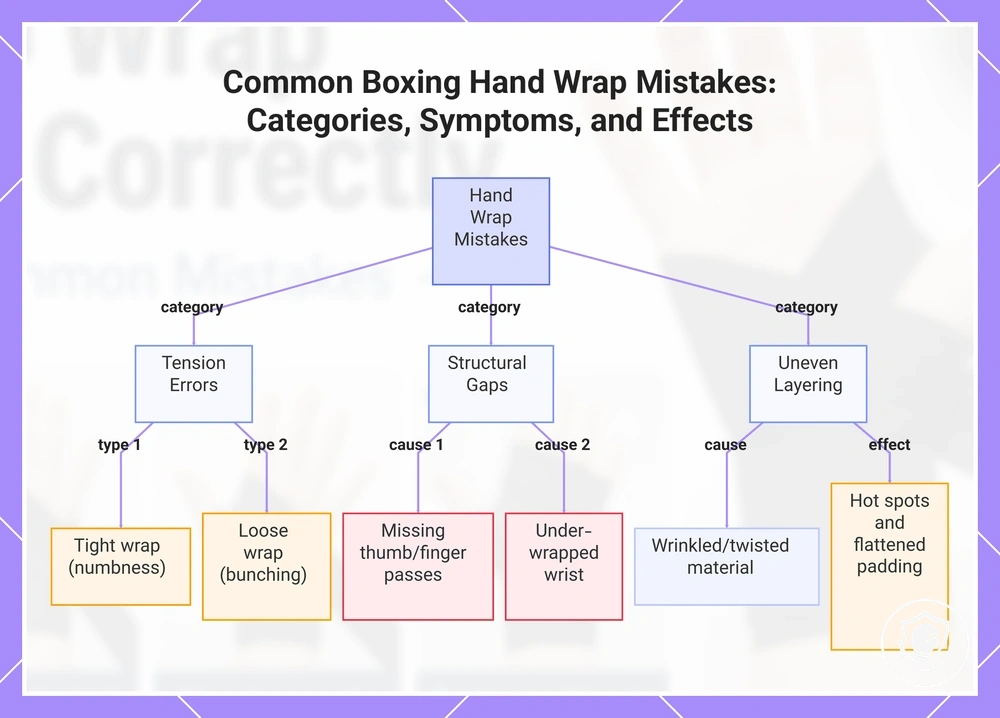
Common boxing hand wrap mistakes fall into three categories: tension errors (too tight or too loose), missing structural support (gaps and skipped passes), and uneven layering that creates pressure points.
These problems often become noticeable only after you put on gloves, when shifting, bunching, or numbness signals that the wrap is not providing the intended support.
- Tension Errors — Wrapping too tight can lead to numbness and tingling in the fingers, a clear sign to rewrap with less tension. Wrapping too loose can reduce wrist support and cause bunching inside the glove. For either issue, adjust tension until the wrap feels secure but not restrictive.
- Structural Gaps — Skipping the thumb loop, omitting finger weaves, or leaving the wrist under‑wrapped can leave gaps in protection. These gaps can cause the wrap to loosen during training, leading to a loss of stability. If you feel the wrap bunching or notice reduced glove feel, add the missing passes and rewrap for full coverage.
- Uneven Layering — Twisted or wrinkled wrap material can create uneven layers that produce hot spots and rubbing against the skin. This often results in uncomfortable pressure points and can flatten the padding over the knuckles. When you detect rubbing or a lumpy feel through the glove, flatten the wrap and reapply with smooth, even passes.
This chart shows the three main categories of hand wrap mistakes, their specific issues, and the resulting symptoms or damage.
Wrapping too tight and the symptoms that mean you should rewrap
Numbness, tingling, or skin color change means the wrap is too tight. Rewrap now.
- Numbness, tingling, or pins-and-needles in the fingers
- Skin that feels cold to the touch
- Pale or bluish skin color
- Loss of normal sensation
- Throbbing pain under the wrap
- Loosen or remove the wrap immediately to restore circulation.
- Elevate the limb until normal color and warmth return.
- Rewrap with lighter tension once sensation feels normal. If symptoms return, the wrap is still too tight.
If pain does not ease after rewrapping, you may need to take a break from training—see wrist pain prevention tips for guidance.
Under-wrapping the wrist or leaving gaps that shift inside gloves
When a hand wrap lacks a stable wrist base or leaves gaps in coverage, the wrist line becomes unstable under impact and the wrap can shift inside the glove. Rushing the wrap, using uneven tension, or skipping the wrist base often cause these weak points. The fixes below address the most common gap patterns and their simplest corrections.
- Pattern: Missing wrist base loops → the wrist bends during punches, creating unstable contact. Fix: Add at least three snug wraps around the wrist before moving to the knuckles.
- Pattern: Gaps between the wrist and the first knuckle pass → migration pulls the wrap down, exposing the lower knuckles. Fix: Keep the wrap diagonal across the back of the hand to bridge the gap.
- Pattern: Slack in the wrap during the finger passes → bunching inside the glove creates pressure points. Fix: Maintain even tension and pull the wrap taut between each finger.
- Pattern: Leaving out the finger weaves entirely → the wrap shifts sideways on impact. Fix: Weave the wrap between at least two finger gaps to lock the structure.
- Pattern: Overlapping wrap too much in one spot → lumping that later migrates. Fix: Spread the passes evenly across the wrist and knuckle area.
Loose wraps and tight wraps produce different problems: shifting versus numbness. Identifying your symptom helps you adjust tension rather than technique. Correcting these gap patterns can help keep the wrap stable and the hand protected, but full protection still depends on proper glove fit and punching form.
Uneven knuckle layers and finger passes that create hot spots
Hot spots are often caused by uneven knuckle layers, overlaps, twists, or pinching from tight finger passes. To fix them, first identify the unevenness, then correct it.
- You feel a sharp, focused burn under the wrap instead of even compression.
- One area of the wrap feels tighter than the rest after a few rounds.
- You notice red marks or indentations after unwrapping that may indicate an overlap or twist.
- A finger pass can leave a deep groove or feel restrictive when you make a fist.
- Flatten and redistribute any bunched or twisted sections by rewrapping that hand cleanly.
- Loosen and rewrap the finger pass so it sits flat and does not pinch at the base of the finger.
- Smooth out overlaps as you go, keeping each layer flat against the previous one.
- Check for twists by running your free hand over the wrap after each pass; fix any ridge before continuing.
Bulky endings and poor closure placement that comes undone mid-round
Bulky endings or a closure placed in a high-friction zone often cause hand wraps to come undone mid-round. The extra material presses against the glove, increasing peel force and causing the closure to unfasten.
- Bulky tail creates internal pressure that can peel the closure open. Fix: Reduce bulk by folding the tail flat against the wrist and tucking it under the previous wrap layer instead of leaving a wad.
- Closure in a high-friction zone (e.g., palm heel or inner wrist) can rub against the glove and loosen the wrap. Fix: Reposition the closure to the outer wrist or just above the thumb base where friction is lower.
- Closure not pressed flat after fastening can catch on glove lining. Fix: Smooth the closure material firmly against the wrap before putting on the glove.
- Excess overlap layers near the closure can create a raised ridge that can shift with movement. Fix: Keep the final wrap layers even and avoid stacking extra passes directly under the closure.
- Loose tail tuck can let the closure edge lift during punching. Fix: Tuck the tail under at least two previous wrap layers, then fasten the closure over a flat surface.
If at any point the wrap loosens and shifts during punching, stop and rewrap. Securing the closure is a key part of how to secure hand wraps.
After Training: Removing, Drying, Storing, and Washing Boxing Hand Wraps
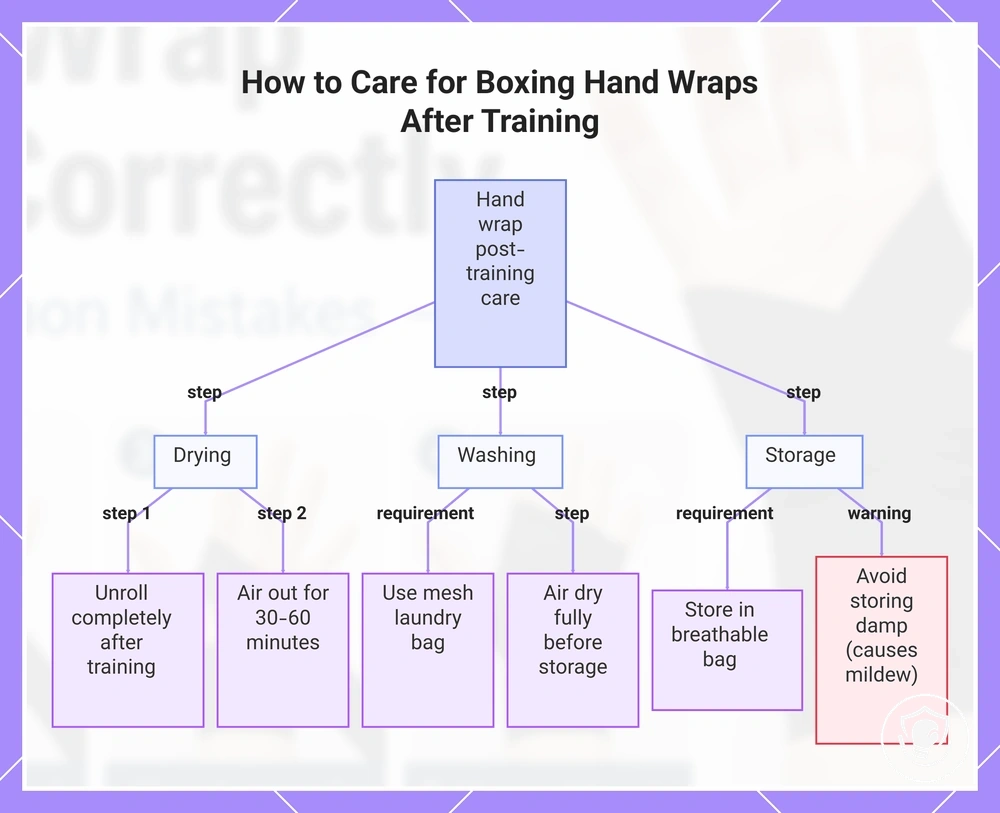
To keep boxing hand wraps fresh and long-lasting, dry them right after training, then store them properly, and wash them when needed. This routine helps reduce odor and prevent fabric damage over time.
Storing wraps while damp traps moisture and can encourage mildew growth within a day or two. Mildew can cause persistent smell and may weaken the fabric fibers.
- Remove wraps and unroll them completely right after training.
- Let them air out for at least 30–60 minutes in a well-ventilated area so sweat and moisture evaporate.
- Place wraps in a mesh laundry bag when washing to prevent tangling and reduce fraying.
- Wash wraps.
- Air dry wraps fully before rolling them for storage.
- Store dry wraps in a breathable bag to avoid trapped moisture and odor.
This chart outlines the three main steps—drying, washing, and storage—for keeping boxing hand wraps fresh and long-lasting after training.
Unwrapping without overstretching the fabric and keeping pairs together
Unwrap hand wraps gently to preserve elasticity and prevent overstretching, keeping them supportive for future use.
- Unwind the wrap carefully, holding the roll end to prevent tangling.
- Air dry the fabric before rolling to avoid trapping moisture.
- Roll the wrap with even tension, starting from the end with the Velcro.
- Keep the pair together in the same pouch or roll them side by side.
Avoid knotting wraps or storing them wet, as this can weaken the fabric over time.
Drying and storing wraps so they don't smell or mildew in a storage pouch
Make sure hand wraps are fully dry before putting them in a storage pouch. Storing damp wraps traps moisture, leading to mildew and a persistent odor.
- DO: Air-dry wraps flat in a well-ventilated area until fully dry.
- DO: Use a fan or open window to increase airflow around the wraps.
- DO: Turn wraps over halfway through so both sides dry evenly.
- DO: Store dry wraps in a breathable mesh bag or pouches that allow some ventilation.
- DO: If using a sealed storage pouch, add a moisture absorber.
- DON'T: Skip checking — placing damp wraps in a sealed pouch traps moisture and promotes mildew.
- DON'T: Fold wet wraps tightly together — this prevents airflow and encourages mildew.
- DON'T: Leave wraps in a closed gym bag or pouch after training without drying first.
- DON'T: Store wraps in a humid location unless they have been fully dried and sealed with a moisture absorber.
In humid environments, wraps usually take longer to dry, so allow extra time to ensure they are fully dry before storage.
Washing hand wraps by hand or machine using a wash bag to prevent tangling
Use a wash bag and a gentle cycle to reduce tangling and fraying when washing hand wraps. A wash bag contains the wraps and limits movement, which helps prevent fraying along the edges.
Tangling happens when the long straps whip around in water or hit against other items, especially if the Velcro is left open.
Compare hand washing and machine washing for preventing tangling and fraying in hand wraps.
| Hand washing | Machine washing |
|---|---|
| Low agitation, greater control | Moderate agitation; reduced with a wash bag |
| Very low tangling and fraying risk when done gently | Low tangling and fraying risk when using a wash bag and closed Velcro |
| Often preserves elasticity longer, but depends on fabric and dye | Can be safe with cool water and gentle cycle, though durability varies by wrap material |
Allow hand wraps to dry completely before rolling and storing them, regardless of the method used.