
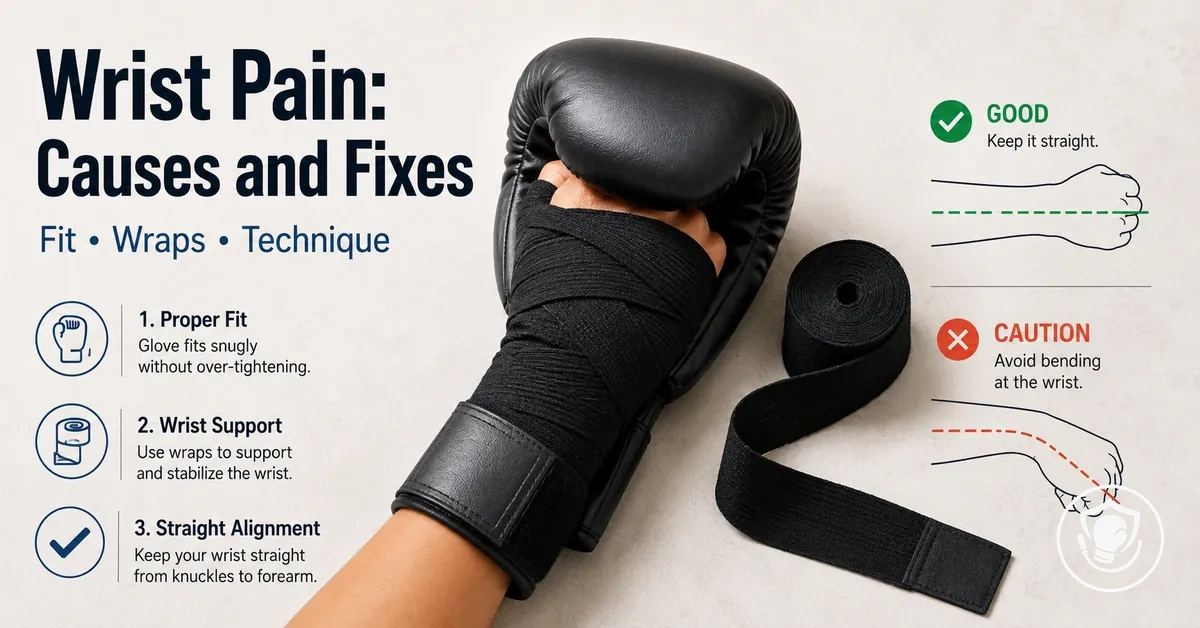
Home Boxing Equipment for Beginners: Fixing Wrist Pain from Gloves, Wraps, and Punching
Wrist pain during home boxing training often points to issues with gear fit, impact, or technique, rather than a serious injury. Home beginners need to tell apart normal discomfort from pain that requires stopping, which is the first step toward safer workouts. The main variables that affect wrist comfort include glove closure, wrap tension, bag hardness, and punching alignment.
Instead of relying on gear alone, check how each variable interacts with your training load. A pattern check — adjusting one factor at a time and observing the response — identifies the real cause without risking further discomfort. Loose or tight wrap tension can cause wrist instability or numbness, while a poorly anchored glove may allow the joint to bend on impact.
On a heavy bag, the bag's hardness and round count affect shock transmission to the wrist. A beginner hitting a stiff bag without adequate wrist support from wraps and a well-fitted glove may feel sharp pain after a few sessions. Pushing through sharp pain often delays recovery rather than building toughness; pause and adjust the setup.
Buying more padding alone does not solve wrist pain; protection depends on hand position inside the glove and wrist alignment during the punch. A tight hand wrap and snug glove closure support the wrist only when the fist stays neutral on impact. Without proper alignment, even high-quality gear may not prevent wrist strain over time.
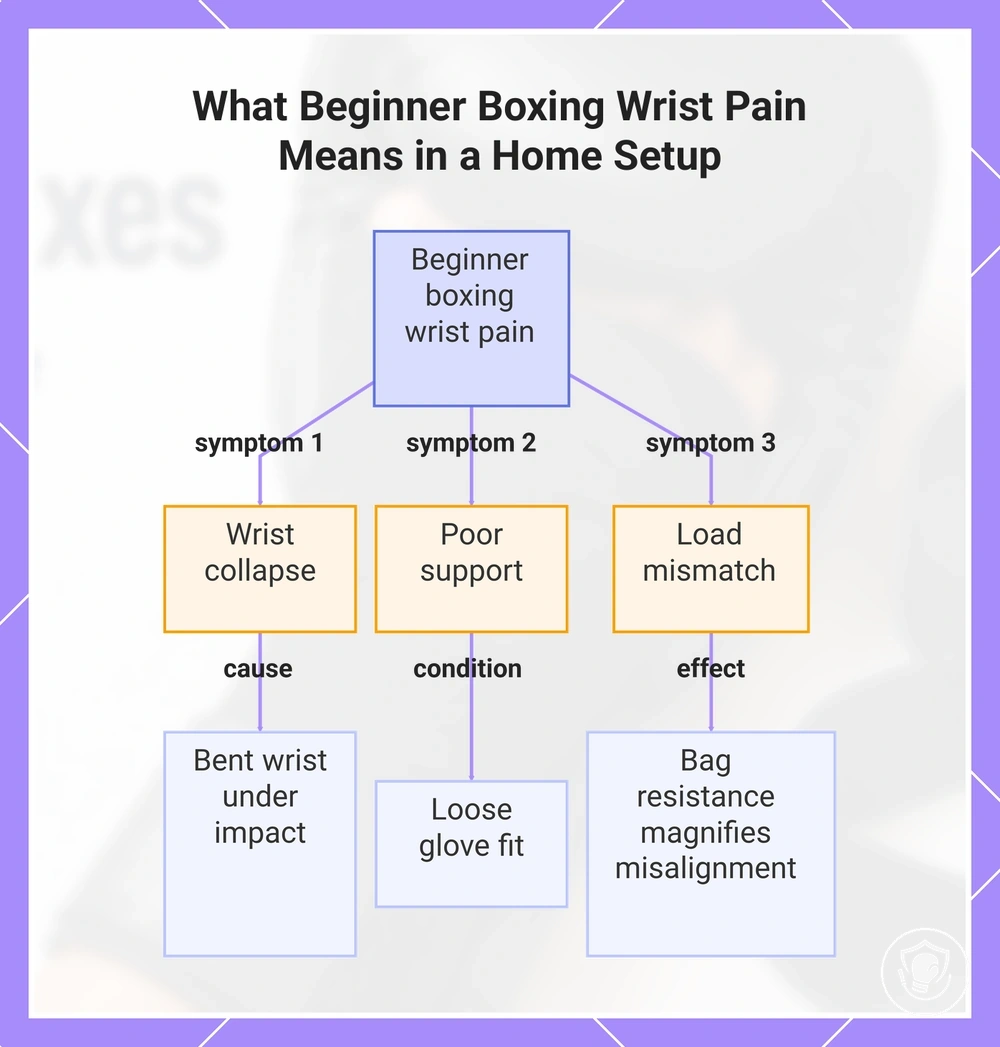
What beginner boxing wrist pain usually means in a home setup
Beginner wrist pain during home training usually signals a wrist collapse, poor support, or a load mismatch rather than a single universal cause. Gear support helps, but it can't replace straight wrist alignment under impact.
Home setup amplification means that small form errors and equipment gaps become more noticeable than they might in a coached gym. Connecting wrist pain to equipment choices, the beginner home boxing equipment hub covers common gear trade-offs that influence support and impact. When training alone on a heavy bag, feedback comes directly from the bag's resistance — and if the wrist is bent or the glove fit is loose, the bag magnifies that misalignment with every punch. A home setup often lacks a coach's real-time correction, so the same imperfect repetition can build into persistent wrist pain over time.
Mapping where the pain appears and what triggers it points to the variable that needs adjustment.
This chart shows the three main signals that beginner wrist pain during home boxing training usually indicates: wrist collapse, poor support, or load mismatch.
Pain Pattern Check: Where It Hurts, What Triggers It, and When to Stop
If you experience sharp pain, worsening pain, swelling, numbness, or instability in your wrist during training, stop training immediately. This is a safety screen and pattern check, not a diagnosis — focus on the pattern first.
This pain pattern check diagram labels common pain location zones on the hand and wrist — thumb-side, pinky-side, back of wrist, and palm-side — along with the trigger types that often affect each area.
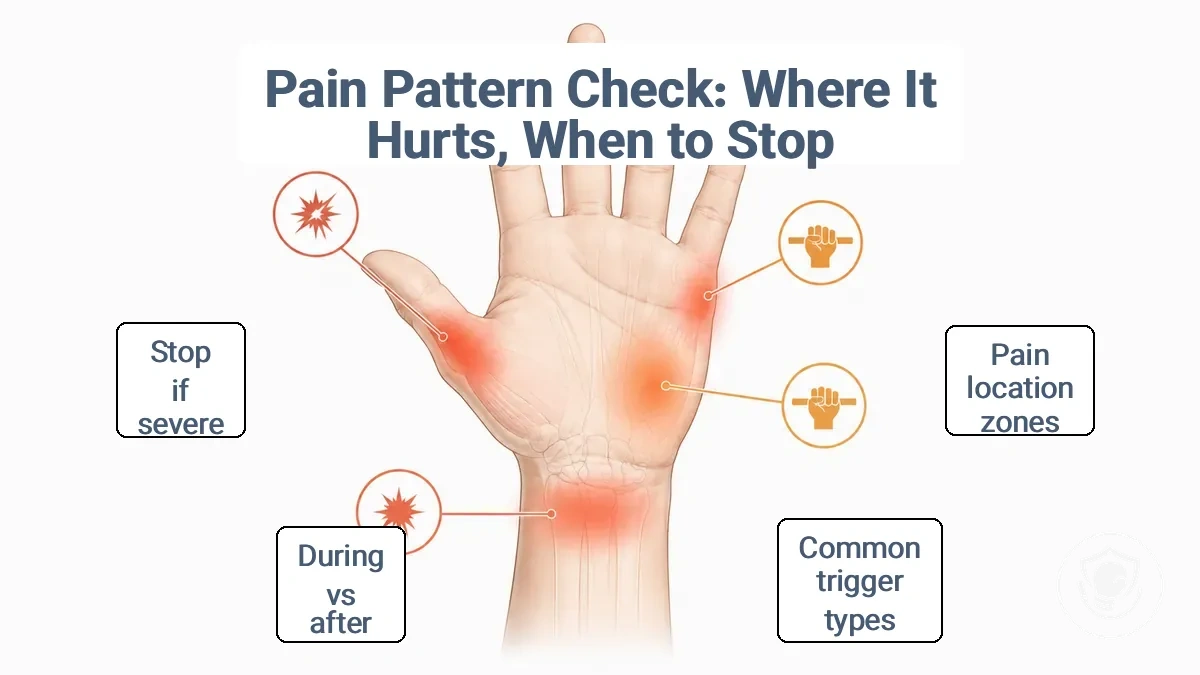
Pain patterns vary by location, trigger, and timing — whether pain appears during impact or after training. Below, patterns are grouped by location and trigger, each with a safe test adjustment to try.
Pain during impact
- Pain on the thumb side during jabbing or heavy bag work – may be provoked by repetitive compression – likely driver: repeated stress on the thumb base. Test adjustment: check glove fit or reduce bag weight.
- Pain on the pinky side during hook shots – may be provoked by repeated ulnar stress – likely driver: overuse of the wrist edge during impact. Test adjustment: wrap more securely and avoid over-rotation.
- Pain on the back of the wrist during extension at impact – may be provoked by hitting with a bent wrist – likely driver: forced wrist extension. Test adjustment: keep the wrist straighter and reinforce with wraps.
- Pain on the palm side at the base during heavy strikes – may be provoked by direct impact on the pad – likely driver: bruising or irritation of the soft tissue. Test adjustment: add a gel pad or switch to a glove with thicker padding.
Pain after training
- Pain on the thumb side after training – may be provoked by sustained gripping – likely driver: tendon irritation from prolonged tension. Test adjustment: rest and ice the area; avoid grip-heavy drills for several sessions.
- Pain on the pinky side after training – may be provoked by grip fatigue from holding punches – likely driver: muscle strain in the hand. Test adjustment: gentle stretching and reduce grip tension during wraps.
- Pain on the back of the wrist after heavy bag work – may be provoked by repeated wrist extension during punches – likely driver: tendon strain. Test adjustment: wear a wrist support during recovery and limit extension-heavy moves.
- Pain on the palm side after training – may be provoked by cumulative impact on the heel of the hand – likely driver: local inflammation. Test adjustment: ice the area and avoid direct impact until tenderness resolves.
If any location involves sharp pain, worsening pain, swelling, numbness, instability, or weakness that does not settle with rest – stop training until a professional evaluates the issue.
Glove and wrap setup issues that make the wrist collapse on impact
Loose glove fit, insufficient closure tension, and weak hand wrap anchoring often cause wrist collapse on impact. When the glove cuff does not lock the wrist in a neutral position, the joint can rotate or hyperextend as force travels through the hand. Adjusting closure tightness and wrap compression can improve stability. The image shows where the glove cuff and hand wraps should anchor to prevent wrist collapse on impact. However, setup alone cannot compensate for poor punching alignment.
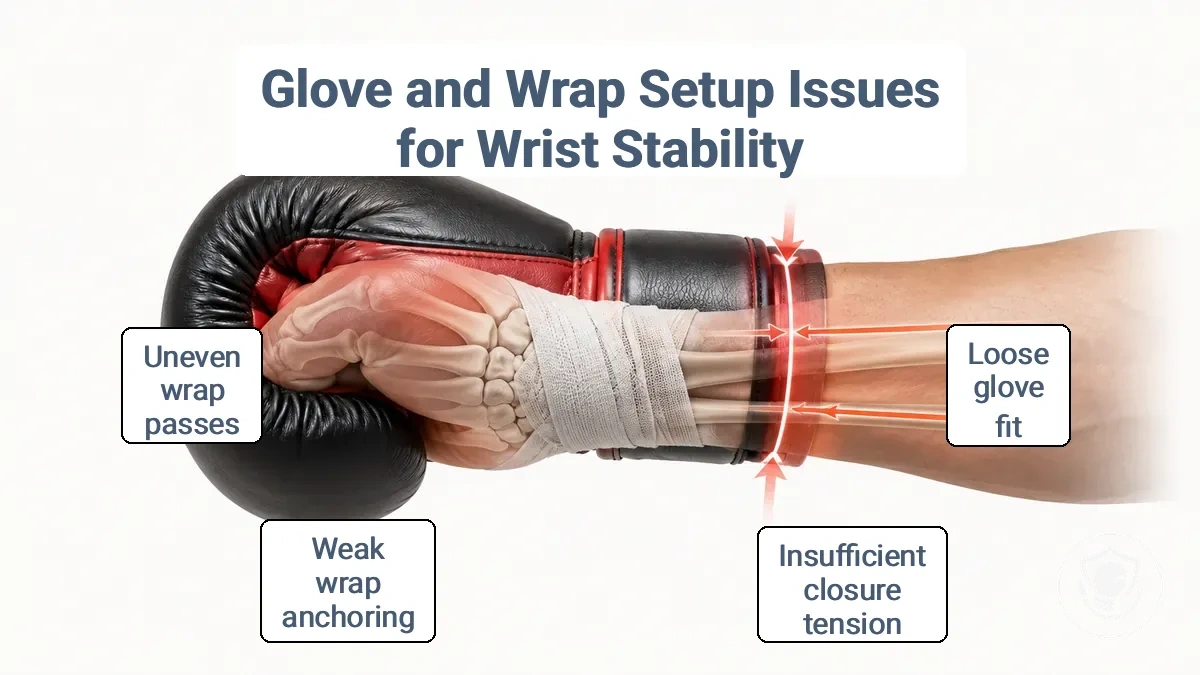
Three setup conditions—glove cuff fit, closure strap tension, and hand wrap anchoring—require verification before each session. The checklist below translates these setup issues into specific conditions to check.
- Glove wrist cuff that gaps or slides when making a fist → can allow the hand to shift inside, bending the wrist on contact.
- Hook-and-loop closure that does not hold the cuff snugly against the wrist → reduces wrist cuff stability and may cause rotation.
- Hand wraps that lack tension around the wrist anchor point → may fail to lock the wrist in a neutral position under load.
- Wrap tension that is too loose below the thumb → can compromise wrist stacking and may allow backward bend.
- Wrap passes that cross the wrist joint unevenly → can create pressure points and uneven support.
- Over-tightening wraps around the wrist → can restrict circulation and cause discomfort, mimicking instability but not solving it.
- Wrist cuff padding that is too thick or too thin relative to hand size → can alter the fit and can make closure less effective.
Changing one variable at a time can help isolate which factor affects wrist stability.
- Support failure: Wrapping too loosely or using an ill-fitting glove cuff may let the wrist bend or rotate on impact.
- Pressure pain from over-tight wrapping: Excessive wrap tension around the wrist can cause numbness or aching, which may be mistaken for a stability issue.
Glove fit and closure stability problems that let the wrist bend inside the glove
Loose closure strap tension or inadequate glove fit can let the wrist bend inside the glove during impact. Without a snug wrist cuff and secure closure, the hand shifts, deviating from the straight wrist line—this slop or drift increases pain risk.
- Loose closure strap reduces cuff stability and leaves slack between the wrist cuff and the hand, allowing the wrist to shift even during light contact and increasing bend risk on each punch.
- Excessive space inside the glove (glove looseness) lets the hand drift from its intended position, which can change wrist angle at impact.
- When the closure strap is not tightened evenly, one side may remain loose, causing asymmetrical wrist support and potential deviation.
- Weak or worn hook-and-loop closure may not maintain tension during a session, allowing progressive slop to develop.
- After a few exchanges, re-test the glove fit on light contact: if you still feel movement inside the glove or sense wrist bend, the fit or closure needs adjustment before heavy work.
Check your glove's wrist cuff and closure stability using the glove fit checks before your next session.
Wrap support mistakes: tension, overlap, and missing wrist anchoring
Incorrect wrap support—poor tension, uneven overlap, or missing wrist anchoring—can cause wrist pain or instability because hand wraps reinforce alignment rather than replace it. Tension and anchoring determine whether the wrap helps or hinders; the key balance is support versus circulation.
- Too much wrap tension can create pressure points and restrict circulation, leading to discomfort.
- Too little tension can leave gaps that fail to stabilize the wrist, allowing excessive bend and risk of collapse.
- Missing wrist anchoring or ignoring the thumb loop can cause the wrap to shift or loosen, reducing support and often requiring reapplication.
- Uneven overlap can create uneven compression, leading to localized irritation or pressure pain.
- Wrapping too high on the forearm can leave the wrist exposed, reducing stability.
- Wrapping too low on the hand can fail to lock the wrist, allowing movement beyond safe range.
- Skipping the circulation check after wrapping may lead to numbness or tingling; if these signs appear, loosen the wrap immediately.
See the full method for how to wrap hands correctly.
Wrist wraps vs hand wraps: what each supports and what they don’t
Hand wraps stabilize the hand structure and wrist together, while wrist wraps mainly add compression and support to the wrist. Compare them by the support area each covers and the limitation each addresses, based on correct application and the underlying failure pattern.
| Wrap type | What it supports | What it doesn’t support |
|---|---|---|
| Hand wraps (quick wraps / inner gloves) | Knuckles, wrist, and hand structure stability | Direct wrist compression or limitation of wrist extension |
| Wrist wraps | Wrist compression and wrist stability under load | Hand structure or knuckle alignment |
| Hand wraps | Reducing impact and distributing force across the hand | Isolating wrist support if alignment is the root issue |
| Wrist wraps | Limiting excessive wrist movement during pressing or overhead work | Distributing impact across the hand |
Neither wrap style fixes poor alignment on its own; alignment and technique still matter regardless of the wrap chosen.
Impact and training-load causes of wrist pain (especially on a heavy bag)
When wrist pain appears despite correct hand wraps and decent gloves, training load on a heavy bag is often the overlooked cause. The repetitive impact from a dense bag can transmit force through the wrist joint, especially when small alignment errors are present. A heavy bag frequently amplifies this stress because its firm surface offers less give than a partner's pads or a speed bag.
A hard bag combined with high punch volume creates conditions where wrist stress accumulates quickly. Both a harder target and higher volume can independently stress the wrist, but they affect the joint through different mechanisms.
Fatigue sets in, technique breakdown becomes more likely, and even minor wrist misalignment can trigger pain flares. When training load is high, your 14 oz vs 16 oz glove choice can alter how much impact reaches the wrist and how quickly fatigue builds. Use this checklist to separate bag hardness, volume, and intensity as distinct factors, since fatigue can blur which variable is causing wrist pain.
- Test with a softer bag or reduce bag hardness if your gym has options available.
- Reduce session volume by several rounds over several training sessions.
- Lower punch intensity to a controlled, consistent level during bag work.
- Increase rest intervals between rounds to allow better recovery.
- Check whether pain appears later in the session, which points to fatigue as a factor.
- Test different levels of contact force on the heavy bag, using lighter contact for a full training block.
- Log how many total punches you land per session and correlate them with pain onset.
- Evaluate whether your wrist hurts more after the first round or the last round.
Make one adjustment at a time: reduce load first, then re-test your form.
This chart shows the main causes of wrist pain from heavy bag training and a diagnostic checklist to isolate bag hardness, volume, and intensity factors.
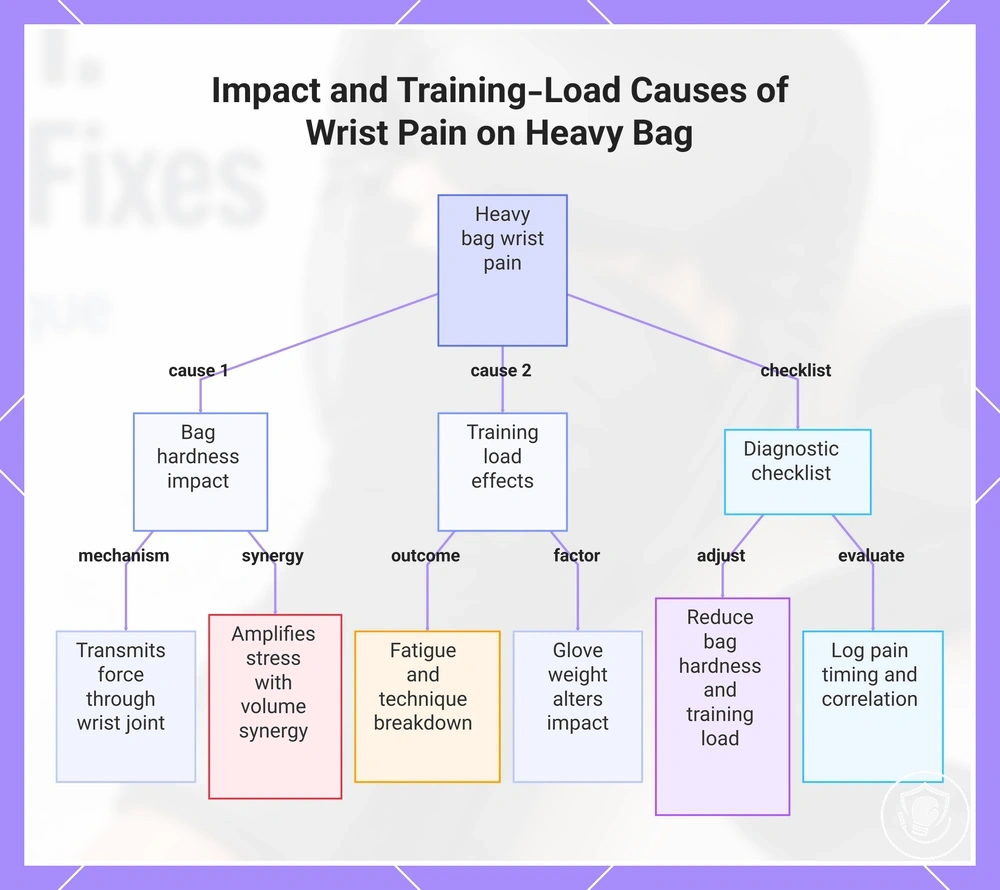
Heavy bag density and swing: why harder targets amplify wrist errors
Bag density and bag swing change the feedback your wrist receives at contact. A denser, harder bag offers less give, so misalignment in your fist or wrist can be transmitted as a bend or twist rather than being absorbed by the target. A bag that swings freely adds a moving target that can catch your hand at an angle, increasing the chance of a glancing contact that torques the joint.
Rather than hitting harder through discomfort, test safe adjustments to distance, power, and target selection. These changes reduce the harsh feedback and lower wrist stress while keeping your workout productive.
- Increase your distance from the bag so your fist meets it at full extension rather than at an angle.
- Reduce punching power until you can feel clean, centered contact on every strike.
- Choose a softer bag or a lighter target if your current bag is extremely dense and unyielding.
- Time your punches to meet the bag at the peak of its swing rather than when it is moving toward or away from you.
- Focus on keeping your wrist straight and your fist aligned with your forearm through the entire punch.
- Keep contact light while testing, and pause between combinations to reset your stance and check your hand position before the next burst.
Power, fatigue, and volume: how wrists fail late in rounds
Fatigue and accumulated volume late in rounds cause wrist pain spikes and loss of alignment control. As form breaks down, errors accumulate, which can trigger a pain flare.
- Wrist angle drift — loss of neutral position during punches.
- Sloppy contact — impact feels jarring and less clean.
- Reduced guard return — hands drop after combinations.
- Increased clinch or missed shots — coordination suffers.
- Slower reaction time — hands feel heavy.
- Wrist or forearm pain persisting between rounds.
- Difficulty maintaining proper fist position — wrist collapses on impact.
- Stop or scale down intensity as a test before your next session if you notice two or more of these markers.
Technique Faults That Bend or Twist the Wrist at Contact
Technique misalignment at the moment of impact is a common cause of wrist pain, even with proper gear. A straight wrist line through the knuckles at contact helps transfer force safely; any unintended bend or twist can redirect force into the joint. This misalignment typically shows up at contact rather than in the setup.
Common faults that introduce unwanted bend or rotation at the contact point:
- A bowed (flexed) wrist at impact closes the angle and can shift knuckle alignment, which can result in off‑center contact on the bag surface.
- Excessive wrist extension (cupping the hand back) reduces the straight‑line connection from forearm to knuckles, which can force the joint to absorb more shock.
- Supination (rotating the palm upward) through impact twists the wrist and can pull the contact point toward the thumb side of the hand.
- Pronation (rotating the palm downward) before contact can collapse the wrist laterally at the moment of impact.
- Flipping the wrist too early (breaking the wrist angle before impact) can dissipate power and may force the wrist to bear load in a weakened position.
- Holding the wrist too rigidly in a bent position (either flexed or extended) can prevent the natural stacking that distributes force.
- Off‑center contact from any of these faults can increase torque on the wrist ligaments, especially when punching at speed.
More wrist support may not fix a bent wrist at impact. The correction starts with one fault — identify it, practice a lighter punch with a straight wrist line, then re‑test lightly before adding speed.
This chart shows the main categories of wrist technique faults that occur at the moment of impact, including bending, rotation, and timing/rigidity faults, which can lead to wrist pain and off-center contact.
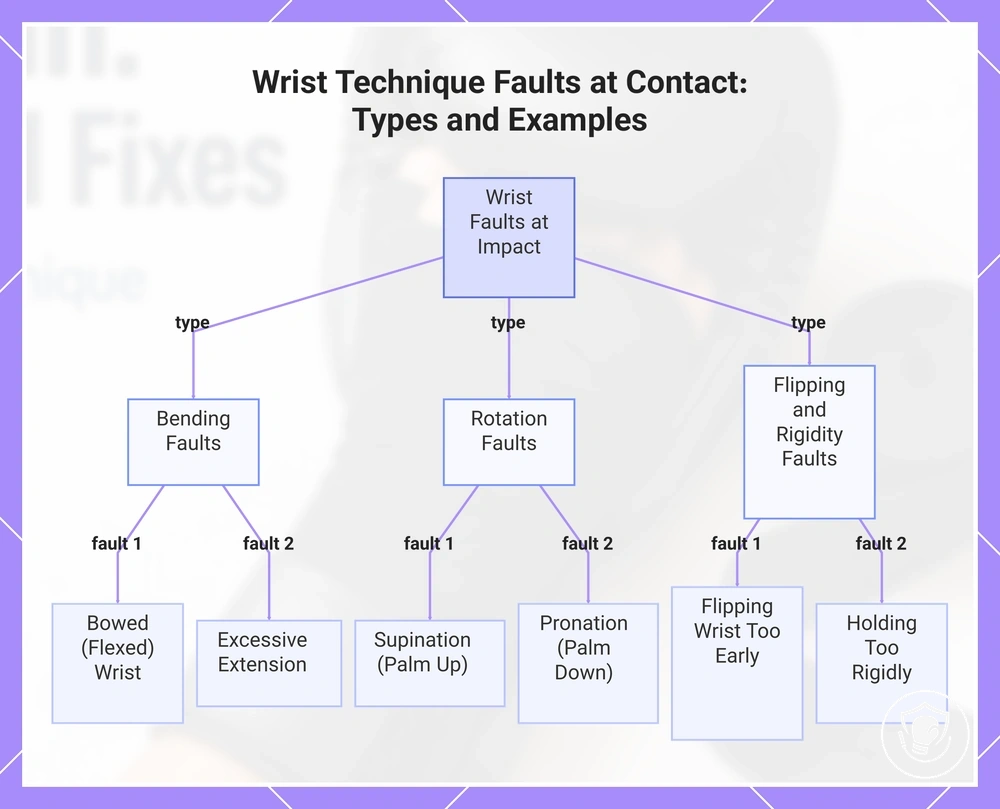
Wrist Alignment at Contact: Stacking Knuckles, Wrist, and Forearm
Stacking means aligning your knuckles, wrist, and forearm so they form a straight line from the knuckles to the forearm at the point of contact. This position helps keep the wrist stable and allows force to travel through your arm without stressing the wrist.
- Focus on your top two knuckles as the contact point—they tend to line up with the wrist.
- Keep your wrist neutral, not bent upward or downward, so the forearm and hand stay aligned.
- Feel the straight line running from your forearm through your wrist to your knuckles just before impact.
- Practice at low power, using this alignment cue on each slow strike.
Targeting and contact-point mistakes that force the wrist to fold or rotate
Off-center contact and poor targeting produce glancing contact when the fist strikes at an incorrect distance or angle, transmitting torque that forces the wrist to fold or rotate beyond its natural range.
- A contact point too far toward the thumb side can rotate the fist open, pulling the wrist into extension and increasing torque.
- Off-pinky contact can force the fist to close abruptly, rotating the wrist shut and causing it to fold under stress.
- Striking below the target can create a sudden deceleration that snaps the wrist into flexion or extension.
- Clipping the top of the target with the fist edge may extend the wrist suddenly as the arm deflects upward.
- An overly steep punch angle can produce a glancing blow that twists the wrist sideways, especially when the alignment is off.
- Rolling the wrist mid-strike to steer the punch often results in off-center contact and an awkward fold at impact.
- Aiming too far left or right without adjusting stance or fist angle can force the wrist to rotate unexpectedly when the target is struck off-center.
- Rushing a punch with the fist too open or closed can leave the wrist in a vulnerable position, increasing the risk of painful rotation or folding.
For instance, stepping too close can produce a glancing hit that forces the wrist to rotate off-center and creates torque.
Immediate fixes: re-fit, re-wrap, and reduce impact stress
Immediate relief for wrist pain during boxing often begins with better support and lower impact stress, while testing one change at a time. Begin with support adjustments—re-fitting and re-wrapping—before modifying load. View each adjustment as a test, not a guaranteed fix.
- Re-fit gloves to be snug but not tight; a loose fit increases wrist movement—re-test and check if pain decreases.
- Re-wrap hands with even tension across wrist and knuckles, avoiding wrinkles; re-test pain response.
- Add an extra wrist strap or brace to limit excessive extension; this may reduce bending pain—check how it feels.
- Reduce punching force by using lighter contact on bag or pads; see if pain decreases.
- Reduce punch count per round to allow wrist recovery; monitor pain response.
- Switch to a softer target like speed bag or focus mitts; these absorb more shock—note whether pain decreases.
- Check wrist alignment during each punch; if wrist bends under load, adjust technique or support to keep it straight.
Stop immediately if the pain sharpens or persists through multiple tests.
This chart shows the immediate steps to relieve wrist pain during boxing, starting with support adjustments, then load reduction, and including technique checks and safety warnings.
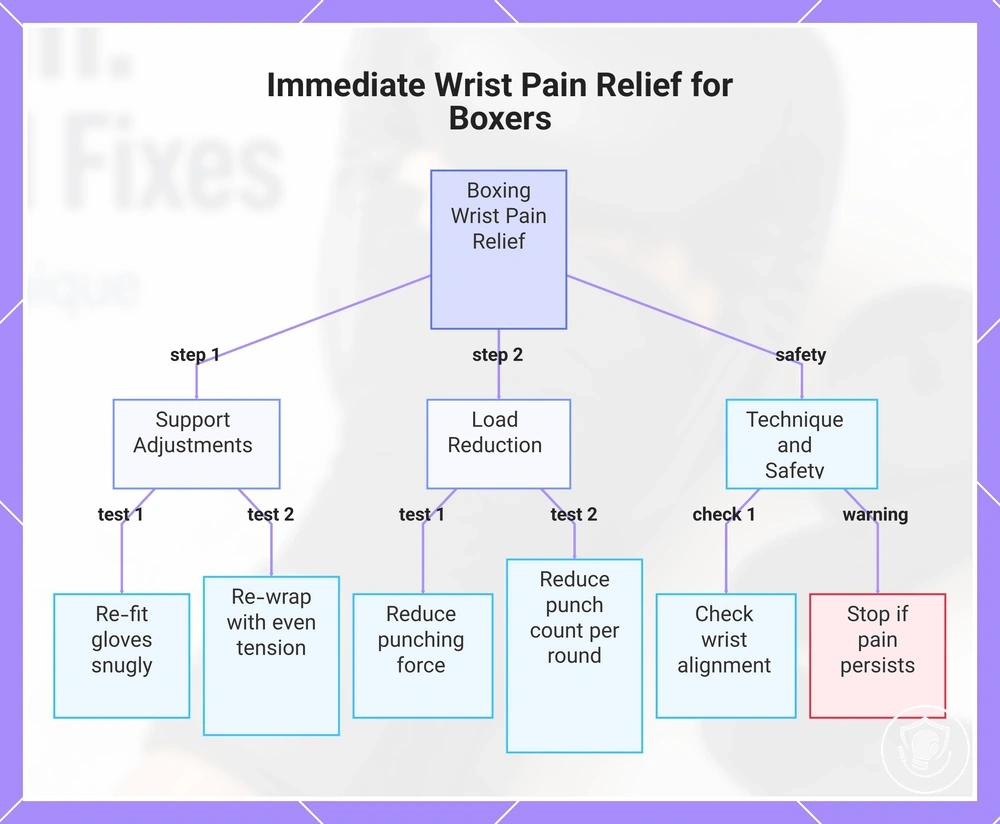
Re-fit the glove so the wrist stays stacked and secure during punches
Excessive movement inside the glove can cause the wrist to drift off alignment on impact. Re-fitting the cuff and closure reduces that movement, keeping the wrist stacked and improving comfort when fit is the cause.
- Loosen the closure and re-seat the hand so the palm and fingers sit snugly against the lining.
- Position the cuff so it wraps evenly around the wrist, then tighten the strap to a secure tension to prevent the wrist from shifting when making a fist.
- Fine-tune the closure to eliminate any remaining slop around the wrist without over-tightening.
- Flex the wrist through its full range of motion to confirm stable cuff placement without pinching.
- Re-test on light contact, like shadow boxing or gentle bag work, to confirm the wrist stays stacked under load.
Wrap the wrist for stability without cutting circulation or blocking fist closure
Wrap tension and coverage stabilize the wrist without cutting circulation or blocking fist closure. Numbness or tingling indicate excessive compression; adjust tension to keep the wrap supportive without restricting circulation.
- Do anchor the wrap at the palm for a stable starting point.
- Do overlap layers evenly to distribute tension and maintain even pressure.
- Do keep the wrist neutral during application to preserve stability.
- Do adjust tension so the wrap feels snug without compressing the joint.
- Don’t pull so tight that it causes numbness or tingling in the hand.
- Don’t restrict thumb or finger movement when wrapping the palm.
- Don’t leave gaps that allow the wrap to loosen during use.
- Don’t ignore signs of restricted circulation; loosen and reapply as needed.
After wrapping, check fist closure to confirm the wrist remains mobile while supported.
Lower impact stress fast: change bag intensity, power, and punch selection
To lower impact stress on the wrist, start by temporarily reducing bag intensity, power, or punch selection and see if pain drops. This quick test helps confirm whether load, not technique or equipment, is causing the pain. The goal is to reduce peaks, keep control.
- Scale down punch power to reduce the force spike.
- Focus on speed and placement to make lighter contact.
- Limit hook and uppercut volume to decrease rotational torque on the wrist.
- Shorten rounds to avoid fatigue-driven technique breakdown and pain flare.
- Increase rest between rounds to improve recovery and re-test with control.
- Replace high-impact punches (crosses, hooks) with jabs and straights to lessen wrist strain.
- Stop if pain worsens; return to previous load level before retesting.
Support Options: When Wrist Braces, Extra Wrap Support, or Knuckle Padding Actually Help
Support options such as a wrist brace, extra wrap support, or knuckle padding can help when the dominant failure is a loss of stability or uneven pressure distribution, not when the problem originates from poor alignment or technique. Identifying the specific failure pattern—stability, pressure, or alignment—guides which support option may be appropriate.
Each failure pattern points to a specific support option that addresses it. For instability during bag work, a wrist brace that restricts motion may help; for circulation and anchoring needs, extra wrap support can provide compression; for contact discomfort, knuckle padding distributes pressure. Support is additive—it does not replace corrected setup and technique, and using it without addressing form can lead to dependency. The criteria below match each option to a failure pattern and its expected limitations.
- A wrist brace helps when instability during heavy bag work leads to wrist pain; it limits unwanted movement, but it does not correct poor punching alignment.
- Extra wrap support helps during longer sessions by providing compression for comfort and circulation, but it cannot stabilize a previously injured joint on its own.
- Knuckle padding helps when contact discomfort limits training; it distributes pressure to reduce knuckle pain, but it does not fix instability or alignment issues.
- A wrist brace may help at night by keeping the wrist neutral when uncontrolled bending disturbs sleep, but it will not relieve nerve compression from daytime motion.
- Extra wrap support may help when the wrist feels loose during weight-bearing exercises; it provides moderate stability through compression, but relying on it too much can mask instability that needs strengthening.
- Knuckle padding may help when bag work bruises knuckles; it absorbs impact and spreads force, but it does not correct punching form that causes excessive knuckle force.
- Test any support option with lighter contact first to confirm it alleviates the targeted issue without introducing new discomfort.
Question: Do wrist braces prevent wrist pain?
Answer: Wrist braces do not prevent wrist pain caused by poor technique or alignment, but they may help when pain comes from instability during specific activities.
Question: Should I use padding if my wrist hurts?
Answer: Only use padding when pain is from knuckle impact or pressure, not from instability or nerve compression.
This chart shows when each support option (wrist brace, extra wrap, knuckle padding) is appropriate based on the specific failure pattern, along with key limitations and testing advice.
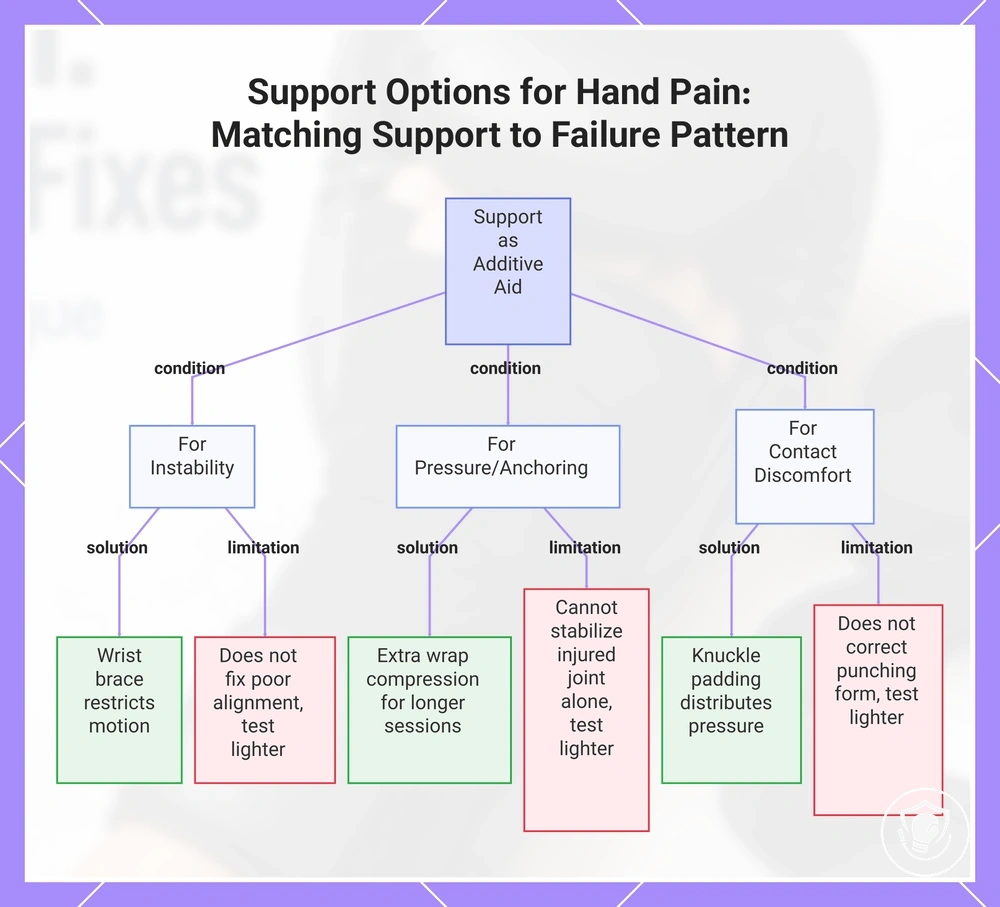
Choosing wrist brace support vs more wrap support based on the failure pattern
The failure pattern you observe during training determines whether a brace or a wrap is the better choice. The decision comes down to four criteria: stability, comfort, range of motion, and training type.
- If pain occurs when the wrist is fully extended during bag work, a brace that restricts motion can provide the needed stability, but may limit mobility during other drills.
- If soreness builds after lighter sessions, a wrap that anchors the joint without restricting movement supports comfort, though it offers less protection against high-impact loads.
- If you notice bruising or sharp pain at the joint line, a brace may offer more direct pressure relief, yet it may feel bulky under gloves.
- If discomfort is diffuse and comes from repetitive micro-movements, a wrap helps with circulation and proprioception, but it may loosen during longer sessions.
- If you need to preserve hand speed and dexterity, a wrap allows more range of motion, though it does not prevent extreme wrist deviation.
- If the wrist feels unstable when pushing against resistance, a brace holds the joint in a neutral alignment, but may transfer load to the forearm.
- If you are between training types and want to test support level, start with a wrap then add a brace if the pattern does not improve.
- After identifying the pattern, choose the minimum support that solves the pattern.
For example, the same boxer might need a brace for heavy bag work to control wrist extension, yet switch to a wrap during shadow boxing when comfort and freedom of movement matter more.
Gel knuckle pads and extra padding: what they fix vs what they can’t fix
Padding improves contact comfort and pressure distribution across the knuckles, but it does not address wrist torque or alignment.
- Helps: Redistributes pressure across the knuckles, which can reduce localized irritation.
- Helps: Cushions impact on the bag or mitts, which can improve contact comfort during heavy sessions.
- Helps: May reduce knuckle irritation that sometimes radiates into the hand and wrist area.
- Helps: Provides a thin barrier that can smooth out glove fit when the external padding is too stiff.
- Does not help: Does not correct wrist alignment or stabilize the wrist joint during impact.
- Does not help: Does not reduce wrist torque generated by improper punching mechanics.
- Does not help: Cannot substitute for proper hand wrapping or support from the glove's wrist closure.
- Does not help: Limited effect on deep wrist pain that originates from tendon or ligament strain.
Fix the driver, not the symptom — padding alone rarely addresses structural wrist issues.
Return-to-training progression and basic wrist conditioning for beginners
Return to normal training after wrist pain by rebuilding tolerance while keeping alignment stable. The progression is gradual and guided by pain, with each step depending on load increase and a stability check. Progress only when pain is stable.
- Pain-free range of motion: Begin with wrist flexion, extension, and side-to-side movements with no added weight; proceed if pain-free.
- Light resistance: Add a resistance band or light weight for resisted wrist flexion and extension, keeping volume low and alignment stable, then re-test for pain before moving on.
- Controlled wrist movements: Progress to wrist curls with a light dumbbell or a household object, performing several controlled repetitions, and step back one stage if pain returns at the same load.
- Static gripping: Hold a soft ball or towel in a fist for a few seconds to build grip strength without sudden loading; re-test stability before advancing.
- Dynamic wrist movements: Add towel wringing or banded rotation pull-aparts to increase range of motion under controlled tension, and increase intensity only when pain stays stable.
- Light bag work: Start with light, short rounds of shadow boxing or very light pad work, focusing on form and wrist alignment, and ramp up volume gradually only if pain remains stable.
- Return to heavier bag work last: This stage requires full tolerance to previous steps; begin with moderate power and monitor wrist reaction, stepping back if the same load triggers pain.
If wrist pain persists: what to change next, what to rule out, and when to get checked
Persistent wrist pain after adjusting your setup or training load signals that it is time to reassess rather than push through. This checklist organizes when to stop training versus when to scale down; it provides decision support, not a medical diagnosis.
- Red flags
- Swelling, warmth, or redness around the wrist — stop training and consider getting checked.
- Numbness or tingling in the hand or fingers — stop and seek evaluation.
- Weakness that makes gripping or holding objects difficult — stop and get a professional assessment.
- Fever along with wrist pain — may signal infection; stop and see a provider.
- Visible deformity or inability to move the wrist — stop and seek immediate care.
- Severe pain that does not improve with rest — stop and consult a professional.
- Functional limitations
- Difficulty gripping or lifting items you normally handle — scale down or stop based on severity.
- Reduced range of motion that prevents full wrist or finger movement — reassess before resuming training.
- Pain that returns as soon as you restart activities like typing or carrying — consider reducing load or stopping.
- Loss of coordination or dropping objects — stop and seek evaluation.
- Persistence patterns
- Pain that remains the same or worsens after a period of rest — schedule a professional evaluation.
- Pain that occurs when the wrist is at rest — a caution sign that requires reassessment.
- Pain that flares up each time you return to training — a clear stop signal until examined.
- No improvement after modifying your setup or technique — move toward getting checked.
When in doubt, stop—these red flags are decision guides, not medical opinions.
Question: Is it normal for boxing to hurt your wrists?
Answer: Some discomfort can occur as you adapt, but persistent pain that lingers after training or appears during daily tasks is not normal. It signals something that needs addressing rather than pushing through.
Question: When should I see a professional?
Answer: Seek a professional assessment when red flags are present or when functional limitations continue despite modifying your routine. Delaying evaluation when warning signs exist may lead to longer recovery or further irritation, so it is safer to get checked early.