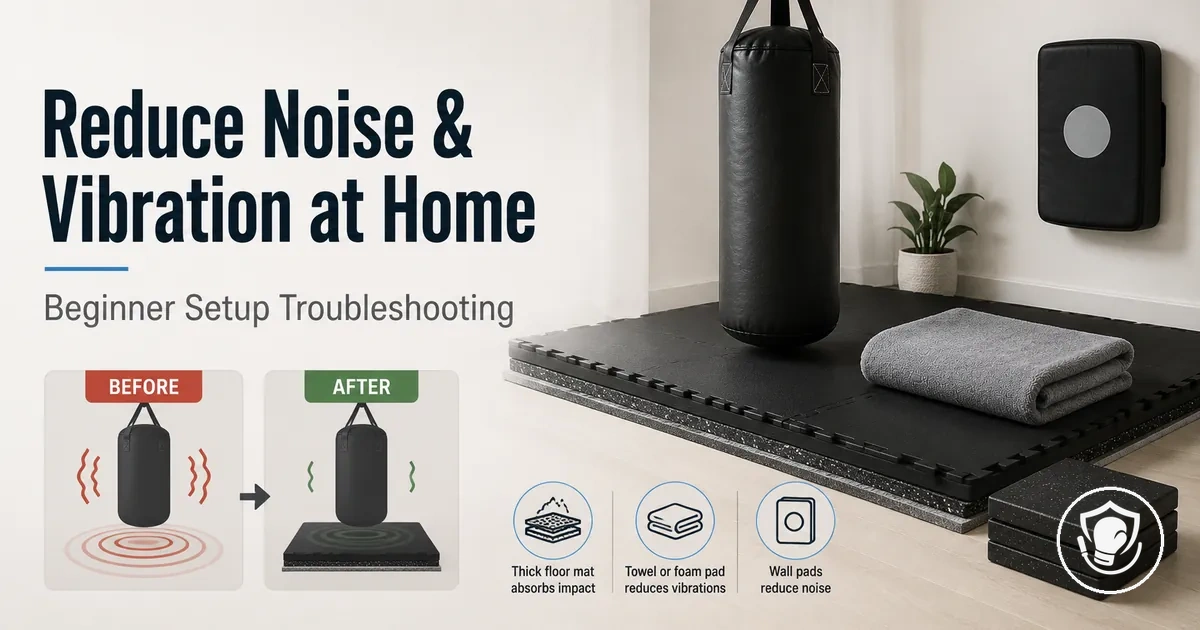
Reducing Punching Bag Noise and Vibration at Home
Reducing disturbance from a punching bag at home means separating two distinct problems: audible noise from impact and rattle, and physical vibration that travels through the floor and building structure. Noise often includes the echo of punches off room surfaces and the rattle of chains or mounting hardware, while vibration shows up as a low thud or shake felt in adjacent rooms. The effectiveness of any fix depends on your bag type, mounting method, floor type, and building construction. For a broader overview of essential gear, see the home boxing equipment hub. This page focuses on practical reduction and correct fix selection rather than structural construction projects.
Every part of your setup contributes differently: the bag itself produces impact sound, the stand or mount can amplify rattle, and the floor transmits vibration. When you hear a rattling chain or mount, the likely cause is loose hardware or metal‑on‑metal contact that can be damped with padding. When you feel a floor shake, the problem is often vibration transmission that requires isolation between the bag base and the floor. If you see rattle, suspect the mounting; if you feel vibration, suspect the floor interface.
Beginner safety and stability should remain intact when applying any fix. Over‑isolating the bag may reduce noise but could introduce movement that makes the bag unsafe to strike. Isolation reduces transmission through the floor, not the impact sound at the bag itself. The priority is to first identify whether your disturbance is primarily noise (audible) or vibration (felt), because the solution differs.
Noise vs Vibration in a Home Boxing Setup and Why the Fixes Are Different
Noise reduction and vibration reduction are two distinct challenges in a home boxing setup. Mixing them up often wastes time and money. Airborne noise travels through the air and bounces off hard surfaces, creating echo or clang. Structure-borne vibration travels through the wall and floor as a low-frequency rumble or shake. Buying foam panels to silence a floor rumble is often ineffective because the problem passes through solid structure rather than through the air.
A common mistake is to treat every loud sound as noise, but the transmission paths differ. Airborne noise echoes off hard surfaces and can be reduced with soft materials. Structure-borne vibration travels through the mount into the building frame and requires isolation. Which path dominates depends on room construction and mount contact.
Noise vs vibration in a home boxing setup — the diagram below shows the two transmission paths. 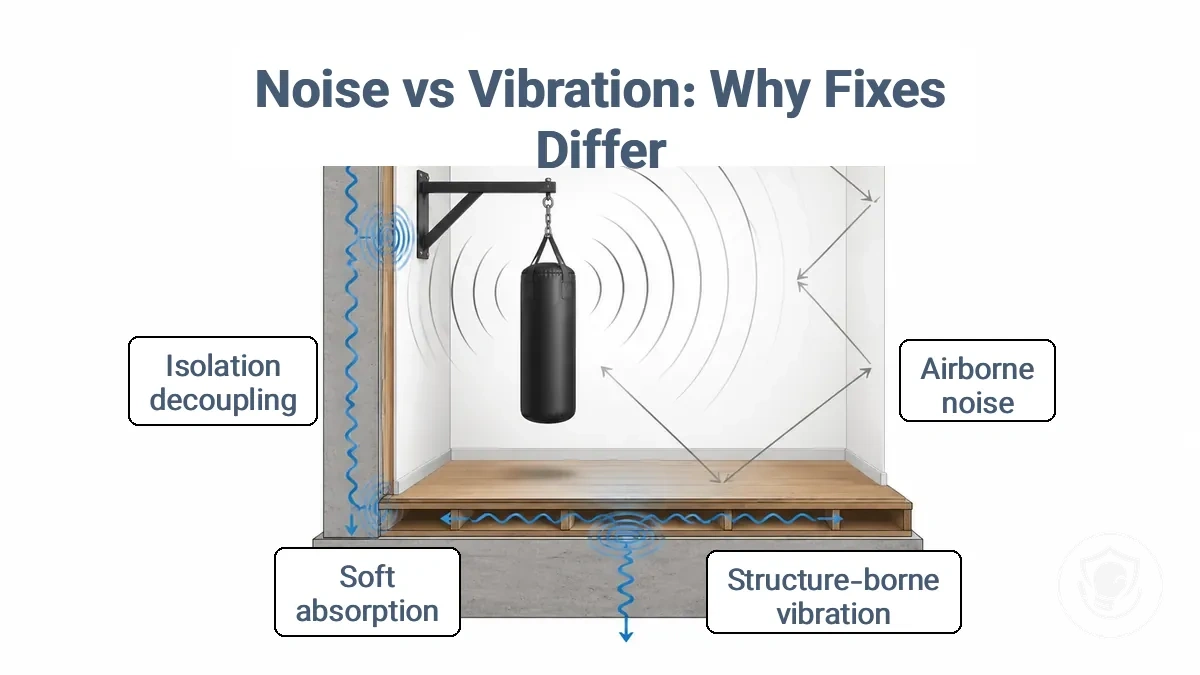
Imagine the same loud complaint in two different rooms: in one, a sharp echo off bare walls; in another, a deep thud that shakes the floor. Sorting the symptom into the correct category is the first step toward choosing a fix that actually works.
- Sharp echo in the room → Noise → Add soft surfaces (absorption).
- Floor rumble felt downstairs → Vibration → Use isolation pads (decoupling).
- Clanging from metal swivel → Noise → Lubricate or dampen (absorption).
- Wall shaking with each hit → Vibration → Add isolation or mass (decoupling).
- Tinny sound echoing off hard walls → Noise → Add soft surfaces (absorption).
- Low-frequency thud through floor → Vibration → Use isolation mats (decoupling).
- Rattling of loose parts → Vibration → Check and tighten (decoupling).
- Pinging sound from bag hitting board → Noise → Apply damping material (absorption).
Airborne Sound, Structure-Borne Vibration, and Resonance Through Floors and Walls
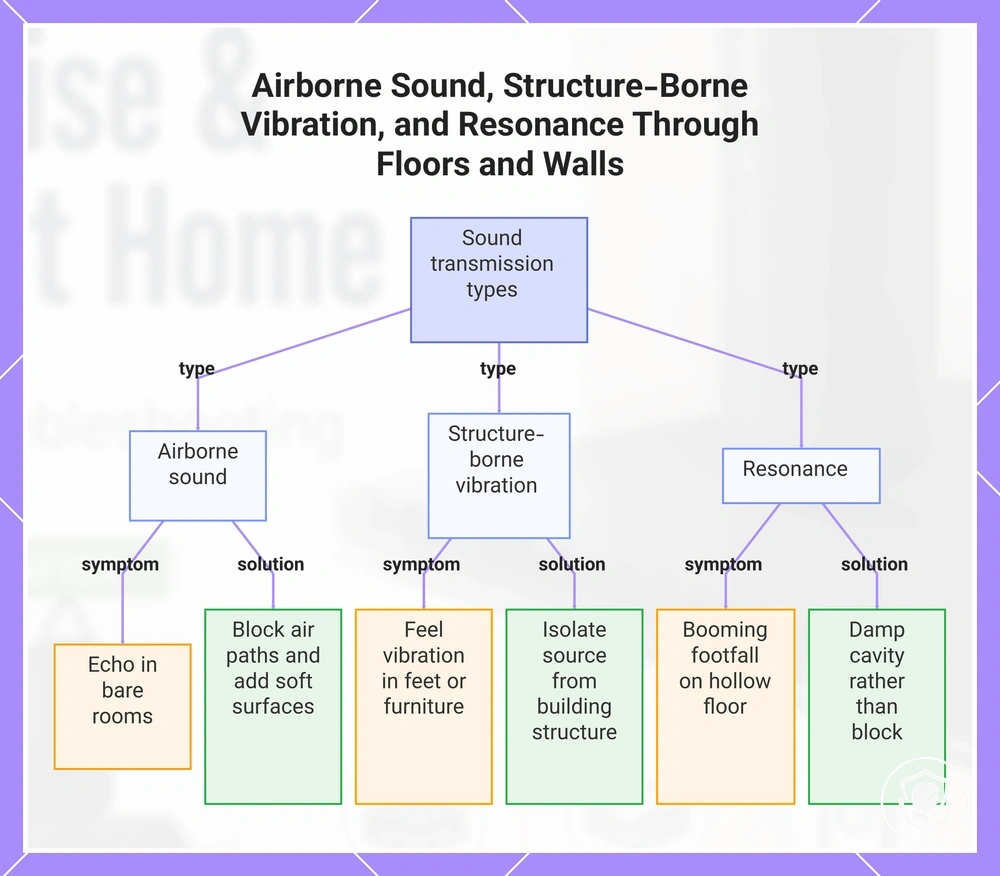
Airborne sound travels through air as pressure waves, reflecting off hard surfaces and creating echo in bare rooms. Reducing it often requires blocking air paths and adding soft surfaces.
Structure-borne vibration moves through solid materials like floors, walls, and framing along a vibration path, causing rattle from loose hardware or clang from metal chains. Reducing it often involves isolating the source from the building structure.
Resonance is a low booming sound that occurs when a hollow floor or wall amplifies an impact, making footsteps or dropped objects sound heavier. Resonance often indicates a cavity that requires damping rather than plain blocking.
- Footsteps on a hard floor → structure-borne vibration
- Voices carrying through a wall → airborne sound
- Booming footfall on a hollow floor → resonance
- Rattle from a loose chain or hardware → structure-borne vibration
- Echo in an empty room with bare walls → airborne sound
- Washing machine spin that shakes the floor → structure-borne vibration
- Slamming door that makes the wall hum → structure-borne vibration or resonance
If you feel it in your feet or furniture, treat it as vibration; if it lingers after the impact, treat it as echo or resonance.
This chart explains the three types of sound transmission through structures, their characteristic symptoms, and recommended reduction methods.
Quick Diagnosis: Identify the Main Source Before You Change Anything
The fastest improvement to noise or vibration comes from locating the dominant source before adding any gear or materials. One specific contact point or component usually produces most of the extra sound, so randomly chasing symptoms can waste time and money.
To isolate the main source safely, run these checks in order. Before starting, verify that your mount is stable and the bag has enough clearance from walls and ceiling.
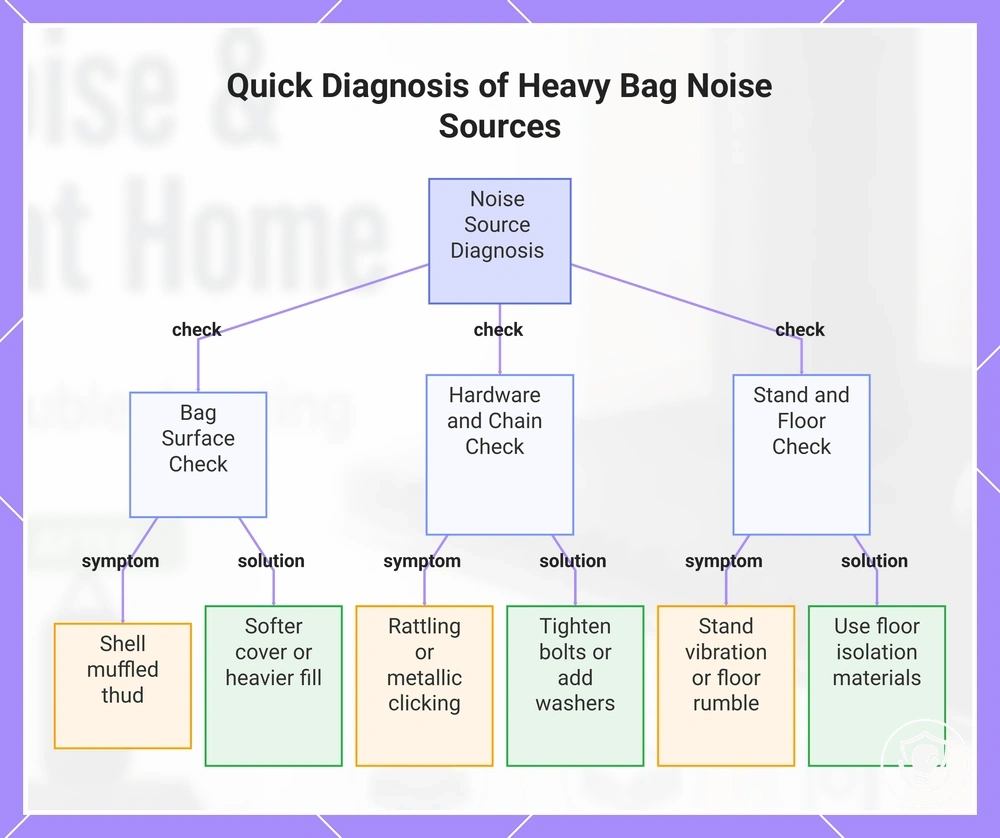
- Bag shell. Listen closely to the bag surface while it swings. If you hear a muffled thud or slap, the shell material itself may be transmitting impact noise. That change suggests you may need a softer outer cover or heavier fill.
- Hardware attachment. Hold the chain or swivel lightly while the bag moves. If rattling or metallic clicking reduces, the hardware may be loose. This often means bolts need tightening or that washers can help.
- Stand frame. Place a hand on the stand base while the bag is in use. Feel for strong vibration that travels into the floor. If the noise changes when you lift the base slightly, prioritize floor isolation instead of bag modifications.
- Floor contact. Listen for a low rumble that seems to come from below. If the sound changes when you place a mat or pad under the base, the floor contact may be amplifying vibration. Floor isolation materials usually help here.
- Wall contact. Watch or feel for any contact between the bag and the wall during a swing. Even slight brushing can transfer thumping into adjacent rooms. If contact occurs, increase clearance or adjust the hang point.
- Chain vs. strap. Hold the chain during a swing and listen for changes in noise compared to when it hangs freely. If the noise changes, the chain links may be the source; prioritize checking the hardware attachments.
- Apartment edge case. In shared buildings, complaints may come from low‑frequency transmission through floors even when the sound in the room seems modest. If your tests point to structural vibration, floor isolation (like a gym mat or platform) is often the first fix, not adding mass to the bag.
This chart shows the main checks to identify the dominant noise source from a heavy bag: bag surface, hardware, and stand or floor issues.
Impact Thud, Chain Rattle, Frame Creak, Sliding Base, and Wall Contact Signals
This table maps each noise or movement signal to its most likely source, a quick check, and the first corrective action. Use it to narrow down the cause; start with the loudest or most repeatable signal.
| Signal | Most likely source | Quick check | First action |
|---|---|---|---|
| Impact thud | Floor contact vibration or base transmission | Rock the bag; listen for a dull floor thump | Add a vibration-absorbing mat or tighten base to floor |
| Chain rattle | Loose chain or worn swivel | Shake the chain; feel for slack | Lubricate or tighten chain; replace swivel if worn |
| Frame creak | Loose frame joint or dry bushing | Twist the frame; listen for squeaks | Lubricate joints or tighten fasteners |
| Sliding base | Insufficient friction between base and mat or floor | Push the base; check if it slides easily | Reposition the base mat or add friction tape |
| Wall contact | Bag swing path too close to wall | Measure clearance between bag and wall | Relocate bag or shorten swing arc |
| Metal clang | Loose metal part contacting chain or frame | Inspect for washers, bolts, or other loose parts | Secure or pad the contact point |
| Base wobble | Base not fully seated on mat or uneven floor | Check base flatness and mat grip | Level base and re-seat mat |
| Sharp creak | Dry or tight joint rubbing under load | Lubricate joints and test | Apply silicone lubricant or replace bushing |
If two signals overlap—for example, a rattle and a thud occur together—start by addressing the most likely contact or looseness issue. Often, fixing a loose chain or base contact reduces or eliminates the echoing noise. If the overlapping signals persist after tightening and padding, move on to echo-based adjustments.
Floor and Base Isolation Using Rubber Mats and Vibration Isolation Pads
Place a rubber mat or vibration isolation pads under the base to decouple the equipment and add damping, reducing vibration transfer through the floor structure. This can result in less rumble and floor shake, though the setup helps reduce transmission, not the direct impact sound of the bag.
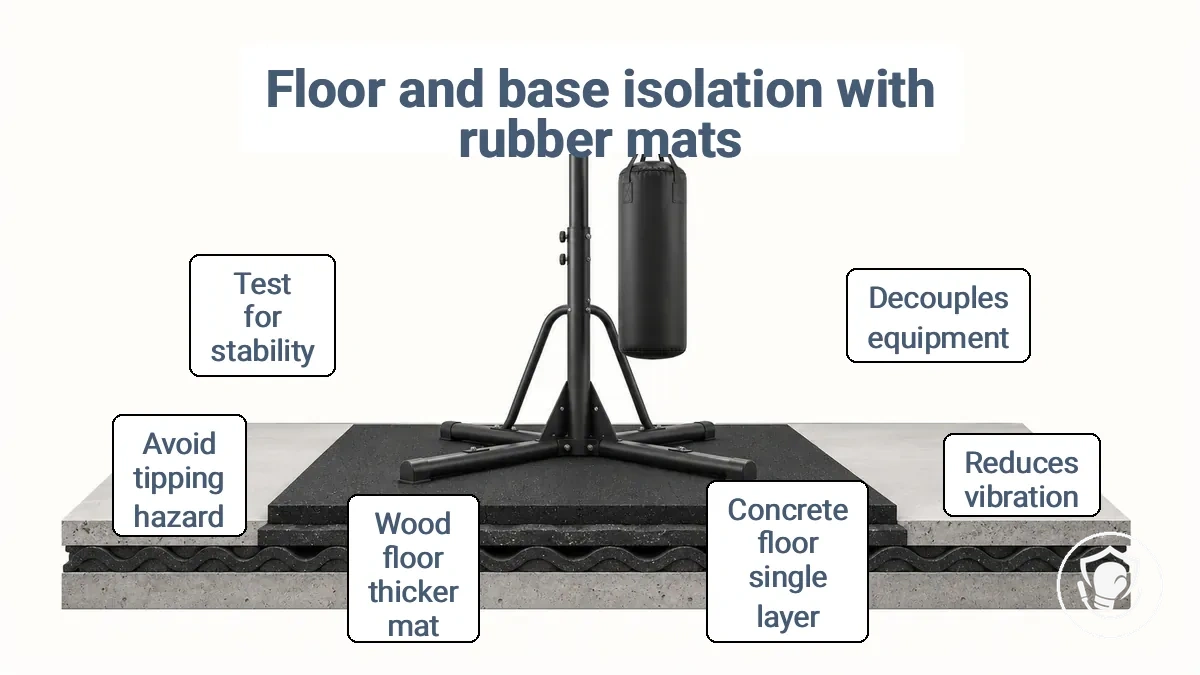
On a concrete floor, a single layer of isolation pads may be enough to reduce noticeable vibration. On a wooden floor, a thicker rubber mat or stacked pads can provide additional damping.
Use pads when you feel a rumble or shake through the floor; if the issue is a rattle from loose components, tighten hardware first. After installing the first layer, test the setup by doing light strikes and checking for movement. If vibration persists, consider a floor protection setup under the equipment.
Adding more layers improves damping but also raises the equipment, which can create a tipping hazard if the stack becomes unstable. If the setup wobbles or feels unstable, reduce the height or number of layers until stability is restored.
Before adding additional layers, verify these conditions:
- The isolation material provides sufficient traction to prevent sliding during strikes.
- The surface under the mat is level and free of debris.
- There is enough clearance around the equipment to avoid contact with walls or furniture.
- The setup shows no wobble when lateral force is applied.
- The distance from the equipment to any shared wall is adequate to minimize transmission.
- Each layer is properly aligned and secured if stacked.
- After each change, test the setup by performing typical movements and confirm that vibration has decreased without compromising stability.
Layering Pads and Mats for Better Damping Without Making the Setup Unstable
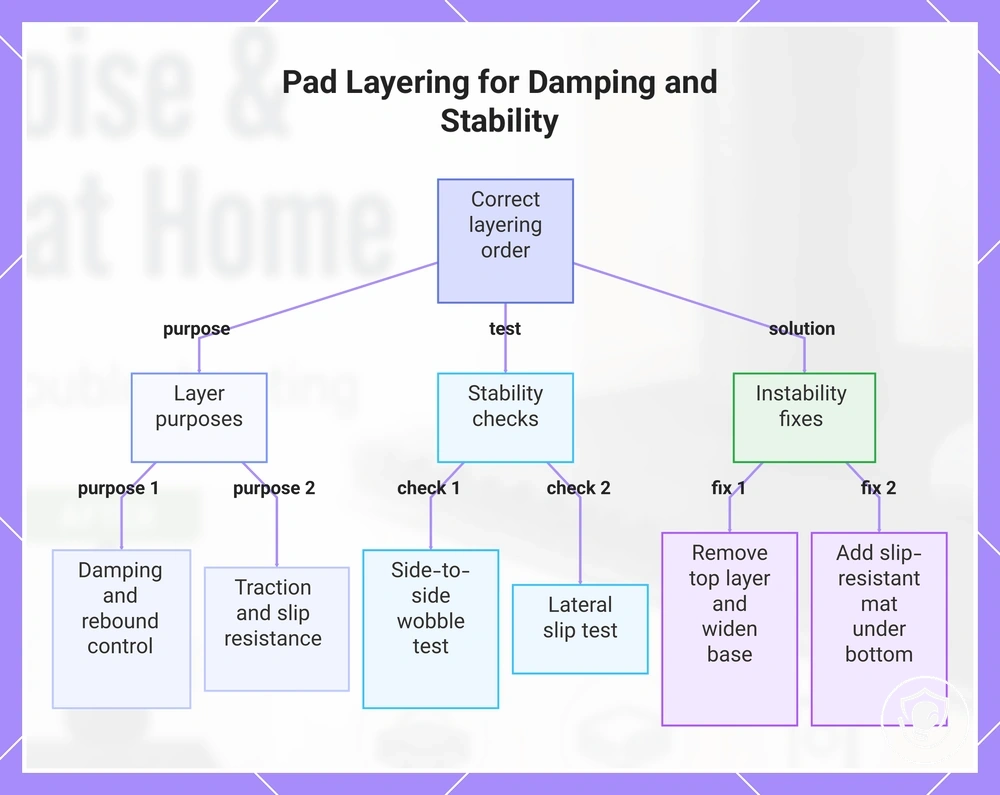
The order of layering matters: incorrect order increases wobble and vibration, while correct order reduces both. Each layer serves a different purpose: damping, decoupling, and traction. A taller stack can amplify instability, so lower height usually provides more stability.
- Place the first layer directly under the device base with a damping material that compresses under load and rebounds slowly. Gently push the top of the device to check for side-to-side wobble.
- Add a second layer of a similar but slightly stiffer material to help control rebound speed and reduce bounce. Test that the stack compresses evenly across the footprint without tilting.
- Set the bottom layer with high surface friction against the floor or shelf so the whole stack is less likely to slide during use. Push the base laterally to confirm the traction keeps it in place.
- Apply the full weight of the device and watch for any lateral movement or rocking. If the stack shifts, add a slip-resistant mat under the bottom layer or roughen the contact surface.
- If wobble increases after adding a layer, remove the topmost layer and widen the base footprint instead.
This chart shows the correct order of layering pads for damping, the key stability checks, and the solutions for wobble or sliding.
When Anti-Vibration Pads Reduce Noise and When They Cannot
Anti-vibration pads help when noise travels through the floor or building structure. These bullets separate good-fit from poor-fit cases to help you match the fix to the path (air vs structure).
Pads typically change floor transmission more than the strike sound at the bag.
Good fit signs:
- Floor rumble that coincides with equipment operation, especially when the main noise complaint occurs in a room directly below or adjacent, suggests structure-borne transmission that pads usually help with.
- A low-frequency hum that travels through walls or floor points to vibration coupling rather than airborne noise.
- Rattle or vibration in nearby objects on the same floor suggests the vibration path runs through the structure.
- Noise reduces noticeably when you place pressure or weight on the equipment or floor, showing that decoupling can help.
Poor fit signs:
- A clear echo or reverberation in the room suggests airborne sound reflecting off hard surfaces, not floor transmission.
- A sharp impact or click rather than a continuous rumble often points to direct airborne sound or loose hardware.
- Rattling from the equipment housing or loose fasteners suggests mechanical noise that pads alone usually cannot fix.
- A high-pitched noise that travels through the air typically is not affected by pads placed under the equipment.
- Vibration that seems to come through walls or ceiling rather than the floor is usually not addressed by pads under equipment feet.
Quieting Hanging Bag Hardware: Chains, Swivels, Mount Points, and Spring Dampers
Clangs, squeaks, or rattles from a punching bag often come from the hardware: chains, swivels, carabiners, and mount points. Before troubleshooting, pause heavy strikes if the mount feels unstable—structural weakness can lead to failure.
Metal-on-metal contact between chain links, loose carabiners, and dry swivels often cause rattles. Before adjusting hardware, review safe placement and mounting.
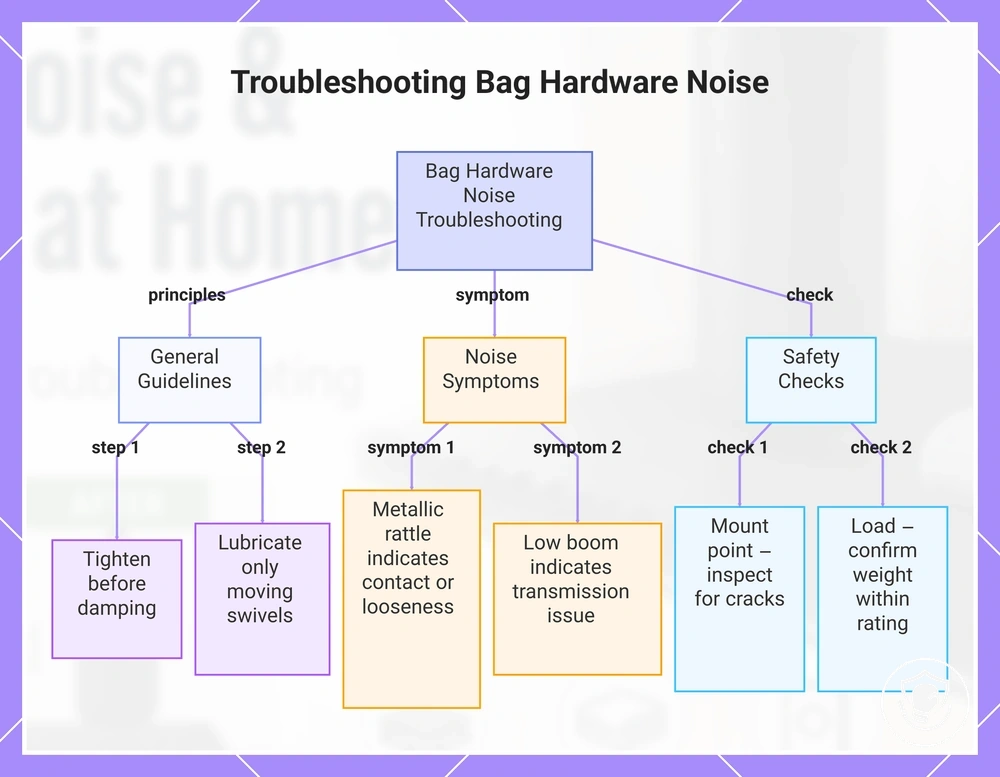
Tighten or stop contact before adding damping—damping won't fix loose parts. A metallic, repeatable noise indicates contact or looseness; a low boom indicates transmission.
Lubrication is only appropriate for moving parts like swivels, and only with the right type. Excess lubricant on chains or mount points can attract debris and reduce friction grip. If unsure, prioritize safety verification over quick fixes.
Caution: Pause heavy strikes if the mount shifts.
- Chain: Check for bent links or rust. Bent links cause rattle; replace if damaged.
- Carabiner: Confirm gate closes fully. Loose gate means risk; replace immediately.
- Swivel: Rotate and listen for squeak. Dry squeak indicates need for lubrication.
- Mount point: Inspect for visible cracks. Cracks indicate structural risk; pause use.
- Spring damper: Ensure spring is tightly attached. Loose spring adds clang; tighten.
- Bolts: Tighten all mounting bolts. Loose bolts cause vibration; secure with tool.
- Clearance: Verify bag does not hit ceiling. Contact can cause low boom; adjust height.
- Load: Confirm total weight within hardware rating. Overloading can lead to failure; reduce weight.
This chart shows the main principles, noise symptoms, and safety checks for quieting hanging bag hardware.
Using a Spring Damper Safely Without Increasing Sway and Secondary Noise
A spring damper reduces transmitted vibration only when the mount is rigid and clearance is sufficient, allowing it to lower low-frequency boom and bounce. When clearance is tight or the mount flexes, it may increase swing amplitude and cause secondary noise from contact.
Helps when:
- A rigid mount helps reduce low-frequency vibration transmission to the ceiling.
- Sufficient clearance lets the bag swing freely without touching walls or fixtures.
- A damper tuned to the natural frequency reduces peak resonance without adding secondary bounce.
- Place the damper where sway is largest, near the top of the suspension.
- Matching the bag weight and spring rate prevents bottoming out or over-extending.
Hurts when:
- With insufficient clearance, increased swing may cause contact with walls or fixtures.
- A flexible mount causes the damper to make the mount sway, transmitting more vibration.
- A damper too stiff or too soft for the bag weight amplifies bounce instead of damping.
- Adding a damper without checking swing amplitude may cause the bag to hit nearby surfaces despite initial clearance.
- Lack of a rigid ceiling anchor shifts movement to the anchor point, creating secondary noise.
If the bag starts touching walls or ceiling fixtures after adding the damper, remove the damper or change placement to restore safe clearance.
Controlling Bag Movement That Creates Extra Noise in Small Rooms
Limited clearance around the swing path is a common cause of noise in small rooms. The bag hits walls or furniture, and the stand wobbles against the floor. These contact events amplify noise more than you expect.
If clearance is tight, reposition the bag to increase distance from walls, especially shared walls.
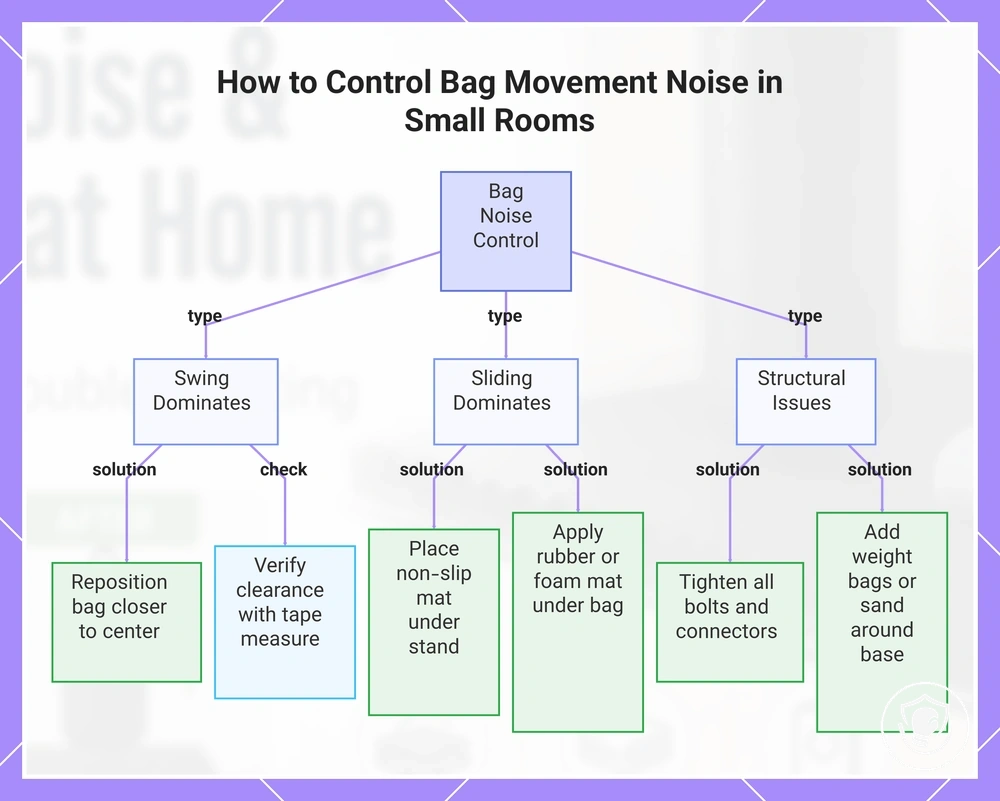
When swinging dominates, review your small space setup choices for placement and travel limits; when sliding dominates, address friction with a mat or pad. If you cannot increase clearance, reduce movement through placement and travel limits — the following checklist focuses on preventing contact and wobble.
- Excessive swing path: reposition the bag closer to center to minimize wall contact — verify clearance with a tape measure.
- Bag hitting adjacent wall: adjust suspension or stand position to create at least a few inches of clearance — check for no contact during test swings.
- Stand wobble on hard floor: place a non-slip mat under the base to dampen vibration — check for reduced wobble during use.
- Bag sliding across the floor: apply a rubber or foam mat to increase friction — slide the bag gently to verify stability.
- Repeated contact with a shared wall: increase distance from that wall by at least a few inches — listen for reduced thudding.
- Loose hardware causing rattles: tighten all bolts and connectors — shake the stand gently to check for no movement.
- Base shifting under heavy hits: add weight bags or sand around the base to stabilize — push the bag sideways to test resistance.
This chart categorizes bag movement noise issues by swing, sliding, and structural causes, with direct solutions.
Stopping a Freestanding Bag From Sliding and Turning Footwork Into Impact Noise
A freestanding bag that slides across the floor with each punch converts footwork into impact noise. The steps start with no-cost adjustments and lead to simple stabilization changes that can reduce sliding before increasing power.
- Check the floor surface: smooth floors (tile, wood, laminate) lower friction and increase slip; push the bag to gauge sliding.
- Place a high-friction mat under the base to improve traction and reduce sliding; check that the base stays in place after a strike.
- Fill the base with sand instead of water to add weight and reduce shifting; check movement after a punch.
- Add extra weight (sandbags or weight plates) to the base if it has pegs or space; test with a short combo and observe remaining slide.
- Position the bag so its back edge touches a wall or corner; this can limit backward travel and reduce overall movement.
- Mark the base edge with tape and re-check movement after 10 strikes; if the tape line shifts, repeat one of the earlier steps for further stabilization.
Caution: When adding weight, make sure the base remains stable and does not tip over during use. Traction improvements help but cannot eliminate all movement on every surface.
Reducing Room Echo With Soft Surfaces and Noise Reduction Foam Panels
Echo in a room occurs when sound waves reflect off hard surfaces—walls, floors, windows—causing the sound to linger and blur speech. Adding soft surfaces and foam panels controls these reflections, reducing perceived echo and harshness. Echo control improves what you hear in‑room; isolation handles what travels through floors.
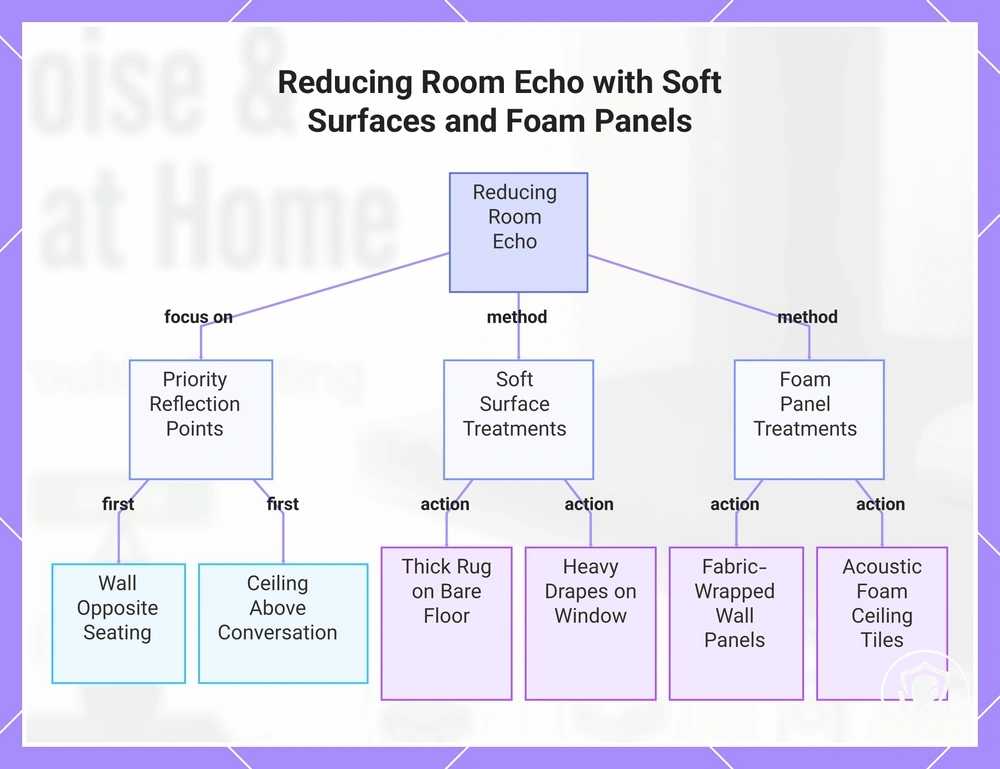
A room with tile floors, bare walls, and large windows reflects sound freely, making conversations tiring. Prioritizing the most reflective surfaces—such as the wall opposite a seating area or the ceiling above a conversation zone—can yield the most noticeable improvement. Treat first reflection points first.
A common misconception is that foam panels soundproof a room. In reality, they absorb airborne noise and reduce echoes, but do not block sound from entering or leaving. If low‑frequency rumble or impact noise persists, combine echo control with structural isolation.
Focus on the following common reflection points for a noticeable change in echo:
- Hard wall → install fabric-wrapped acoustic panels → can reduce flutter echo and harshness
- Bare floor → add thick area rug with pad → can lessen footstep echo and hard reflections
- Large window → hang heavy drapes or curtains → can reduce harsh reflections from glass
- Flat ceiling → mount acoustic foam panels or tiles → can lower ceiling bounce and improve speech clarity
- Open corner → place a bookshelf or upholstered chair → can help scatter and absorb sound
- Empty wall → hang canvas art or a quilt → can add absorption without a full panel install
- Long parallel walls → add diffusers or soft panels on one wall → can reduce flutter echoes
This chart highlights priority reflection points and actionable treatments using soft surfaces and foam panels, while noting that foam panels absorb echo but do not block sound.
What Panels Can Improve vs What Requires Structural Soundproofing
Foam panels can reduce echo from punches and improve sound clarity in a home gym, but they are unlikely to stop vibration traveling through the floor or walls.
Match the fix to the sound path — airborne or structure-borne.
What panels can improve (airborne path):
- Echo from bag strikes and training sounds
- Reverb that makes the room sound chaotic
- Clarity of music or voice in the gym space
- Harsh reflections off hard walls and ceiling
- Overall noise level inside the room from equipment use
What panels are unlikely to change (structure-borne path):
- Floor vibration from a heavy bag or speed bag
- Noise transmitted to rooms below or next door
- Low-frequency thumping felt through the floor
- Impact sounds carried through joists and framing
- Vibrations from platform or mat movement
Apartment Reality Checks and Low-Impact Adjustments When You Can't Fully Isolate
Manage noise at its source in an apartment through placement, timing, and equipment choice. No single adjustment eliminates low-frequency transmission, and low-frequency travels farther through floors and framing than higher-pitched sounds.
Without building modifications, the most practical adjustments are clearance from shared walls, movement control during use, and limiting intensity during sensitive hours. The actual reduction in disturbance depends on the specific construction of the apartment, the sensitivity of the neighbor, and the type of surface under your equipment.
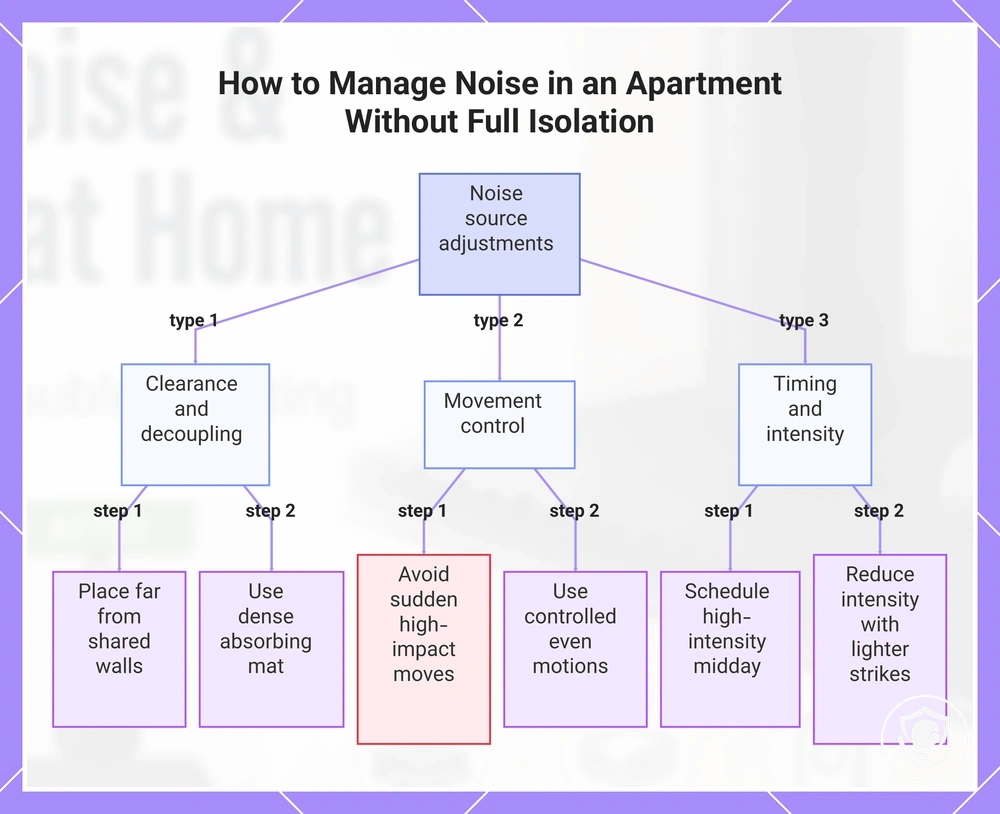
- Place your equipment as far as possible from any shared wall, especially from the wall adjacent to your downstairs neighbor's main living area.
- Use a dense, vibration-absorbing mat or platform under the equipment to decouple it from the floor and limit low-frequency transmission.
- Avoid sudden, high-impact movements (drops, heavy stomps) and instead use controlled, even motions that produce less floor impact.
- If your downstairs neighbor complains about deep thudding, prioritize isolation steps; if you hear sharp loudness in your own room, prioritize hardware changes (foam pads or diffusers) to manage in-room echo.
- Schedule high-intensity sessions for the middle of the day or when the downstairs neighbor is unlikely to be home or awake.
- Reduce overall intensity by using lighter strikes, lower settings, or shorter sessions when noise sensitivity is highest.
- Check for any loose floorboards or gaps near shared walls and cover them temporarily with a heavy rug or draft stopper to reduce sound leakage.
- Keep equipment off the floor entirely where possible—mount on a sturdy, padded stand or frame that adds clearance from the subfloor.
- Maintain consistent, low-impact practice patterns rather than unpredictable loud bursts, as rhythmic sound is often perceived as less intrusive by neighbors.
This chart shows the three main practical adjustments for reducing noise at its source in an apartment: clearance and decoupling, movement control, and timing and intensity.
Common Questions About Punching Bag Noise and Vibration Reduction at Home
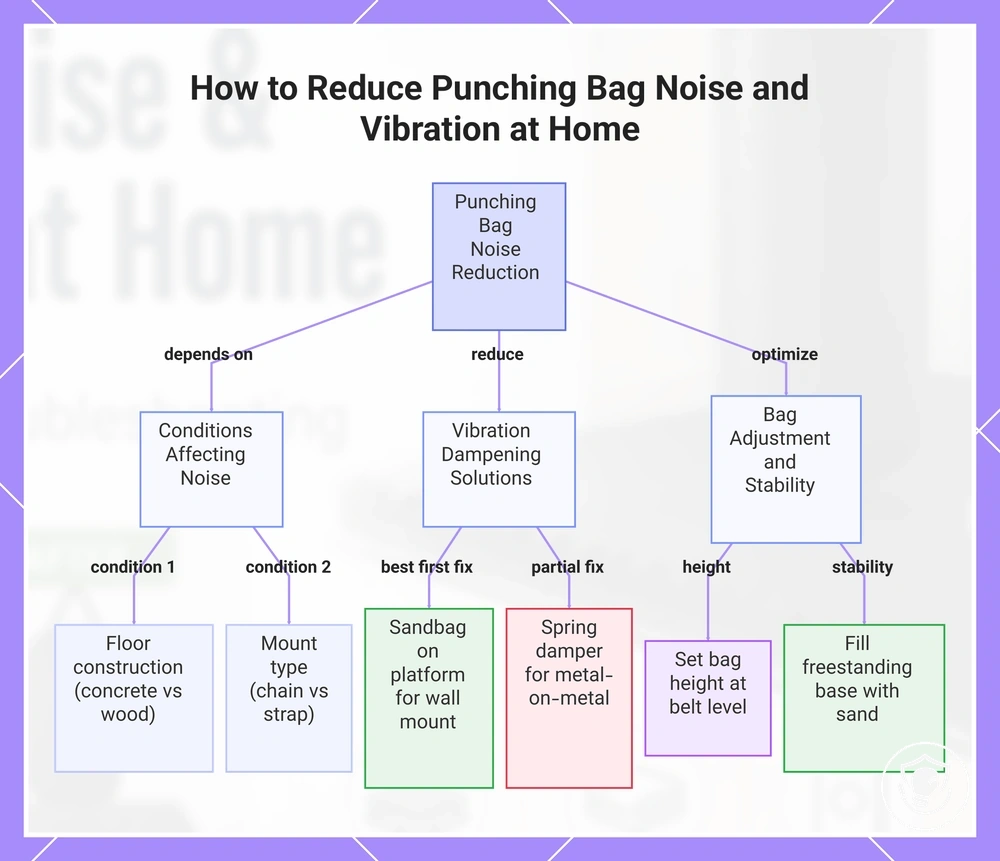
This FAQ covers quick checks and edge cases for whether a setup is quiet enough, whether a specific fix applies, and how to handle common residual concerns without repeating full procedures. Each answer depends on your floor, building, and bag mount conditions.
Can a heavy bag workout be quiet enough for an apartment?
It can be quiet enough in many apartments, but depends on floor and wall construction. Concrete floors and solid walls transmit less vibration than wooden joists and drywall, so a setup that works in one unit may be too loud for another. Adding a rubber mat under the bag and replacing metal chains with straps often reduces noise to an acceptable level for neighbors below.
Does putting foam panels on the wall stop the echo and rumble?
Foam panels reduce echo and high-frequency slap sounds but are less effective against low-frequency rumble that travels through floors and walls. The rumble comes from vibration in the structure, not from airborne sound. A sandbag on the platform or a padded mounting block between bracket and wall usually quiets the rumble more than foam alone.
Will a spring damper between the bag and the mount fix vibration?
A spring damper reduces noise from metal-on-metal contact and smooths rebound but may not eliminate vibration already transferred into ceiling or wall joists. The spring absorbs some shock before it reaches the mount, yet the mount still shakes if the structure is resonant. For wall-mounted bags, a sandbag on the platform is often the best first fix for damping structural shake.
How can I stop my freestanding bag from sliding on the floor?
A freestanding bag slides when the base is too light or the floor surface is slick. Filling the base with sand or water adds enough weight to keep it still, though sand usually provides a more stable anchor than water because it does not slosh. Placing a rubber or non-slip mat under the base also holds it in place without scratching the floor.
Should I use a mat under a hanging bag to protect the floor?
A mat under a hanging bag is not needed for floor protection since the bag does not rest on the floor, but it still helps reduce noise. Dropped weights or missed steps can damage a hard floor, and the mat catches sweat and impact. For vibration, the mat alone is usually insufficient because the bag's weight transfers energy through the ceiling mount.
Does the type of bag filler affect how much noise the bag makes?
Bag filler slightly affects noise because a softer bag absorbs more impact sound than a very firm one. Fabric-filled bags or bags with a loose sand core produce less thud than solid wrapped bags when struck. The filler change is small compared to the effect of mounting hardware and the wall or ceiling it attaches to.
Can I reduce noise by keeping the bag at a certain height?
Hanging the bag lower can reduce some shaking because it has less distance to swing and the mount experiences a shorter lever arm. A bag that is too low, however, forces you to punch downward, which transfers more vertical shock into the mount. A good starting point is belt height or slightly lower, then adjust upward if you feel the mounts vibrating through the structure.
Will switching to a double-end bag solve the noise problem?
A double-end bag creates less structural vibration because it is held by two elastic cords rather than one rigid mount, so it transfers less shock to the ceiling and floor. It is not a direct replacement for a heavy bag workout because it moves differently, but it can be quiet enough for some homes. The trade-off is that you need proper ceiling and floor anchor points that do not rattle.
This chart shows the key factors and solutions for reducing punching bag noise and vibration, including building conditions, dampening methods, and bag adjustments.
Fix-Order Checklist: Lowest-Cost Changes First, Then Targeted Upgrades
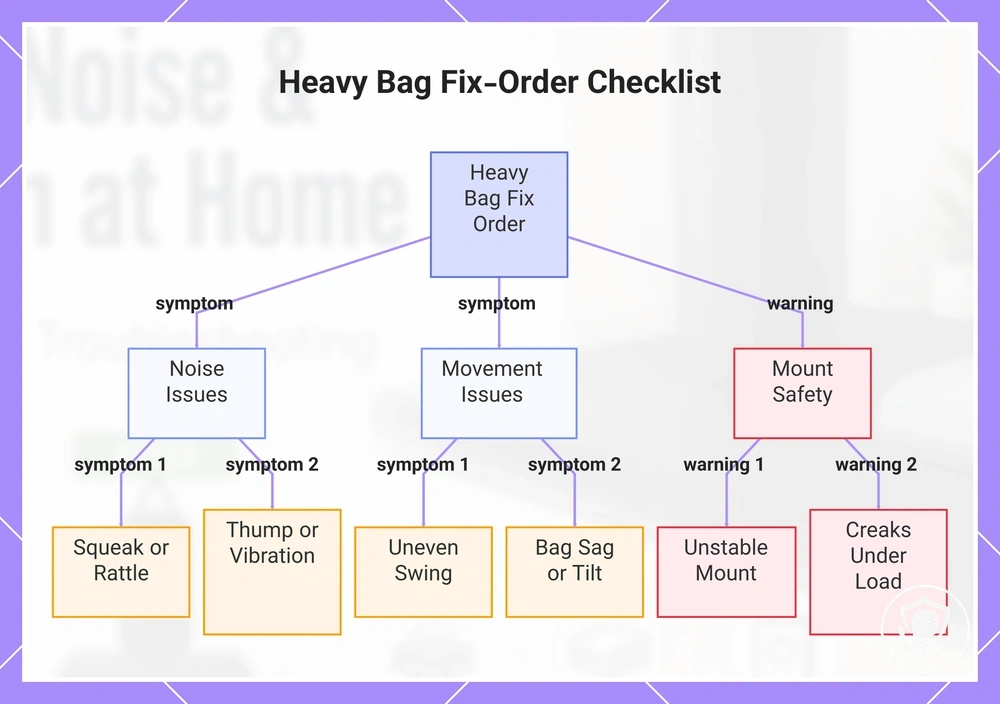
Begin by tightening loose hardware and stopping any contact or sliding. This sequence prioritizes the lowest-cost changes that give the greatest impact and least disruption. Change one thing, retest, then escalate if needed.
- Squeak or rattle after each hit — check joints and bolts visually. Tighten or apply thread-lock. Retest. If the sound continues, lubricate pivot points.
- Floor thump during use — verify by feeling the floor near the base for thump as you hit. If strong, add a rubber mat under the entire unit. Retest. If still present, escalate by isolating the mount from the floor.
- Bag swings unevenly with a thud — mark the bag position with tape. Adjust the clamp or add anti-slip material. Retest. If still sliding, check the mount interface.
- Rattling at joints when the bag moves — shake each joint by hand. Tighten set screws. Retest. If the rattling remains, apply lubricant or replace worn connectors.
- Echo after each punch — clap in the room and listen. Add soft furnishings or wall padding. Retest. If the echo persists, consider structural dampening.
- Caution: If the mount feels unstable or wobbles, stop for safety and check stability and footing immediately. Tighten anchor bolts only after verifying the base is secure. Do not use if tipping risk remains.
- High-pitched squeak on impact — move the bag slowly by hand to locate the source. Lubricate pivot points. Retest. If the squeak returns, replace bearings.
- Vibration that travels through the floor to other rooms — verify by feeling the floor in an adjacent room as you hit. If strong, add a heavy rubber mat under the entire base. Retest. Still transferring? Escalate by checking the mount interface.
- Bag sags or tilts to one side — visually check height adjustment. Level the bag using the adjustment knob. Retest. If it is still uneven, realign the mounting plate.
- Noise from the bag hitting the ceiling — measure clearance above the bag. Lower the bag height. Retest. If it still touches, relocate the mount to a lower position.
- Loose bolts after several sessions — inspect all fasteners weekly. Apply thread-locking compound. Retest. If they continue to loosen, replace with locking washers.
- Mount creaks under load — apply weight and listen. Tighten all mount-plate screws. Retest. If the creaking persists, inspect for cracks in the mount or wall bracket.
If noise or vibration remains after these steps, revisit placement and floor contact — those typically drive greater vibration outcomes. Adjusting bag position or adding a thicker floor pad often resolves what earlier steps missed.
This chart categorizes common heavy bag issues by symptom type and highlights the priority areas for inspection and repair.