
Home Boxing Equipment for Beginners: Safe Placement and Mounting Basics
Safe placement and mounting for a home heavy bag or punching bag means choosing the right location and attachment method so the bag fits your space, building structure, and training needs. Placement refers to where the bag sits in the room; mounting refers to how it hangs or stands. These basics apply to most home setups, though not to every installation type.
Every home setup has different ceilings, floors, and neighbor situations. The safest choice depends on the type of ceiling or wall, the load on the attachment point, how much clearance the heavy bag needs for a full swing path, and on rental rules and shared walls.
- Damage risk – hitting walls, ceilings, or nearby objects during training
- Injury risk – falling bag, poor clearance, or weak attachment points
- Noise and vibration complaints – structure‑borne sound that travels through floors and walls
For more on safe placement and mounting, visit the beginner home boxing equipment hub.
Safety-first scope: what this page covers and what it does not
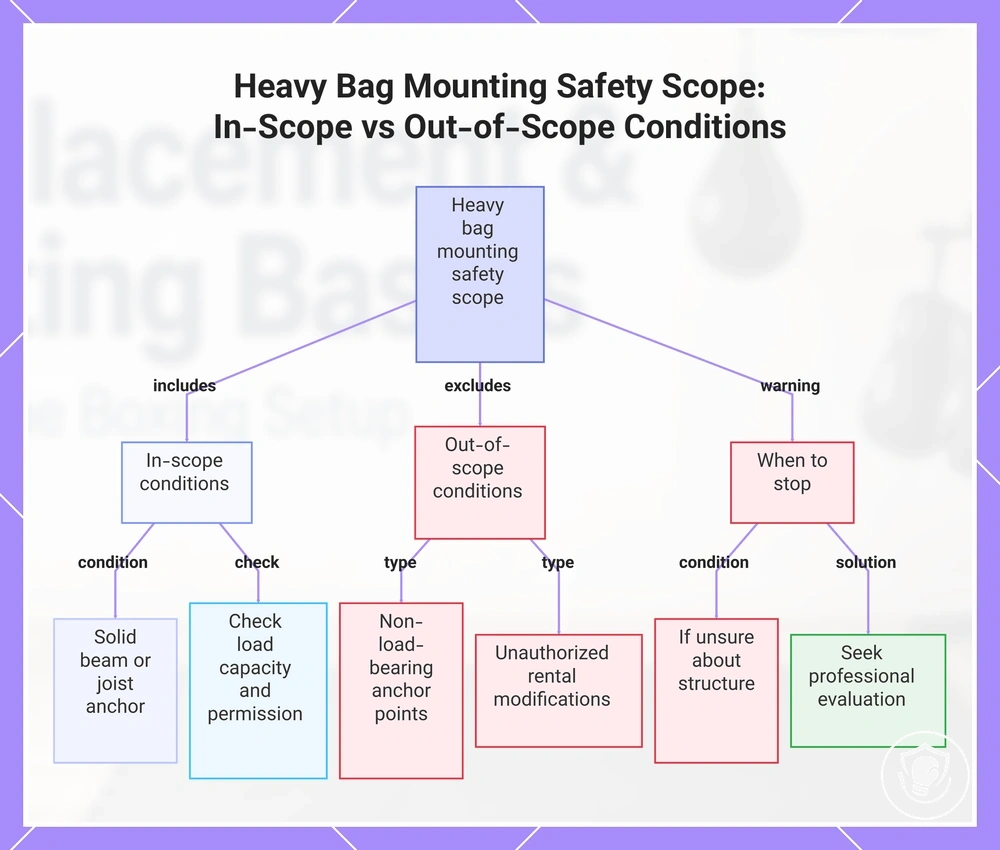
This page covers safe mounting and placement for home heavy bag equipment. It clarifies which situations you can handle on your own and which require permission or professional evaluation. The key boundary is distinguishing where the bag can physically fit from where it can be safely anchored.
Safe mounting means attaching a bag to a support that can bear the load safely. Unsafe mounting happens when the anchor point is not designed for dynamic weight or when modifications to a rental unit are made without permission. If you are unsure about the structure or do not have clear permission, stop and reassess before proceeding.
The following conditions differentiate in-scope from out-of-scope mounting situations:
- In scope
- Mounting on a solid beam or joist that can support the weight
- Using a single-point anchor designed for heavy bags
- Checking load capacity of the structure before installation
- Obtaining permission from a landlord or building manager before mounting
- Identifying unsafe anchor points such as drywall or ceiling tiles
- Out of scope
- Mounting on drywall alone without additional support
- Using a door frame not rated for dynamic loads
- Mounting on a suspended ceiling or weak ceiling fixture
- Modifying a rental unit without documented permission
- Assessing structural integrity of beams beyond visual inspection
If your mounting situation falls outside the in-scope conditions listed above, seek professional evaluation before proceeding. This page does not cover gear selection, training routines, or soundproofing. Confirm that your anchor point can support the weight and impact of your heavy bag before hanging it.
This chart shows the safe mounting conditions for home heavy bag equipment, including what is in scope, what is out of scope, and when to stop and seek professional evaluation.
Placing a Heavy Bag at Home: Clearance, Swing Path, and Target Height
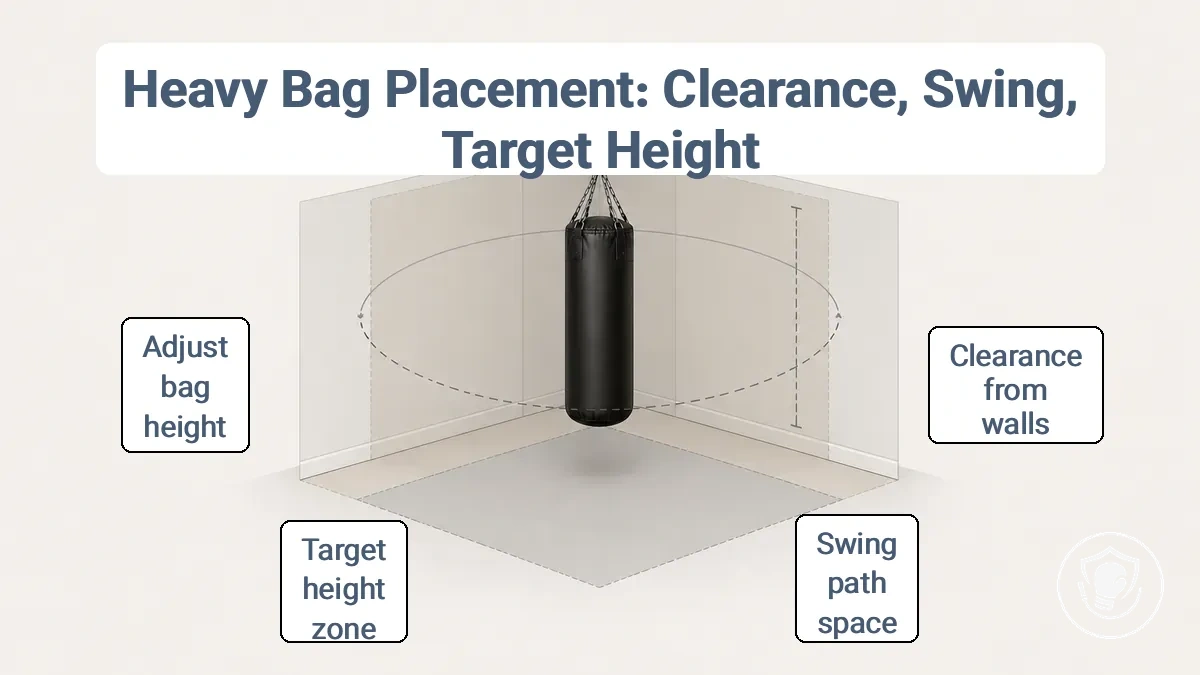
Placing a heavy bag at home means getting clearance, swing path, and target height right. Leave enough clearance from walls based on bag size and swing, and keep the swing arc within a clear zone that allows free movement.
Clearance and Swing Path
- Leave enough floor space around the bag based on bag size and your movement, so you can move without hitting walls or furniture.
- Check the swing arc—the bag can travel several feet when struck. Keep it far enough from walls and obstructions; clearance depends on bag movement and strike force.
- Allow room for your own stance and footwork, not just the bag's footprint.
Height and Target Alignment
- Position the bag so its striking surface covers your target zones: from mid‑thigh to above head for punches, and lower for kicks.
- For a 4‑foot bag, the bottom is often 24–36 inches from the floor; for a 6‑foot bag, 6–12 inches from the floor, depending on your height and training focus.
- The top should reach slightly above your head to practice head punches without overreaching.
- In a tight space, you might hang the bag higher to keep the bottom clear of obstacles, but this changes target availability.
Compare a tight home gym with an open garage. In a small room, you may have to compromise on swing by using a lighter bag or adding a bottom anchor to keep the bag more stable. In a larger space, you can let the bag swing fully and focus on proper target height. The best spot depends on the room layout and the type of anchor you choose.
For more on setting up in tight spaces, see small space setup plan. To protect your floors, check protect floors and surfaces.
Before you drill: load, structure, and apartment constraints that change mounting choices
Your choice of mounting method depends on your building's structure and living constraints, not on the bracket or brand. Begin by checking load-bearing capacity and lease terms.
The diagram shows the difference between a safe anchor point in a beam or stud and an unsafe spot in drywall or hollow space.
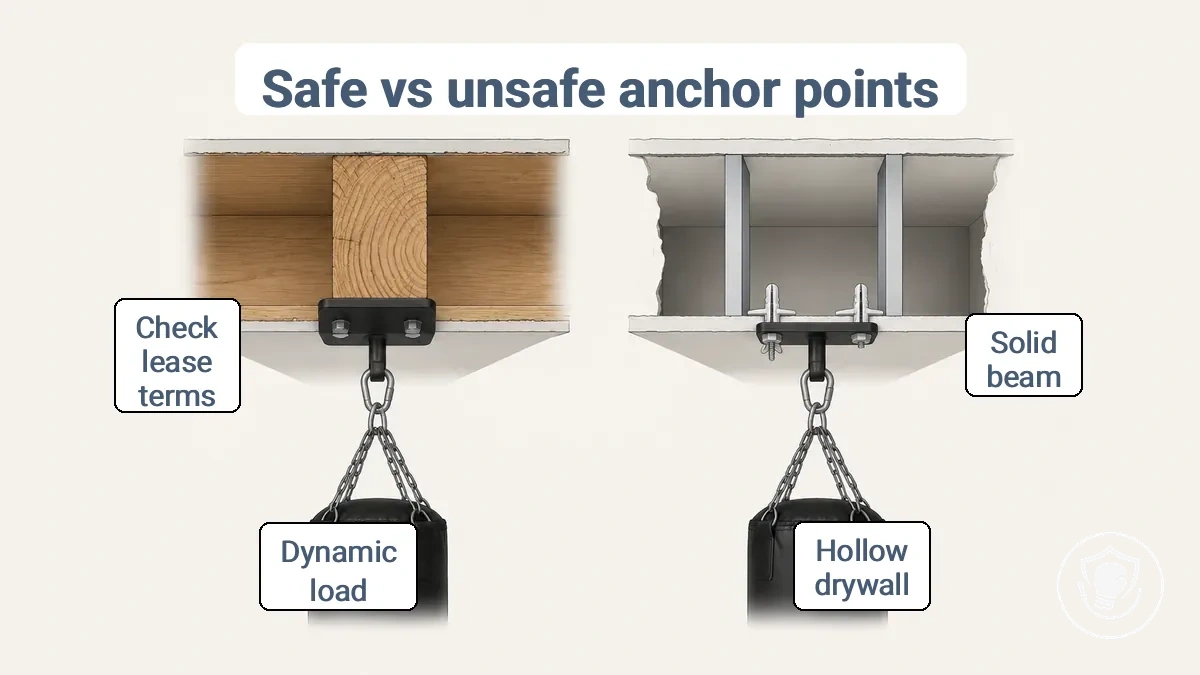
Heavy bag training creates dynamic load — force that changes as the bag swings and absorbs impact. Unlike a static shelf, a swinging bag repeatedly stresses the anchor point. This can increase the load on the beam, joist, or stud beyond the bag's resting weight. The faster and harder the bag moves, the greater the force on the attachment structure.
A common failure point is attaching a heavy bag to drywall, hollow ceiling, or an unbacked surface. These substrates typically cannot handle repeated pull-out forces. A safer approach is to locate a solid structural member — a ceiling joist, a wall stud, or a beam rated for the expected load. If you cannot confirm the substrate is load-bearing, do not drill.
Before you buy a mount, run through this checklist to confirm your space can handle the installation:
- Is the ceiling or wall substrate a solid structural material (wood joist, concrete beam, load-bearing stud)?
- Have you located the exact center of the joist or stud to avoid splitting?
- Is the anchor point at least 2 inches from any edge to help prevent splitting?
- Does the mounting hardware match the substrate type (concrete anchors for concrete, lag bolts for wood)?
- Have you verified that the structure can withstand dynamic load, not just static weight?
- Does your lease allow drilling into structural members?
- Have you informed neighbors to manage noise and vibration expectations?
Stop if any of these apply:
- You cannot identify the substrate material behind the mounting surface.
- The ceiling or wall is hollow (drywall only) with no backing.
- Your rental agreement prohibits drilling into structural elements.
In an apartment, vibration from heavy bag training can travel through the structure to neighboring units. For noise or vibration concerns, see the guide to reduce vibration and noise for additional dampening options.
Mounting Hardware That Affects Safety and Stability
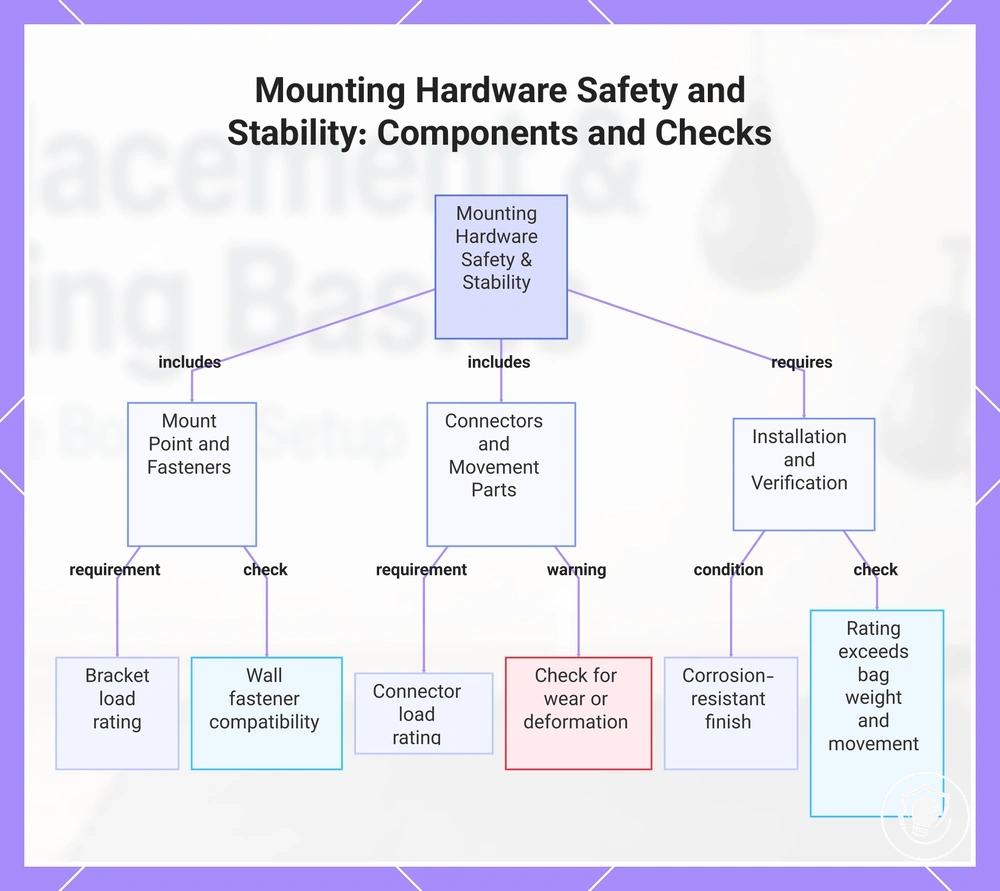
Mounting hardware that affects safety and stability includes the mount point, fasteners, connectors, and movement-control parts like swivels and chains. The weakest link among these components often determines overall stability and failure risk.
Mismatched fasteners or under-rated connectors often lead to gradual loosening or sudden pull-out when subjected to dynamic loads. Using hardware with verified load ratings above bag weight and movement reduces risk. Indicators like wobbling, visible gaps, or fastener loosening suggest inadequate hardware.
Key hardware components and their load-control attributes, grouped by function:
Mount point and fasteners:
- Mount point (bracket or wall plate): The load rating of the bracket should exceed the combined weight of the bag and any dynamic force. A bracket rated only for static loads may fail under repeated movement.
- Wall attachment: Fasteners that secure the bracket to structural supports should have a load rating compatible with the bracket. Using standard screws instead of lag bolts can reduce pull-out resistance.
- Bolts and screws: The diameter, length, and material of fasteners affect shear strength and pull-out force. Verify the manufacturer load rating for the specific wall type.
- Anchors (for masonry or drywall): Expansion or epoxy anchors provide different holding strengths. The anchor load rating should be matched to the bracket and the wall condition.
Connectors and movement parts:
- Connector links and shackles: The working load limit of connectors such as carabiners or quick links should exceed the bag weight with a safety margin. Connectors that twist under load can wear and reduce capacity over time.
- Swivels: Swivels allow rotation but create friction and wear. A swivel with a load rating lower than the bag weight can fail after repeated use.
- Chains or straps: The chain gauge or strap material determines tensile strength. A chain rated for static load may stretch or break under the repeated shock of bag impact.
- Springs or shock absorbers (if used): These components reduce vibration but add load. Their rating should be included in the overall load calculation.
Additional installation factors:
- Corrosion-resistant finish: Brackets and fasteners exposed to moisture or sweat benefit from a corrosion-resistant coating (e.g., powder coating, zinc plating) to maintain load rating over time.
- Fastener torque: Under-torqued or over-torqued fasteners can compromise load transfer. Follow the manufacturer torque specification to avoid stripping or loosening.
Must-check before buying or using:
- Component load rating is lower than bag weight plus safety margin.
- Fasteners mismatched to wall type (e.g., drywall anchors used where structural support is needed).
- Connectors with wear or deformation.
- Swivel is not smooth or has no load rating listed.
- Chain or strap gauge too thin for bag weight.
This chart outlines the main mounting hardware categories, their safety requirements, and the essential checks to verify stability and prevent failure.
Ceiling mount kits: what they include and what must be load-rated
The fasteners and hook/eye connector in a ceiling mount kit must be load-rated for dynamic loads because they bear the repeated forces from a swinging bag. Each load-rated part is designed to handle forces beyond the static weight.
A typical ceiling mount kit includes these parts, each with a specific attribute to verify for dynamic load safety:
- Mount plate: confirm it is made of steel or heavy-duty metal; a thin or plastic plate may bend under repeated load.
- Hook/eye connector: verify it is load-rated and rated for dynamic (not just static) use; a non-rated hook can fatigue and break over time.
- Fasteners (lag bolts or screws): ensure they are the correct size and rated for the ceiling beam/joist material; mismatched hardware can pull out under dynamic stress.
- Spacers or washers: if included, they should be metal to distribute load and prevent crushing of the mount plate.
- Ceiling beam/joist: though not part of the kit, the structure must support the dynamic load; a beam/joist in poor condition can fail regardless of the mount’s rating.
The entire system—from fasteners to the ceiling structure—must be assessed together. A kit alone does not guarantee safety without proper installation and beam/joist verification.
Wall brackets: leverage, spacing, and why fastener choice matters more
Wall mounting increases pull-out risk because the shelf weight creates leverage that pulls the bracket away from the wall, unlike ceiling mounting where gravity drives fasteners straight down into shear. The farther the load sits from the wall (stand-off), the more leverage acts on the bracket arm, multiplying the outward force on the fasteners. Pull-out is the main failure risk for wall-mounted brackets, especially when the substrate is not solid.
The practical solution is to choose fasteners that match the wall material and verified anchor points. When you lag brackets into wood studs or set them into masonry, the fastener gets enough embed depth to resist the rotational force. On drywall without a stud, heavy toggle bolts can deform over time because the wallboard cannot transfer the leverage load to the structure.
Wall vs ceiling force comparison
- Wall: Leverage creates tension on fasteners, pulling the bracket away from the wall.
- Ceiling: Load pushes straight down, creating shear on fasteners.
- Wall fails via pull-out; ceiling fails via shear bending or fastener snap.
To reduce pull-out risk when mounting brackets on walls, check these points:
- Use a bracket that spans at least two-thirds of the shelf depth to reduce leverage.
- 16-inch stud spacing provides more anchor points than 24-inch spacing.
- Use a stud finder to locate solid wood or metal studs before drilling.
- For masonry walls, use masonry-rated anchors or sleeve bolts.
- Anchor into studs or masonry — drywall alone cannot resist leverage pull-out.
- Space brackets evenly to distribute the load across multiple fasteners.
- For plaster and lath walls, check for solid lath behind the plaster before selecting fasteners.
Swivel hooks, connectors, and springs: controlling twist and shock without creating weak links
Swivel hooks, connectors, and springs each change how twist and shock move through the hanging assembly, but only when matched to bag weight and clearance limits. A swivel hook lets the chain rotate freely, reducing twist that would otherwise wear the links and mounting. A spring can absorb impact shock, but only if its working load rating matches the dynamic load from the bag. The wrong or unrated part becomes a weak link rather than a solution.
If clearance is tight and chain twist is a recurring issue, a swivel hook with a locking latch reduces alignment stress. If impact noise or vibration transfers to the ceiling, a spring may cut that transfer, but only when the spring's working load limit matches the peak dynamic load. The rule to avoid weak links is to use rated components and inspect connections regularly for wear or deformation.
- Swivel hook – Allows 360-degree rotation, reducing chain twist and alignment wear during swings. Useful when bag motion creates repetitive twisting; the swivel bearing can seize if contaminated, effectively turning it into a fixed connection.
- No swivel – Chain twist transfers directly to the mounting, increasing wear on links and the top plate. Simpler and cheaper, but more likely to cause noise and instability when the bag rotates.
- Rated chain link or shackle – Maintains full strength when matched to the chain size and grade.
- Unrated connector – Can fail under dynamic loading because the rated limit is unknown; may also allow twist to accumulate if it does not rotate.
- Spring with a rated load capacity – Absorbs shock and reduces vibration transfer to the ceiling. Effective when the spring’s rating exceeds the bag weight plus impact forces; requires enough swing clearance to avoid bottoming out.
- Spring without a load rating – Introduces an unpredictable weak point; may stretch or break if overloaded, and can amplify sway if too stiff.
Using a swivel when twist is the main problem and a rated spring when shock is the primary concern keeps the assembly balanced without creating a new weak link.
Tools and Prep for a Clean, Safe Install
Proper tools and preparation prevent misalignment, weak fastening, and accidental damage.
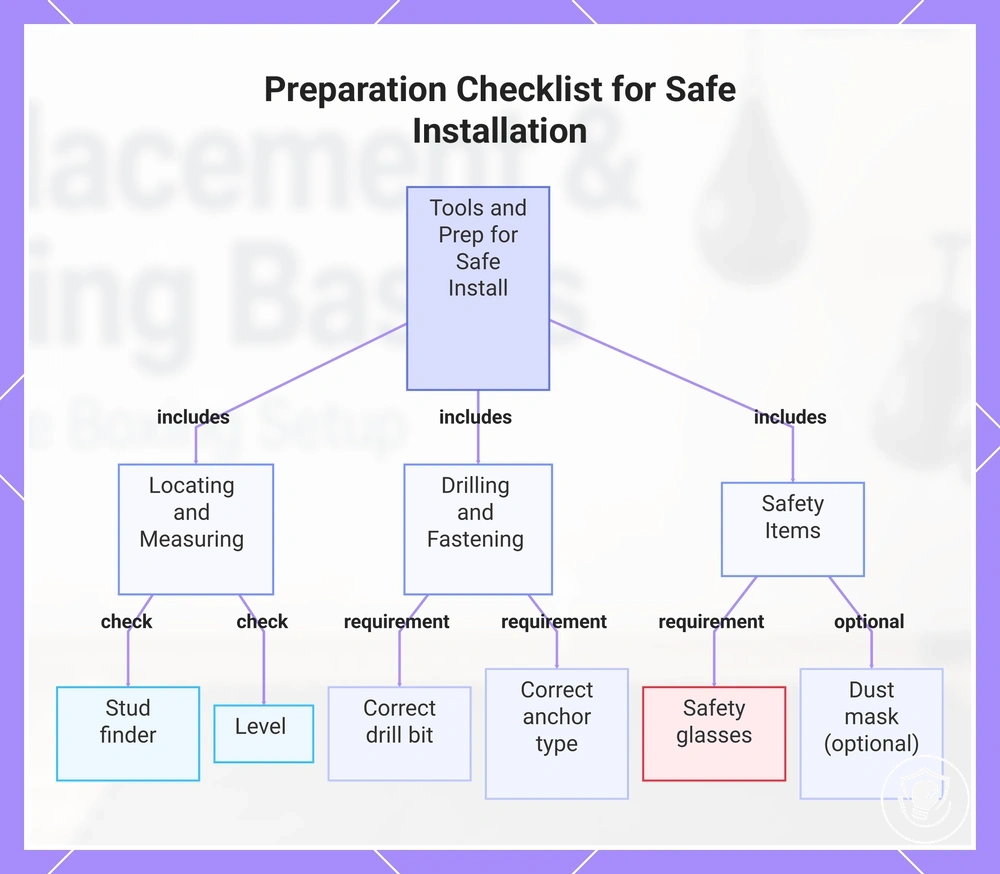
The goal is to verify the surface is solid, the holes are accurately marked, and the fasteners can be tightened securely. A grouped checklist covers locating and measuring, drilling and fastening, and safety items.
Locating and Measuring
- Stud finder: confirms a solid beam or joist, preventing weak anchoring.
- Measuring tape: verifies spacing and alignment to avoid misplaced holes.
- Level: ensures the safe sits flat, preventing door misalignment.
- Marker: marks drill points clearly to prevent inaccurate drilling.
- Shims (optional): compensate for uneven floors to keep the safe from rocking.
Drilling and Fastening
- Drill and appropriate drill bit: depends on substrate (concrete, wood, or metal); using the correct bit prevents stripped holes or broken bits.
- Wrench or socket set: tightens bolts to correct torque, preventing loose fastening over time.
- Anchor bolts or lag screws: depends on floor material; concrete requires expansion anchors, wood needs lag screws. The correct fastener prevents pullout.
- Hammer drill with masonry bit (optional for concrete): used only when drilling into concrete; helps prevent slow or incomplete holes.
- Vacuum or brush (optional): cleans dust from pilot holes, preventing debris that can interfere with bolt seating.
Safety Items
- Safety glasses: protect eyes from debris when drilling, preventing injury.
- Work gloves (optional): improve grip and help prevent cuts when handling metal edges.
- Dust mask (optional): reduces inhalation of dust when drilling concrete or drywall.
Stop conditions — pause and verify before proceeding if any apply:
- If you cannot confirm a solid wood stud or concrete slab behind the mounting surface, relocate the safe.
- If the drill bit size does not match the anchor bolt diameter, obtain the correct bit before drilling.
- If the safe does not sit level after initial placement, adjust the surface or use shims before continuing.
This chart shows the key tool and preparation categories needed to ensure a clean, safe installation of a safe, including locating and measuring, drilling and fastening, and safety items.
Ceiling mount installation sequence
A safe ceiling mount installation sequence for suspending a heavy bag or speed bag starts with finding a solid joist or beam, drilling the correct pilot hole, and seating the fastener properly. Each step includes a built-in check so you can confirm a stable hang before moving to the next step.
A common reason installations fail is assuming all ceilings are the same. Concrete, wood, and suspended ceilings each need their own fasteners and methods. Sticking to a joist-first approach and checking each step lowers the chance of the mount pulling loose.
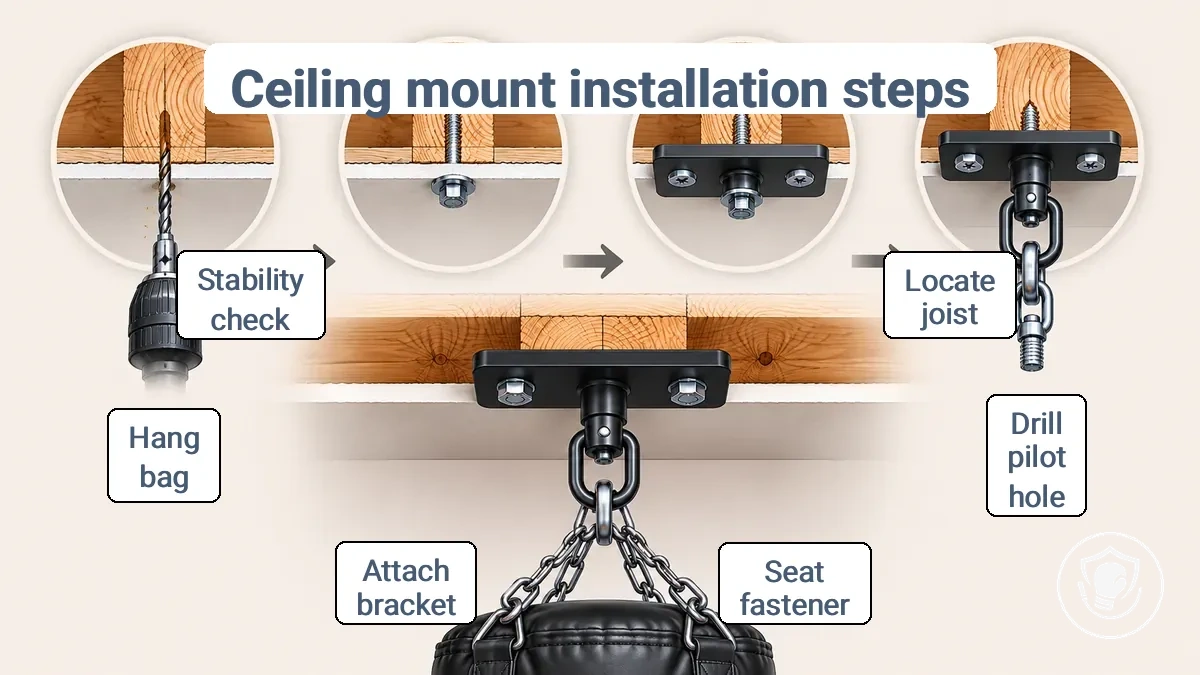
- Locate the structural joist or beam. Use a stud finder to locate a structural joist or beam. Pass: clear signal typically indicates solid wood. Mark the center. Fail: no signal or weak signal means move to the next joist or use an alternative method (e.g., a mounting plate that spans two joists if allowed by local codes).
- Mark the pilot hole position. Align the mark with the planned hanging point for the bag. Pass: the mark is centered under the bag's intended position. Fail: the mark is off‑center; re‑measure and adjust before drilling.
- Drill the pilot hole. Drill a pilot hole using a bit that matches the fastener diameter, as instructed by the hardware supplier. Pass: the hole is clean and straight. Fail: the hole is oversized or angled; move the mount to a fresh spot on the same joist.
- Insert and seat the fastener. Insert the fastener into the pilot hole and drive it until the head sits flush against the ceiling. Pass: the fastener is snug and does not spin freely. Fail: the fastener strips or cannot tighten; remove it and use a larger‑diameter fastener or relocate the mount.
- Attach the ceiling plate or hanger bracket. Attach the ceiling plate or hanger bracket to the seated fastener, then level it with a spirit level. Pass: the bracket stays level and feels solid when pressed. Fail: the bracket tilts or shifts; add washers or shims to level it, or re‑check the fastener seating.
- Assemble the chain and swivel. Connect the chain to the bracket, then attach the swivel. Pass: the chain hangs straight and the swivel rotates freely. Fail: the chain twists or the swivel is stiff; adjust links and check for debris in the swivel joint.
- Hang the bag. Hang the bag using locking carabiners or the supplied hardware. Pass: the bag hangs level and the chain is not twisted. Fail: the bag tilts or the chain is tangled; adjust the chain length or re‑attach the carabiners.
- Perform a final stability check. Do a final stability check by gently pulling the bag in all directions and watching for movement at the ceiling plate. Pass: no visible movement or loosening. Fail: the plate shifts or the fasteners move; tighten everything again or, if movement persists, consult a professional before using the bag.
Common mistakes that compromise a ceiling mount
- Mounting into drywall alone — the joist or beam must carry the weight.
- Oversized pilot holes reduce the fastener's grip on the joist.
- Using a fastener that does not match the ceiling material, such as wood screws in concrete.
- Skipping the level check leads to an uneven hang.
- Forgetting to re‑tighten all connections after the bag is first suspended.
Locating the Joist or Beam and Setting an Anchor Pattern That Won’t Drift
Verify that the attachment point is a structural joist or beam. If you cannot verify the joist/beam or its exact position, stop and do not drill. Use a stud finder to locate the joist/beam.
Drywall or sheathing can be mistaken for solid support. Confirm the joist/beam position with a reliable method before marking.
Follow these steps to mark your drill location accurately:
- Run the stud finder across the ceiling in the mounting area until it signals a joist/beam edge.
- Mark the edges, then find and mark the centerline between them.
- Verify the joist/beam position by tapping or using a thin probe.
- Align your anchor pattern so that all bolts fall on the joist/beam centerline.
- Double-check the spacing and alignment before drilling.
Drilling and fastening the mount so the hardware stays seated under movement
The mount stays seated under swing and impact movement when you drill a correctly sized pilot hole and seat the fastener fully.
- Select a drill bit slightly smaller than the fastener diameter to ensure a tight grip in the wood or substrate.
- Drill the pilot hole to the same depth as the fastener length, stopping before you drill through the stud or anchor.
- Place the washer over the fastener, then insert it through the mount plate into the pilot hole.
- Seat the fastener by turning it until the plate contacts the wall surface and the washer compresses slightly.
- Re-check each fastener after initial seating to confirm the plate stays flush and level against the wall.
- Tighten each fastener in a cross pattern, stopping when the plate feels firm – do not force the fastener once it meets resistance.
Common mistakes to avoid:
- Don't drill a pilot hole larger than the fastener – this reduces grip and can let the fastener loosen under vibration.
- Don't miss the joist or stud – the fastener needs a solid substrate to seat fully.
- Don't leave fasteners partially seated – each one should be fully driven until the plate is snug against the wall.
Hanging the bag: chain length, swivel placement, and alignment checks
For stable training, hang the bag by attaching chains of equal length to the bag's D-rings, connecting them to a properly placed swivel, and checking alignment. This order helps keep the bag centered and reduces twisting. Use this checklist to verify each step and condition:
- Attach four chains of matching length to the bag's D-rings.
- Connect all chains to a central swivel hook using locking carabiners.
- Hang the bag and check that it hangs straight and centered under the mount.
- Adjust chain length or swivel position if the bag leans or twists.
- Set hang height so the bag's target zone aligns with your strike range (height depends on your reach and bag length).
- Confirm clearance: the bag should swing freely without hitting walls or equipment.
Alignment means the bag's center line runs straight from the mount through the bag, with no side-to-side lean or rotation. Proper alignment can reduce uneven wear on the bag and mount and helps keep the swing predictable. The swivel placement directly affects alignment—if the swivel is offset, the bag may not hang centered. Before using the bag fully, push it slightly in different directions and check that the mount remains stable.
Wall bracket installation sequence
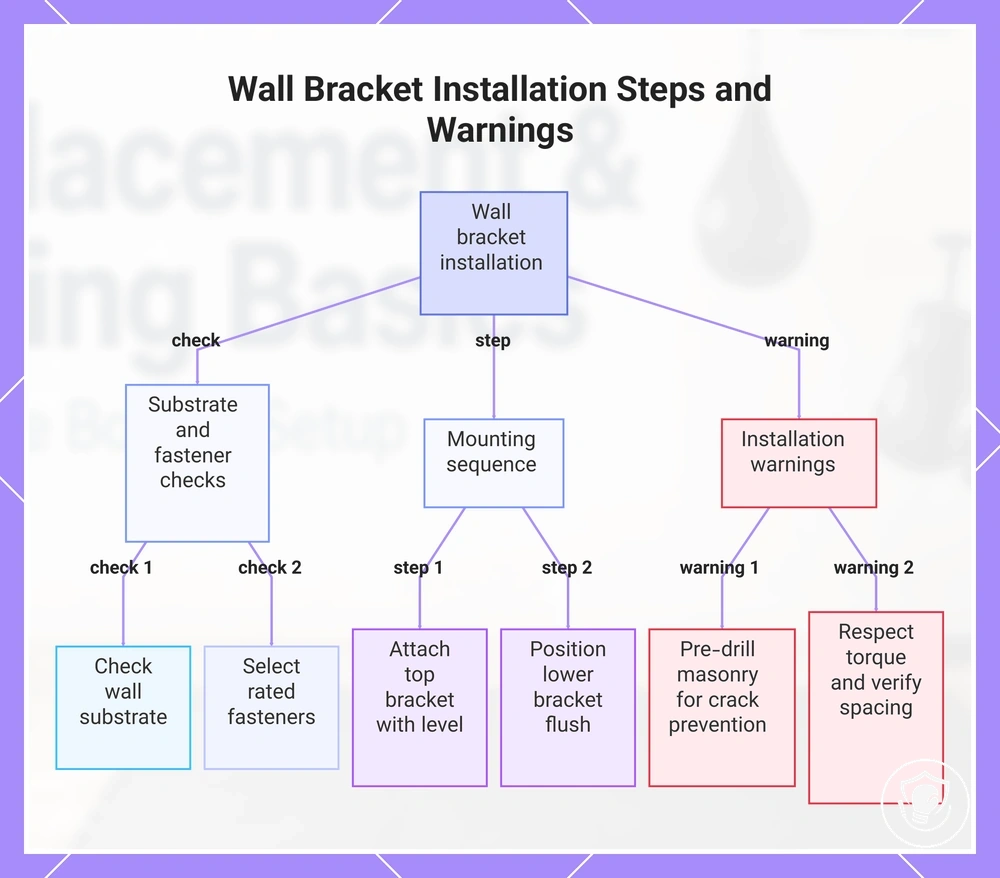
Attach the wall bracket to studs or masonry. Drywall alone cannot reliably resist pull-out forces from leverage during use. Verify the substrate before drilling.
Use fasteners that match the wall substrate and bracket specifications.
- Locate studs or masonry behind the wall surface and mark center points for all bracket positions.
- Select fasteners rated for the substrate material and the bracket's load requirements.
- Drill pilot holes at each mark, then clear dust for better fastener grip.
- Attach the top bracket first, use a level to confirm alignment, and tighten fasteners to the bracket's recommended torque.
- Position the lower bracket using the top bracket as a reference, seat it flush to the wall, and secure it with the same fastener type.
Do not:
- Skip pre-drilling on masonry to help prevent crack damage.
- Over-tighten fasteners beyond the bracket's stated torque range.
- Assume spacing without measuring; confirm bracket placement.
This chart shows the key steps to install a wall bracket, including necessary preparation, mounting sequence, and important warnings.
Choosing studs or masonry points and setting bracket height for control
Choose a stud or masonry point for safe attachment; do not mount a heavy bag directly onto drywall.
For a verified stud wall, use lag screws into the stud center. For masonry walls, use expansion bolts rated for the weight.
If you are renting or cannot confirm the wall type, consult your landlord or a professional before drilling.
Confirm your attachment point and bracket height with this checklist:
- Identify the wall type: is it stud or masonry? If not, choose a different mounting location.
- Locate the nearest stud or verify a solid masonry area using a detector.
- Mark the center of the stud or a drill point in the masonry.
- Measure your bag length and decide the desired hanging height based on your reach and stance.
- Set the bracket height so the bag clears the floor adequately and aligns with your target strike zone.
- Check alignment: the bracket must be level and centered to avoid uneven bag swing.
Fastening the Bracket and Setting Stand-Off Distance from the Wall
Fasten the bracket to a solid surface, then set the stand-off distance so the bag does not contact the wall during use. The gap must accommodate the bag’s full swing path and prevent the bracket from loosening under repeated leverage, avoiding wall contact and damage.
If the stand-off is too short, the bag may strike the wall; if it is too long, leverage on the bracket increases, potentially loosening fasteners over time. The correct distance depends on your room layout, bag size, and typical swing range. Confirm the bracket position before finalizing the fasteners, using the steps below.
- Mark the mounting points based on the bracket’s holes, ensuring they align with the bag’s expected hanging position.
- Drill pilot holes into secure wall material such as studs or solid masonry; use appropriate anchors for drywall or hollow surfaces.
- Insert and seat the wall anchors fully so they can support the bracket without shifting.
- Fasten the bracket to the wall using screws that match the anchor type, tightening them evenly to avoid tilting.
- Thread the stand-off spacers or barrels onto the fasteners, adjusting the depth to achieve the desired offset.
- Place the bag mount onto the stand-offs and secure it with the provided cap or nut, verifying that the bag hangs freely without obstruction.
- Re-check each fastener for snugness after the bag is mounted, as leverage may cause initial settling.
After the bracket and stand-off are in place, do a quick check to confirm safety and clearance:
- Check that the bag’s swing clears the wall throughout its entire arc.
- Ensure the bracket is seated flush against the wall without gaps or wobble.
- Verify that the stand-off spacers are properly seated between the bracket and the wall.
- Gently push the bag to check clearance and listen for any creaking or movement.
After-mount checks: stability, wear inspection, and vibration basics
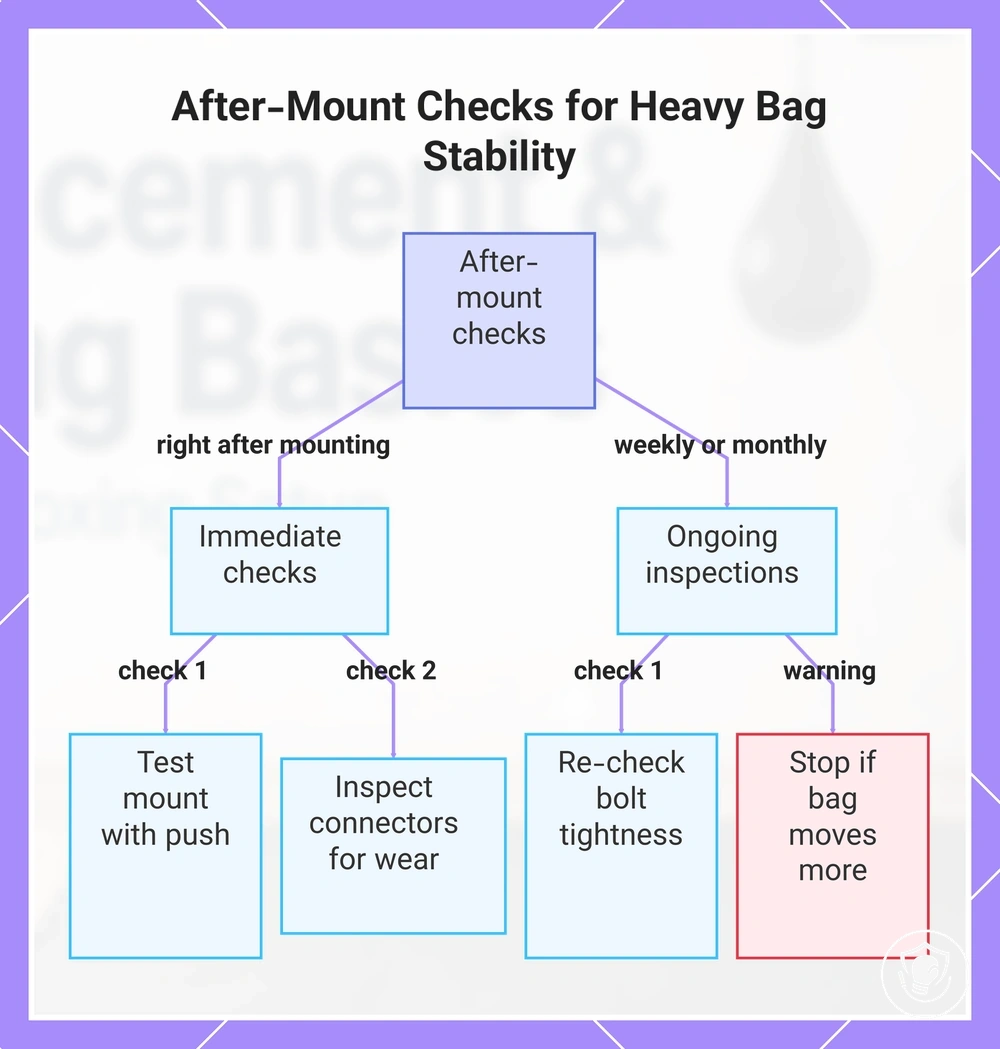
After mounting, check stability, connector wear, and vibration before using the bag at full power. Push the bag firmly to test for looseness or rattle; only proceed if the mount feels solid and connectors are tight.
Stability checks focus on the mount and connectors to confirm the bag stays in place without shifting or rattling. The results of these checks depend on use intensity and wear, so re-check regularly and stop if you see signs of damage. To make the process easier, split it into immediate checks after mounting and ongoing checks over time.
A faint rattle when pushing the bag may indicate a loose bolt or chain connector. If you find looseness, stop and tighten or replace the worn part before training.
Immediate checks (right after mounting)
- Check that all mounting bolts are tight and not missing.
- Check for visible cracks or damage on the mount.
- Check connectors (chain, swivel) for wear or deformation.
- Check by pushing the bag firmly to see if the mount shifts or rattles.
Ongoing checks (weekly or monthly)
- Re-check bolt tightness; vibration can loosen them over time.
- Check rubber components for hardening or cracking.
- Check for corrosion or rust on metal parts.
- Check for new rattles or vibrations during use.
- Stop training if the bag moves more than before or if you hear metal fatigue.
Inspect regularly and correct any issues promptly. A mount that passed once is not safe forever.
This chart shows the immediate and ongoing checks needed to ensure the heavy bag mount is safe and stable before use.
Progressive Load Testing Before Full-Power Sessions
Test mounting safety through progressive loading: apply a small force and observe for movement, sound, or loosening. If stable, gradually increase the load.
Use these staged testing steps to validate stability at each intensity level:
- Stage 1 – Very low intensity: Apply a very small force. Observe for movement or sound. Decision: If you see movement or hear sound, stop and tighten all fasteners. If stable, proceed.
- Stage 2 – Low intensity: Increase to a low force. Watch for shifting, creaking, or loosening. Decision: If you notice any signal, stop and recheck the mount. If not, continue.
- Stage 3 – Moderate intensity: Increase to a moderate force. Observe for wobble, sound, or fastener loosening. Decision: If movement or sound occurs, stop and inspect. If solid, advance.
- Stage 4 – High intensity: Increase to a high force. Observe for loosening or unusual sound. Decision: If you detect any signal, stop. Otherwise, move to the final stage.
- Stage 5 – Near full intensity: Apply close to full force. Observe the mount throughout. Decision: If the mount stays free of movement, sound, and loosening, it is validated for that moment. If you see any signal, stop immediately.
Stop testing and inspect the mount if you notice any of these signals:
- Visible movement or shifting of the mount – stop.
- Unusual sounds such as creaking, popping, or rattling – stop.
- Loosening of fasteners, brackets, or contact points – stop.
- Deformation, gaps, or separation at joints – stop.
- Sudden instability during a test stage – stop.
Routine inspection for loosening, fatigue, and connector wear
Check connectors, chains, and swivels before each session—more often with heavier training—so gradual loosening or fatigue doesn't lead to sudden failure.
- Before each session: Inspect the connector (hook or D-ring) and replace it if cracked, deformed, or worn.
- Before each session: Lubricate or replace the swivel if rotation feels gritty or sticks.
- Before each session: Replace bent, cracked, or heavily rusted chain links.
- Weekly: Tighten any loose bolts or nuts at mounting points.
- Weekly: Replace bolts with damaged threads to maintain clamping force and reduce fatigue risk.
- Monthly: Inspect connectors and swivels for surface rust, corrosion, or new deformation.
- Monthly: Replace chain sections that have stretched or elongated beyond original shape.
Basic vibration control with dampening pads and isolation placement
To help keep your equipment stable and reduce vibration transfer, start by placing dampening pads between the equipment and the floor. The pads can cut down on rattle and noise traveling through the floor to nearby rooms. The arrangement works well for typical home setups, but does not stop the impact sound of a heavy bag strike.
Vibration isolation prevents the shake from one object from reaching another. Dampening pads absorb part of that energy. This reduces the vibration that moves through the surface.
Here are common placement points for pads and isolators, with a note on when each works best:
- Under the base of a heavy bag stand on concrete: Use a dense rubber pad or neoprene mount. This can reduce vibration transfer through the slab, especially high-frequency rattle.
- Between a wall-mounted bracket and the wall: Place a small rubber isolation pad. This can lessen vibration that travels into the wall and can cut noise in adjacent rooms.
- Under the feet of a speed bag platform: Add cushioning pads to help limit the bounce that transfers to the floor.
- Under a floor-mounted punching bag base on wood: Place a plywood sheet under the pad, then the pad on top. This spreads the load and can help prevent the floor from acting like a drum.
- Under nearby furniture or contact points: Add pads under anything that touches the floor near the equipment. This can reduce transferred vibration from rattling other objects.
- On flexible floors (e.g., upper stories): Use thicker pads or a spring isolator if standard pads still let vibration through.
Note:
- Vibration pads can reduce the amount of shaking that reaches the floor, but they do not stop the sound of the bag hitting the pad.
- Isolation placement can help with structure-borne noise, not airborne impact noise.
If you still feel strong vibrations in the floor or hear loud thumping through the walls, stacking additional pads may not solve the problem. A spring isolator or a separate floor platform may be needed instead.
After installing any isolation layer, re-check the stability of the equipment. Pads can shift over time and cause rocking.
For more specific strategies to reduce vibration and noise, see the related section.