
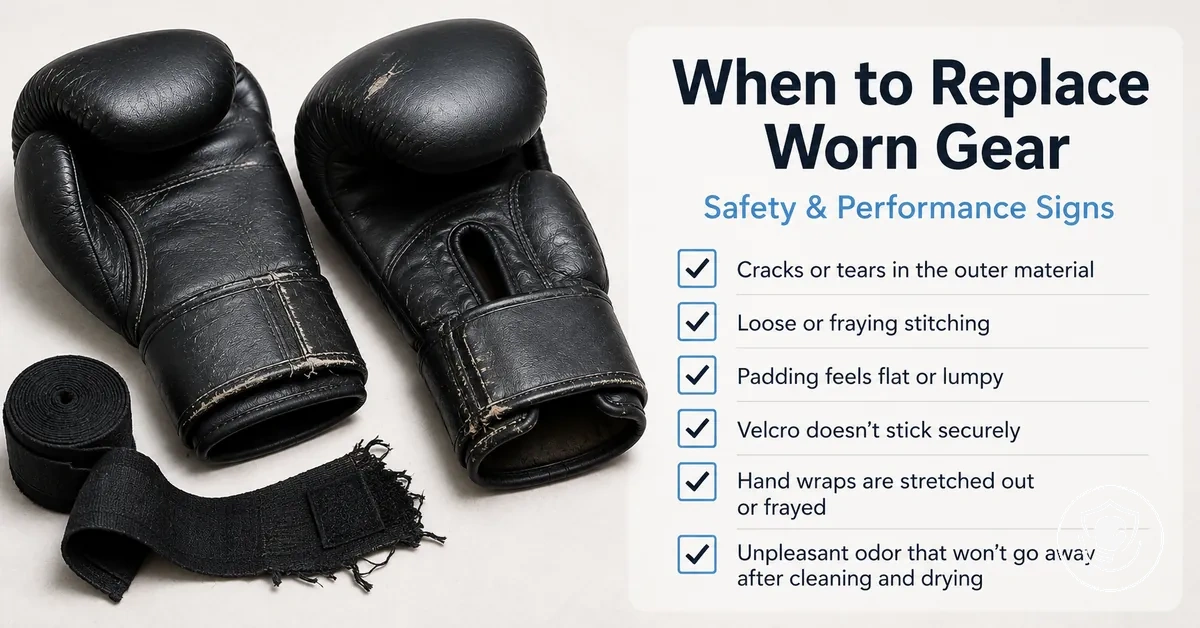
Home Boxing Gear Replacement Checklist for Beginners: Wear Signs That Signal Safety and Performance Risk
Use this home boxing gear replacement checklist to decide when worn-out gear needs retirement for safety and performance. Replacing gear depends on observable wear signs rather than a fixed schedule, because training frequency and maintenance habits shift the timeline. Certain wear signs indicate the gear is unsafe to use now, while others suggest it is degrading but still usable for light training.
Inspect each item for specific wear signs, then decide to replace it, monitor it, or fix a minor issue. For home boxing gear like gloves, wraps, heavy bags, and focus mitts, quick checks and deeper inspections reveal whether the equipment still protects your hands and absorbs impact effectively.
Avoid training with gear that has visible structural damage such as broken seams, cracked plastic cups, or torn outer material.
The home boxing equipment hub provides an overview of essential home boxing gear for beginners.
What counts as "worn out" in boxing equipment and what replacement actually prevents
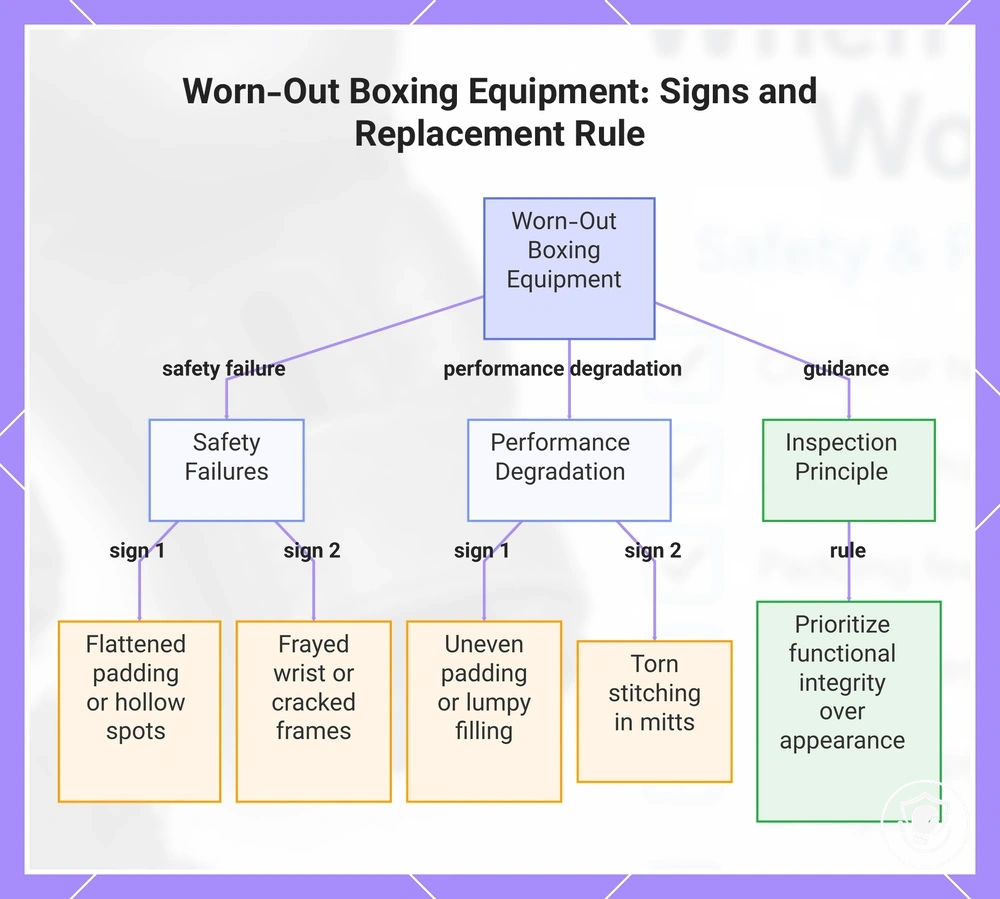
Worn-out boxing equipment is gear that no longer provides its intended protection, stability, or load-bearing reliability during normal training. This is a failure of functional integrity, not a cosmetic one.
Many people confuse old-looking gear with unsafe gear, but a glove with scuffed leather or a bag with faded color can still be functionally sound. Cosmetic wear alone does not make equipment unsafe; replacement depends on condition and performance, not age or aesthetics.
The following signs separate safety failures from performance degradation:
Safety failures:
- Flattened padding or hollow spots reduce protection and can cause knuckle or hand injuries.
- Frayed or stretched wrist closure compromises wrist support in boxing gloves, increasing sprain risk.
- Cracked frames or loose hardware on headgear or groin guards create a failure risk.
Performance degradation:
- Unevenly compressed padding lowers impact absorption and reduces training effectiveness.
- Settled or lumpy filling in a punching bag fails to return to shape and provides inconsistent resistance.
- Torn stitching in focus mitts compromises target firmness and pad work drills.
Regularly inspecting functional integrity rather than appearance helps guide replacement decisions.
This chart categorizes the functional failures that define worn-out boxing gear and provides the key principle for deciding when to replace equipment.
Wear accelerators at home: training intensity, sweat and drying, cleaning, and storage pressure points
Home training conditions—training intensity, sweat, drying, cleaning, and storage pressure points—put stress on gear parts like padding, stitching, and fasteners, speeding up wear. When these factors are high, inspect your gear more often.
This image highlights common wear accelerators on home boxing gear, showing moisture-prone areas, closure points, and high-friction seams where wear often starts first.
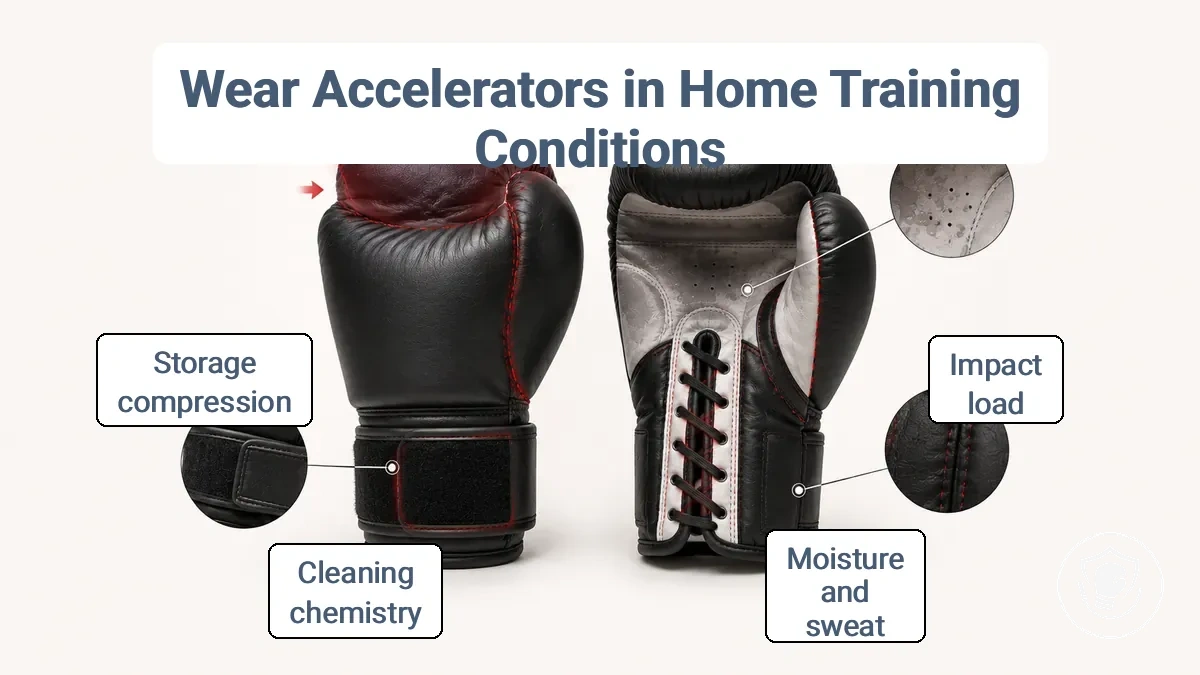
- Impact load: repeated heavy bag strikes compress glove padding and cause seam fatigue.
- Impact load: high-intensity training causes hand wraps to lose support and fray, signaling it's time to replace them.
- Moisture and sweat: sweat buildup in the liner and inner padding degrades liner material, which can make gloves show wear sooner.
- Moisture and sweat: prolonged dampness on metal parts (lace hooks, D-rings) leads to corrosion and weakening.
- Cleaning chemistry: harsh chemicals from cleaners can degrade the outer shell and weaken stitching.
- Cleaning chemistry: frequent cleaning speeds up liner wear if drying is incomplete.
- Storage compression: storing gear under weight squashes padding, causing lasting shape change and reduced protection.
- Storage compression: storing damp gloves in a closed bag traps moisture, speeding up liner degradation and weakening fastener grip.
Managing moisture and cleaning byproducts is covered in the cleaning and drying routines section. Routine inspection—checking padding density, stitching integrity, fastener grip, and liner condition—can catch early wear before it affects performance.
For example, light use with low sweat and good drying may delay visible signs of wear, while heavy training with daily sweat, less thorough drying, and packed storage can trigger early padding compression and liner breakdown. The timeline depends on gear design and care, but higher stress levels are a common cause of faster degradation.
Replacement triggers versus nuisance issues: what is unsafe, what is just uncomfortable, and what is fixable
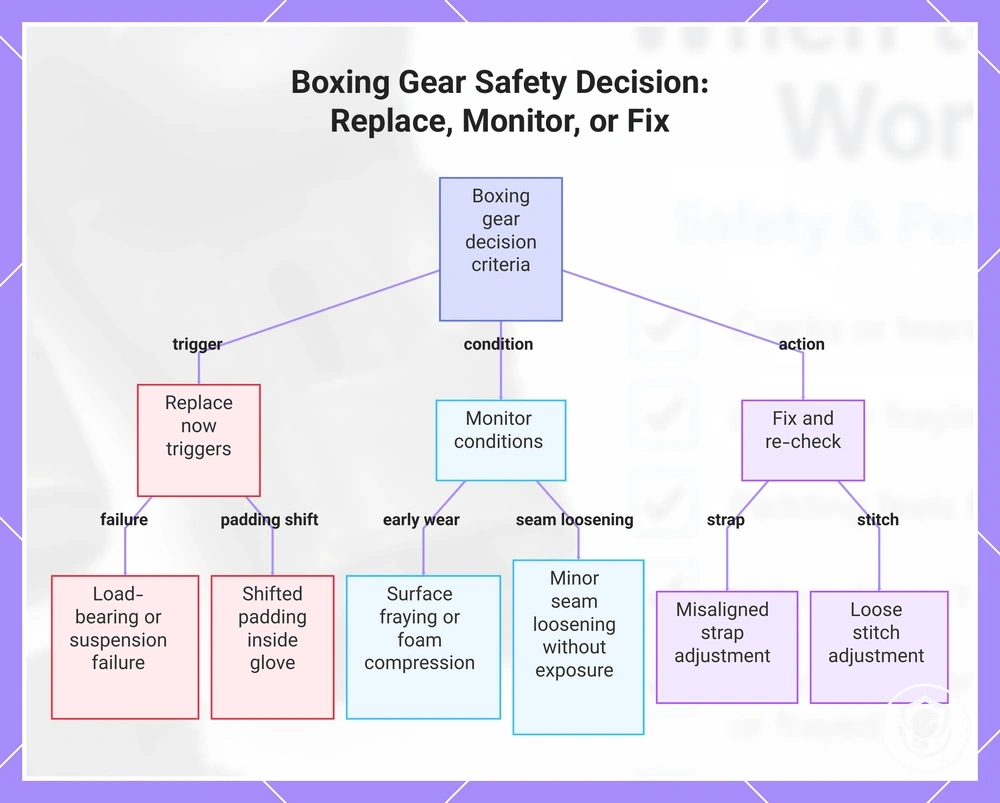
Replace boxing gear when hardware fails, not when wear is normal. Load-bearing or suspension failures demand an immediate stop training rule, while minor discomfort can often be adjusted. Use criteria, not guesswork.
The boxing gear safety checklist helps you decide: replace now, monitor, or fix and re-check.
- Replace now
- Stop training if a load-bearing strap or suspension component shows visible cracks or deformation. This is a replacement trigger.
- Hardware failure such as a broken buckle or torn anchor point makes the gear unsafe. Replace now.
- If the padding inside a glove or headguard shifts freely and cannot be refastened, structural damage has occurred. Replace now.
- Monitor
- Early wear like surface fraying on straps or slight compression of foam can be re-checked after a few sessions. If it worsens, replace.
- If you notice minor loosening of a seam but no exposed padding, keep checking every training session for progression.
- Uncomfortable fit that may not affect protection can be monitored, but re-check frequency should increase as you use the gear.
- If a component feels slightly different but still holds its form, it may be early wear. Mark it and monitor.
- Fix and re-check
- Minor discomfort from a misaligned strap can be adjusted and re-checked. If the problem returns, move to replace.
- A loose stitch that does not expose inner material can be adjusted and re-checked after one training session.
- If a zipper sticks but still closes, cleaning and lubrication may resolve it. Retest before next use.
- For surface dirt or moisture that makes gear feel slippery, clean and dry, then re-check for fit and security.
Conduct this inspection before each use and adjust your decision based on observable condition.
A fixable nuisance is a hand wrap that feels bulky after washing — adjust and re-check. A replacement trigger is a cracked plastic buckle that cannot restore original protection. Structural damage is a replacement trigger, not a patching project.
This chart categorizes boxing gear safety issues into immediate replacement triggers, conditions to monitor, and fixable nuisances that require re-checking.
Repeatable Inspection Checklist: Quick Pre-Session Checks and Periodic Deeper Checks
A repeatable inspection checklist for boxing gear catches early wear before it leads to failure during training. It combines quick pre-session checks for obvious red flags and periodic deeper checks for material breakdown. The two tiers — quick and deeper — let you decide pass or fail.
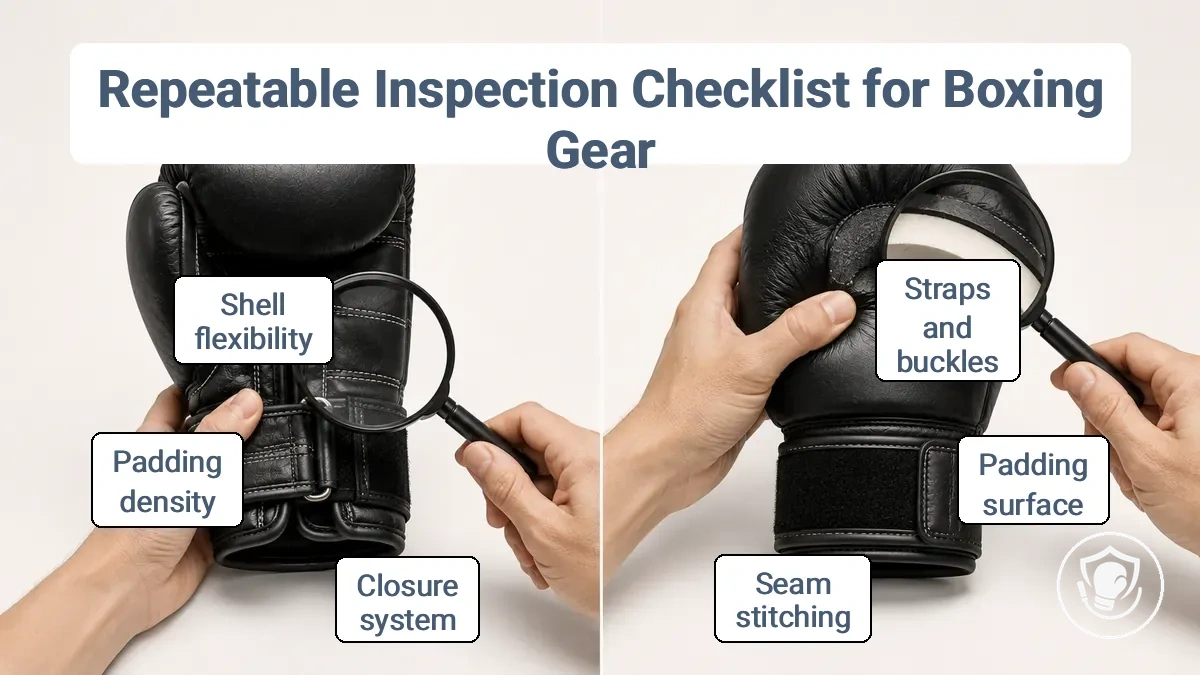
The image labels the same closures, seams, padding, and attachment points used in the checklist.
Quick Checks (Before Each Training Session)
- Straps and buckles: secure grip with no slippage — fail if frayed or torn.
- Closure loops: intact with no stretching — fail if loose or broken.
- Padding surface: consistent thickness, no flat spots — fail if compressed or hard.
- Outer shell: no visible cracks or punctures — fail if shell is compromised.
- Seam stitching: no loose threads or gaps — fail if thread is broken or missing.
- Attachment points (laces, hook-and-loop): hold firmly — fail if grip fades or anchor tears.
Deeper Checks (Periodically, When Time Allows)
- Closure system: test full tension — fail if adjustment does not lock or strap pulls through.
- Padding density: press through full range — fail if padding does not return to shape.
- Seam integrity: stretch seam slightly — fail if any stitch pulls out or material separates.
- Shell flexibility: bend shell gently — fail if material cracks or delaminates.
- Attachment anchors: inspect rivets, welds, or glued mounts — fail if loose or detached.
- All internal layers: feel for hidden wear under foam — fail if inner liner shifts or breaks down.
- Re-check all quick-check items with more scrutiny — re-check any borderline areas.
When any item shows a fail, stop and decide using your trigger criteria — do not continue with failing gear.
Replacing gear only by schedule ignores early warning signs that a simple inspection can reveal. An inspection-triggered decision — fail means stop until repaired or replaced — can be safer than fixed intervals alone.
Quick checks that catch high-risk failures before you train
Before training, a quick gear check can prevent failures under impact or load — scan for red flags.
- Pull each closure strap firmly — slipping signals a red flag.
- Check straps for tears; any tear is a red flag.
- Check for exposed padding through fabric; exposed padding means a red flag.
- Wiggle each loose connector; excessive movement or crack deformation signals a red flag.
- Test each mount for stability; an unstable mount is a red flag.
- Examine plastic parts for deformation; any crack or deformation is a red flag to stop training.
- Press on seams near closures; any separation signals a red flag.
- Examine attachment points where straps connect; a loose or damaged link is a red flag.
- Check each buckle's integrity; a buckle that does not latch securely is a red flag.
- Scan load-bearing areas for unusual wear patterns; exposed material means a red flag.
Deeper checks that confirm material breakdown and loss of protection
Periodic deeper checks detect material breakdown that quick daily inspections may miss, showing gradual degradation before protection is compromised.
- Press firmly into the padding and observe the return speed; slow or incomplete spring-back suggests lost padding resilience.
- Pull seam edges apart gently under good light; visible fraying or separation suggests seam fatigue that can lead to failure.
- Stretch the strap to its full extension and release; if it does not snap back snugly, strap stretch has reduced tension.
- Attach the hook-and-loop fastener and pull to test grip; if it loosens without resistance, fastener grip has degraded.
- Palpate the entire padding surface with your fingers; a noticeably softer or sunken area indicates a soft spot from compression.
- Check the inner liner for hardening or peeling; stiff or flaking material suggests internal deterioration.
A soft spot that does not spring back after pressing indicates uneven padding compression. Use a trigger criterion such as 'monitor and re-check sooner' for such signs.
Safety replacement signals: damage patterns that increase injury risk or equipment failure risk
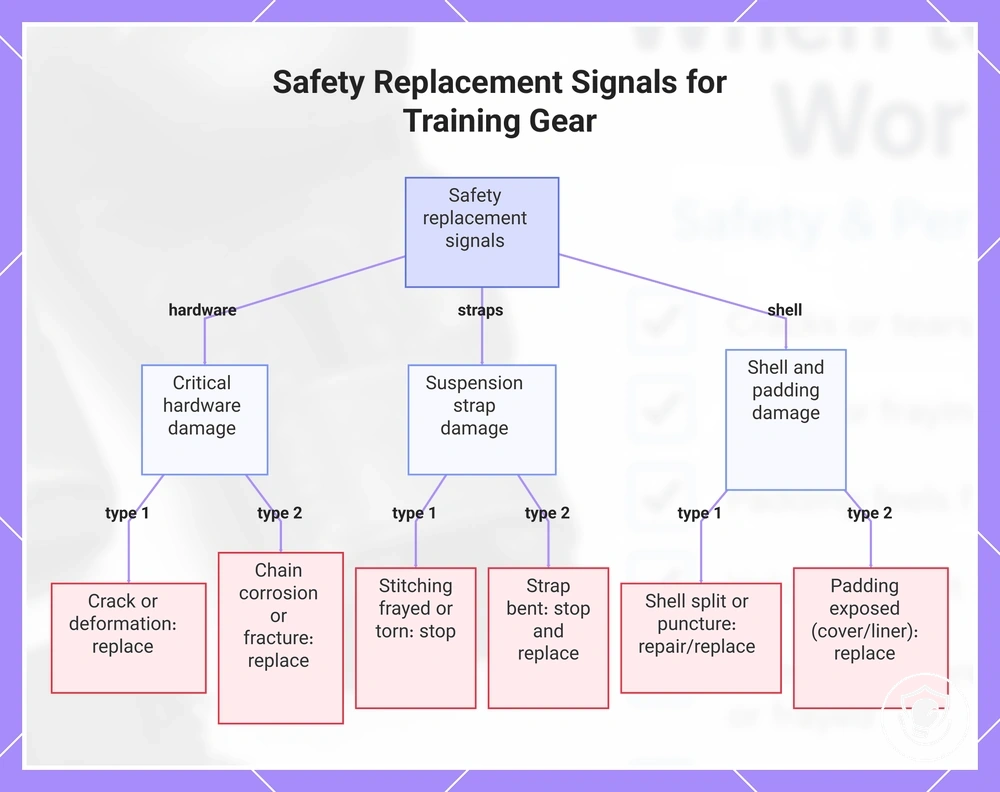
Safety replacement signals are visible damage patterns that warn continued use of the gear can increase failure risk or exposure risk. Always prioritize load-bearing and suspension hardware first.
- If hardware (swivel, carabiner, hook) shows a crack or deformation, stop training and replace it.
- If a chain or suspension strap shows corrosion or rust, replace it before next use.
- If suspension strap stitching is failing with frayed or torn threads, stop training and replace it.
- If a chain link is elongated, twisted, or shows a fracture line, stop training and replace it.
- If the bag shell has a split seam or tear, repair or replace it depending on the location and depth.
- If the bag shell has a puncture that exposes the inner bladder, replacement is recommended.
- If the bag cover wears down and exposes padding, replace it because impact protection is lost.
- If the glove or pad liner is torn and padding is exposed, replace it to maintain protection.
- If a strap is deformed (bent out of original shape), stop training and replace it.
- If a connector has a worn or loose pin, replace it before using the gear again.
When in doubt about a load-bearing component, replace it or have it professionally re-checked rather than taking a chance.
As a rule of thumb, any visible damage to a weight-bearing part means stop training and replace it.
This chart shows the main damage patterns that require immediate repair or replacement to avoid injury or equipment failure, grouped by component type.
Performance replacement signals: wear patterns that reduce support, control, and consistent impact absorption
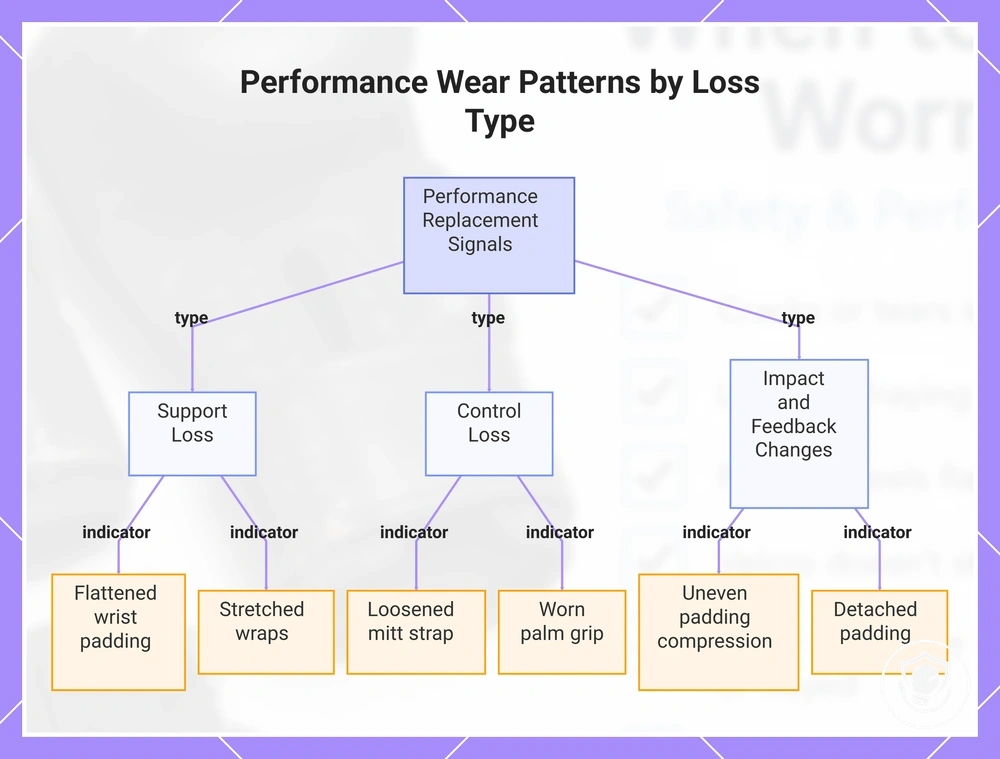
Performance wear changes fit, stability, or impact distribution even without visible tears, resulting in reduced support, diminished control, or uneven cushioning. Look for effect changes rather than waiting for complete failure.
The following wear patterns produce specific performance effects, grouped by loss type:
- Support loss: Flattened wrist padding in gloves reduces wrist support, decreasing wrist stability during impact.
- Support loss: Stretched wraps lose elastic stability, causing fit drift and inconsistent wrist positioning.
- Control loss: A loosened mitt strap causes slippage during pad work, reducing target control and requiring constant adjustment.
- Control loss: Bag surfaces with hard spots alter impact feel, making timing and power harder to gauge.
- Control loss: Worn palm grip on gloves causes hand slippage, reducing precision and control.
- Inconsistent cushioning: Unevenly compressed glove padding creates unpredictable cushioning feel, leading to variable impact absorption and reduced trust.
- Altered feedback: A hardened bag surface returns sharp feedback instead of consistent resistance, reducing the ability to read distance and angle.
- Altered feedback: Detached padding in gloves produces inconsistent feedback, making impact force assessment unreliable.
Threshold for action depends on use intensity—frequent heavy training accelerates these effects, but even light use over time can produce the same performance drop.
This chart shows the main categories of performance wear patterns that reduce support, control, and impact absorption, with specific indicators for each loss type.
Gear-specific replacement checkpoints: what to look for by equipment type
Gear-specific replacement checkpoints turn visible wear patterns into decision cues for each gear type — without fixed schedules.
The image identifies the main gear types and labels the wear locations—closures, seams, connectors, straps—that correspond to the gear-specific replacement checkpoints.
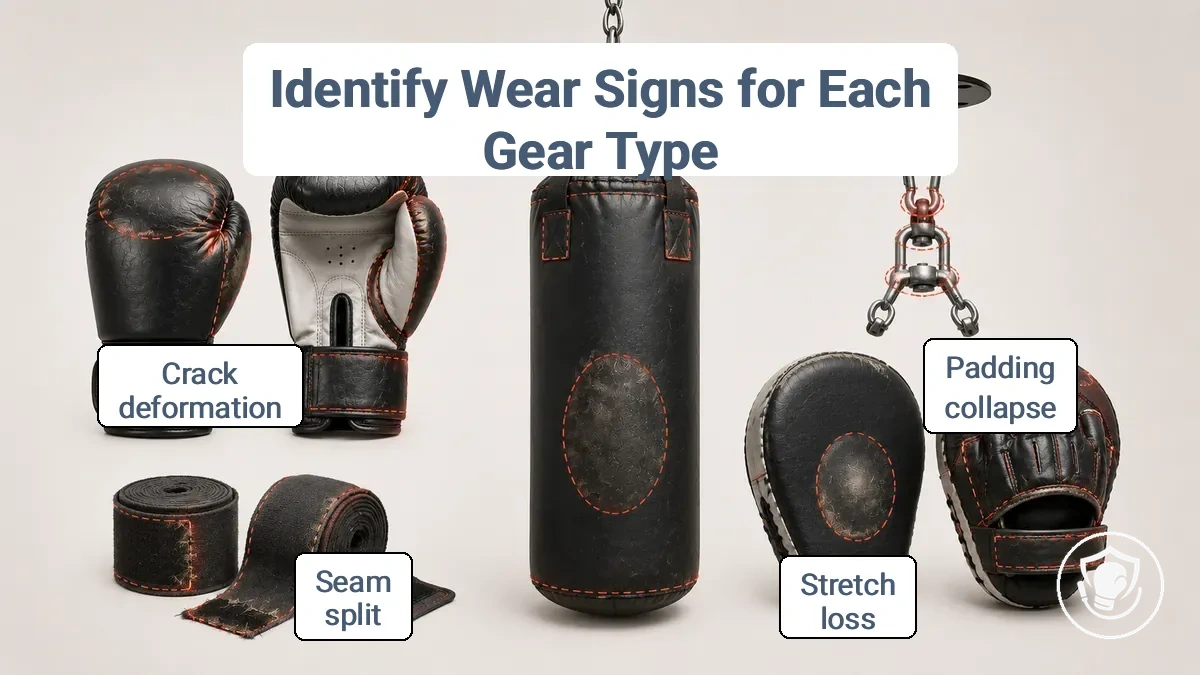
The table organises these checkpoints by gear type, so you can identify the key wear sign for each item and decide to replace or monitor.
| Gear item | Wear sign to check | What it affects | Action cue |
|---|---|---|---|
| Gloves | Padding collapse at knuckle area or closure loosening | Hand protection and fist support | Replace now if padding has compacted or closure no longer holds snug |
| Hand wraps | Stretch loss or visible thinning along strap length | Wrist and knuckle support | Replace now when fabric no longer maintains tension after wrapping |
| Heavy bag | Seam split or hard spot forming on the strike surface | Consistent rebound and shell integrity | Monitor for seam changes; repair or replace if split extends into stitching |
| Suspension hardware | Crack or deformation on chain links or swivel connector | Safe hanging of the bag | Safety flag: stop training if crack or deformation is visible; replace affected hardware immediately |
| Focus mitts | Strap tearing or padding compression on the palm face | Trainer protection and shock absorption | Monitor; replace when strap fails to keep mitt secure on the hand |
When multiple items show wear at the same time, safety-critical failures—suspension hardware cracking or heavy bag seam rupture—pose immediate risk. Replace those before continuing training, even if other items are still within a monitor window.
Boxing gloves: padding collapse, liner separation, odor-linked moisture damage, and closures that stop holding
Replace boxing gloves if they no longer cushion impact or stay secure on the hand. Check each subsystem.
- Padding: Press the knuckle area and palm. If you feel uneven padding, a soft spot, or the foam does not rebound, padding collapse has occurred and impact protection may be reduced.
- Liner: Inspect the inner lining for peeling, tears, or moisture damage. Liner separation exposes raw foam, accelerating breakdown and leading to skin irritation and faster odor buildup.
- Closure: Fasten the hook-and-loop strap and check if the glove stays secure during movement. If the strap slips or fails to hold firm, wrist support may be compromised and the glove may shift on impact.
- Shell: Look for cracks, deep creases, or stitching that has pulled loose. A damaged shell indicates the outer layer no longer holds padding in place, compromising both protection and durability.
- Odor (supportive sign): Persistent odor on its own does not mean immediate replacement, but when paired with any of the above material breakdown signs like liner peeling or moisture damage, it indicates the glove is no longer serviceable and should be replaced.
Hand wraps: stretch loss, thinning, seam damage, and fastening wear that reduces wrist support
Replace hand wraps when they can no longer maintain tension and coverage through a normal session. Use these pass/fail cues to decide.
- Stretch loss: If the wrap feels loose after a few rounds and needs re-tightening, the elastic may have fatigued.
- Thinning: When fabric feels noticeably thinner in the knuckle or wrist area, padding is reduced and wrist stability may diminish.
- Seam damage: Rips or open seams along the edges mean the wrap may tear mid-session, leaving gaps in coverage.
- Hook-and-loop wear: If the fastener no longer grips firmly or peels off during use, the wrap may slip and compromise stability.
- Holes or fraying: Visible holes or loose threads weaken the fabric and can cause bunching under gloves.
- Loss of elasticity: When the material stays stretched out after washing and does not snap back, it has lost its ability to recover shape.
- Odor or discoloration: Persistent smell or staining often indicates fabric breakdown, which can lead to reduced support over time.
- Fastener peeling: If the velcro pad separates from the wrap body, the closure may fail and the wrap may not stay in place.
Heavy bag body: shell cracks, seam splits, and shape changes that alter strike feedback and stress points
Heavy bag body wear from shell cracks, seam splits, or shape changes alters strike feedback and stress points during training. Check surface and shape regularly to maintain consistent response.
- Shell: Shell cracks or tears expose inner filling and can create hard spots that may increase hand impact. Monitor and re-check if small; replace when exposure is significant.
- Shell: Cover fraying may indicate developing weak points in the bag body. Re-check regularly.
- Seams: Seam splits at stitching lines can widen with use, allowing fill to escape and altering bag tension. Replace when the split extends beyond minor fraying.
- Seams: Stitching fray without full separation often precedes a seam split. Re-check.
- Shape/Fill: Shape change, such as bulging or sagging, can signal a fill shift that may affect weight distribution and strike angle. Replace when shape drift prevents consistent feedback.
- Shape/Fill: Uneven fill can cause the bag to move unpredictably, making timing drills less reliable. Re-check.
- Shape/Fill: A dense spot in the bag body can concentrate force on a small area, which may alter stress points during training. Re-check.
Heavy bag suspension hardware: chain and connector wear signs that require immediate replacement
Heavy bag suspension hardware must be replaced when visible wear, deformation, or corrosion indicates a rising probability of failure under load. Load-bearing is non-negotiable.
- A connector with any crack — replace now.
- A chain link with visible thinning, bending, or cracking indicates failure risk — replace now.
- A swivel that binds, grinds, or shows uneven wear — replace now.
- A mount with deep corrosion pitting or metal loss — replace now.
- A quick link that does not close fully due to deformation — replace now.
- A carabiner with a bent gate or distorted body is unsafe — replace now.
- A connector with surface rust that has etched into the metal — replace now.
Focus Mitt Straps and Closures: Slippage, Tearing, and Fit Drift That Compromises Control and Hand Safety
The replacement test for focus mitt straps and closures is stability and hand safety: the mitt must stay stable and protect the holder's hand during repeated impact. Control slips or pad shift force the holder’s wrist into more stress.
- Strap slippage during a round means the closure can no longer hold tension; replace the mitt if the fastener cannot keep the pad tight against the holder's hand.
- Tearing along the strap edge or at the closure anchor point requires immediate replacement because a torn strap cannot maintain the grip needed for consistent control.
- A hook-and-loop closure that grabs significantly less than its original contact area causes slippage and fit drift, letting the pad slide out of position during each punch and forcing the holder's wrist into awkward angles.
- Repeated loosening during a training session means the closure material has worn past the point of reliable hold; continued use increases the chance of the pad shifting mid-combination.
- Padding shift compressed unevenly creates hard spots that transfer more impact to the holder's palm; replace the mitt when the padding no longer absorbs a straight punch without hand stress.
- Padding shift that moves the internal foam cushion changes the hand position inside the mitt, making the holder grip harder to keep the pad facing the striker.
- Mitt twist on the hand during hook punches shows worn internal grip surface or stretched handle pocket; this torque increases wrist and hand stress with every repetition.
- Constant readjustment of the mitt between strikes means grip stability is gone and the pad can no longer offer a predictable target for the striker.
When “how often” depends on use: factors that change replacement frequency without promising fixed timelines
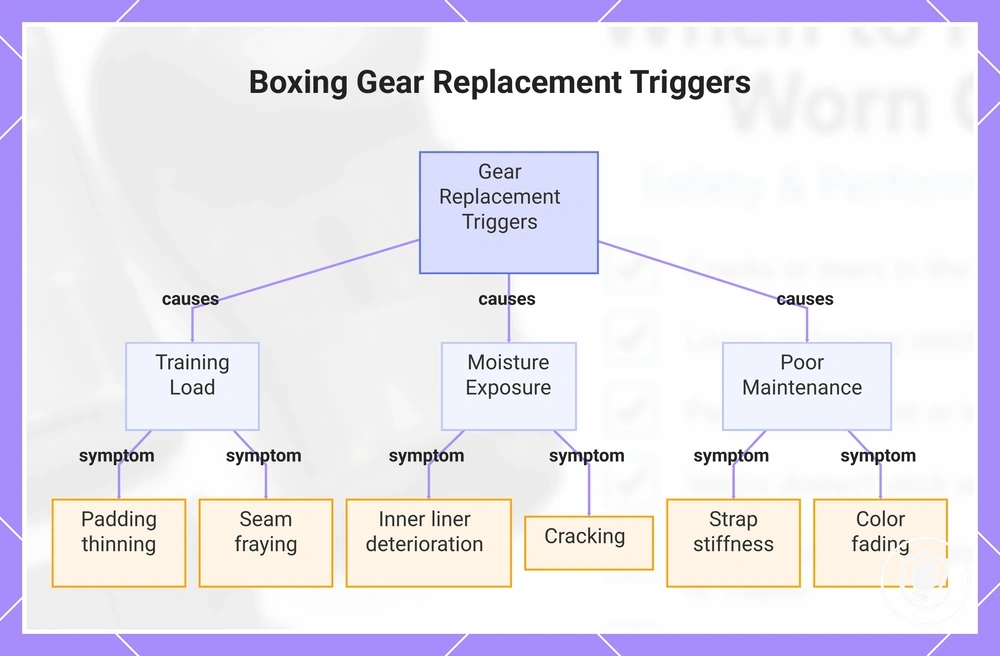
Replacement frequency for boxing gear depends on use and care, not a fixed date. Inspection-triggered decisions are safer than calendars because training load, sweat exposure, and storage vary. Watch for signs such as padding creasing, seam strain, or strap wear.
When how often depends on use, these factors determine earlier trigger appearance.
- High training intensity (heavy bag work, sparring) compresses padding faster, so padding thinning and seam fraying become earlier triggers.
- Frequent exposure to sweat and moisture without thorough drying breaks down materials, so inner liner deterioration and odor appear sooner.
- Storing gear in damp or humid environments accelerates material breakdown, so cracking or shape loss occur earlier.
- Impact from heavy bag sessions stresses seams and outer shell, making seam separation an earlier sign.
- Compression from packing or improper storage can distort padding, leading to faster shape change and reduced protection.
- Infrequent cleaning allows sweat residue to degrade materials, so strap stiffness and color fading become earlier indicators.
- Using gear for competitive sparring increases load on all components, so strap fatigue and padding settling appear sooner.
- Exposing gear to direct heat after training can dry out leather or synthetic materials too quickly, causing cracking or stiffness.
- Infrequent use does not guarantee safety; even stored gear can degrade from moisture fluctuations or compression.
- Rotating between multiple pairs of gear spreads wear, so each set shows later trigger appearance compared to single-pair use.
These factors influence trigger timing without promising a fixed timeline.
A boxer who spars twice a week may see strap fatigue and padding breakdown first, while someone using gloves only for light bag work once a week may notice seam wear or shape loss only after longer intervals. Re-check more often when intensity, sweat, and compression are higher. See durability trade-offs for more on these trade-offs over time.
This chart shows the main factors that cause earlier wear signs in boxing gear, helping you decide when to replace based on use and care rather than a fixed schedule.
Prioritizing replacements when multiple items are worn: what to replace first for the biggest safety gain
When multiple boxing gear items are worn and replacements are limited by budget or time, prioritize replacements by the injury risk each piece prevents, starting with load-bearing hardware and protective items that directly affect safety. Safety-critical first.
For the biggest safety gain, rank your gear by the following risk priorities:
- Headgear suspension straps — suspension hardware; load-bearing straps holding the shell; failure can shift the headgear during impact, increasing head injury risk. Replace immediately if cracked or stretched.
- Heavy bag or speed bag mounting hooks — load-bearing points that can fail and drop equipment, causing injury or damage. Replace if rusted, bent, or loose.
- Boxing glove closure system — closure integrity keeps the glove snug; worn Velcro or laces reduce padding alignment and hand protection. Replace when closure no longer holds securely.
- Glove padding — compressed padding reduces shock absorption and increases hand strain. Replace when padding feels flat or hard.
- Hand wraps — support integrity declines with stretched or torn wraps. Replace when elasticity is lost or fraying appears.
- Headgear shell — cracks reduce impact dispersion and can compromise head protection. Replace if visible cracks appear.
After replacing high-risk items, reassess remaining gear and use your budget priorities and upgrade timing to plan staged replacements.
For example, if headgear straps are worn, glove padding is compressed, and bag hook mounts are loose, replace the headgear straps and hook mounts first to address immediate load-bearing risks, leaving glove padding for the next batch. Budget constraints or a tight training schedule may require staging these fixes over weeks.
After replacement: quick fit and function checks to confirm protection and control are restored
After replacement, confirm fit, stability, and safe function before returning to full-intensity training. Test at low intensity first.
Run these fit and function checks after replacement:
- Check that the closure or fastening fits snugly around the wrist or torso—it should hold without slipping; pass condition: the closure stays secure during a light shake.
- Verify the padding or support alignment: the main structure should match your natural body position; pass condition: no twisting or pressure point.
- Perform a low-intensity movement test, such as slow shadow boxing or light bag work; the gear should stay in place without shifting; pass condition: everything remains stable.
- After the test, re-check all straps and fastenings; pass condition: each closure remains at the original adjustment.
- Confirm the gear does not restrict full range of motion during basic movements; pass condition: you can move freely without binding.
- Stop if any pass condition is not met—do not proceed to full-intensity training until the issue is resolved.
If the gear still slips or feels unstable after re-checking, the problem may come from the original fit or the replacement item itself. Go back to the earlier trigger and inspection criteria to reassess what needs adjustment.
Quick questions that commonly block the decision to replace
Short, direct answers to the questions that often block the replacement decision.
Question: "When to replace boxing gloves?"
Answer: It depends on your training frequency, intensity, and visible wear signs. Check padding compression, inner lining tears, and outer cover damage. Use the wear-sign checklist from earlier to decide if replacement is needed.
Question: "How often to replace hand wraps?"
Answer: It depends on how often you train and how you care for them. Replace when elasticity fades or odor remains after washing. Check for fraying and loss of support.
Question: "Replace heavy bag chains when?"
Answer: It depends on visible wear signs like rust, cracks, or deformation. Unsafe hardware can cause the bag to drop. Check before each session; stop training immediately if chains show wear.
Question: "Is old boxing gear unsafe?"
Answer: Yes, when padding is compressed, seams split, or straps lose integrity. Stop training and replace any item that shows these signs.
Question: "How to know if boxing gear is worn out?"
Answer: It depends on signs such as compression, tears, and reduced protection. Worn-out gear no longer cushions impact. Inspect regularly and replace when signs appear—do not wait for complete failure.
Question: "Should you replace a heavy bag cover?"
Answer: It depends on tear size and material condition. Small rips may be repairable, but large tears expose filling. Replace the cover when the bag shell is compromised to keep training safe.
Question: "How often should you inspect boxing gear?"
Answer: It depends on training frequency and storage conditions. Quick checks before each session reduce injury risk. Increase inspection frequency if you train hard or store gear in conditions that speed wear.